
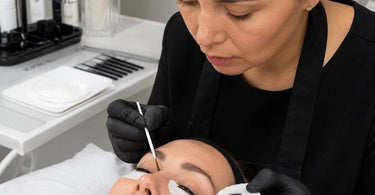
Clients rave about this one seemingly simple service that can totally transform their look, making eyes appear wider, brighter, and more awake without a stitch of mascara. We're talking, of course, about the art of tinting those delicate lower lashes. While it sounds straightforward, any seasoned pro knows that this little area can be a big challenge. The primary culprit? Skin contact. Nobody wants a client leaving with a tiny, tell-tale smudge or, worse, irritation on that sensitive under-eye skin. Let's be real, the struggle is as old as time, or at least as old as lash tinting. So, how do we achieve that perfect, defined look on the lower lash line while keeping the skin pristine and the client blissfully relaxed? Let's dive into the best practices for tinting lower lashes without skin contact, ensuring your technique is as flawless as the final results, and have a little fun while we're at it.
Navigating the world of lower lash tinting can sometimes feel like you're performing a magical, miniature tightrope walk. You have the tint, the developer, the client with their eyes closed (we hope!), and a very small, very important target. The margin for error is slim, but the payoff for getting it right is huge. Mastering this skill not only elevates your service menu but also builds immense trust with your clients. They'll know you're the person who can deliver that enviable, no-makeup makeup look with the utmost safety and precision. So, grab your Lash Tint, your favorite applicator, and let's get ready to rumble... with beauty, of course.
The Golden Rule: Preparation is Your Best Friend (and Your Client's)
Before you even think about mixing your tint, the prep work is where the battle is won or lost. Proper preparation is the cornerstone of preventing skin contact and ensuring a smooth, even application. It’s like setting the stage for a brilliant performance. First, ensure the client’s eye area is meticulously clean. Use a gentle, oil-free cleanser to remove all traces of makeup, skincare, or natural oils. These oils are like an invisible barrier that can repel your tint and cause it to wander where it shouldn’t. After a thorough cleanse, pat the area completely dry.
Next, you'll want to create a protective barrier. Many pros swear by a thin, even layer of Petroleum Jelly, mineral oil, or a specialized barrier cream applied delicately along the lower lash line directly onto the skin. This step is crucial. This isn't just about a stray dot; it's about a protective moat around the lash line. Apply it with a clean, fine-tipped brush or a cotton swab for ultimate precision. Think of it like a force field that deflects the tint away from the skin.
Remember, patience is also a prep tool. Ensure your client is comfortable and relaxed. A client who is fidgety or tense because they're uncomfortable on a hard Massage Table is more likely to move their head, and tiny movements can be all it takes for a slip. Comfortable furniture is a business essential, so ensure your setup is as relaxing as the service itself.
Choosing Your Weapon: The Right Products Make All the Difference
The secret to minimizing skin contact often lies in the product formulation itself. You want a tint that's creamy, non-drip, and specifically designed for the delicate eye area. The consistency is key; a tint that’s too runny is a recipe for disaster, while one that’s too thick can be tricky to apply evenly to the short, fine lower lashes.
When you're looking for Professional Lash and Brow Tint for Spas & Salons, you'll find that top-tier brands offer formulations that are specifically engineered for low-drip and high-adherence to the hair shaft. Brands like Intensive Tint are renowned for their rich, creamy textures that stay exactly where they're placed. Similarly, a classic like Refectocil Original is a staple for many professionals due to its reliable performance and creamy consistency. For those who prefer a cream dye, options like Berrywell Cream Dye and Combinal Cream Dye offer fantastic, precision-focused alternatives.
Don't underestimate the importance of the developer, either. Using a developer that's specifically formulated for lash tints, such as one designed to be thicker, can drastically reduce the chance of run-off. Mixing your tint to the perfect consistency—often a paste-like texture—is a non-negotiable best practice. If it looks like it could drip, it will. So, mix it thick enough that it holds its shape and clings to the lashes like a tiny, diligent worker.
Tools of the Trade: Mastering Application for Zero Contact
Alright, prep is done, and the perfect Tint is mixed. Now, the moment of truth: the application. Your tool selection is your secret weapon for keeping that tint on the lashes and off the skin. A good quality, fine-tipped applicator is essential. Micro-brushes, precision-tipped applicators, or even some angled eyeliner brushes are fantastic for this task.
One of the most effective techniques is to use the tip of the applicator and push the tint into the base of the lower lashes from underneath. Instead of painting it on like a stroke of mascara, think of it as gently massaging the product into the lash line. Apply a small amount of tint to the back of your clean hand or a mixing palette, then dip the very tip of your applicator. Use a gentle, stippling or dabbing motion to get the tint into the roots and along the length of the lashes. Focus on the lash shaft itself, not the skin. This method gives you a great deal of control and prevents you from dragging the tint across the under-eye area.
Furthermore, a tiny brush or a clean mascara wand can be used to separate the lower lashes and ensure that the tint coats each lash individually. This not only prevents the lashes from clumping together but also ensures a more even and thorough color deposit. It's about treating each tiny lash like the VIP it is.
The Shield: Mastering the Art of the Protective Pad
For many professionals, the true game-changer in preventing skin contact is the use of a protective barrier or shield placed directly below the lashes. This can be a silicone pad, a specially designed lash tinting shield, or even a piece of lint-free gauze. Some pros prefer to use a thin, paper tape, gently pressing it under the lower lashes before applying the tint. This tape acts as a physical block, catching any product that might try to escape and leaving the skin completely untouched.
This technique is particularly useful for clients with very short or fine lower lashes, where precision is even more critical. It creates a false edge, so you can be more generous with the product without the worry of a mishap. Mastering the use of these shields is a sign of a true artist. It gives you, and your client, total peace of mind during the service. While the Lash & Brow Service Supplies category is full of great tools, you can even get creative and use a small, clean piece of cardboard or plastic as a shield, though we recommend the purpose-made tools for best results every time.
The Waiting Game and The Big Reveal
Once the tint is perfectly applied and your client is looking like a total rockstar, it's time for the (not-so-patient) waiting game. This is where you can ensure your client is comfortable, maybe offer them a warm, damp towel to hold if they wish, and just make the experience as pleasant as possible. The biggest rule here is: keep a close watch.
Don't set a timer and walk away. The development time can be short, and you need to observe the color and look for any sneaky, migrating tint. If you see any product starting to stray near the skin, you can very carefully and gently wipe it away with a dry cotton swab. The timing will depend on your specific products and the client's natural lash color, but generally, you'll want to keep a very close eye on things, often checking in around the 2-minute mark and then every minute or so after that.
When it's time to remove the tint, the process is just as critical as the application to avoid skin staining. Use a high-quality, oil-based remover or a specific Lash Tint Remover. Always follow the manufacturer's instructions. A gentle, dabbing or rolling motion to lift the tint off is much safer than rubbing, which can push pigment into the skin. Always use a fresh cotton pad or applicator for each wipe to avoid simply reapplying the tint. Finally, cleanse the area gently once more and apply a soothing eye cream to leave the delicate under-eye area feeling nourished and pampered.
When Things Get Tricky: Troubleshooting Common Challenges
Even with the best preparation, every pro knows that curveballs happen. The good news is that most lash tint mishaps are salvageable. If you do get a tiny dot of tint on the skin, don't panic. If you catch it immediately, a dry cotton swab can often lift it right off. If it's already dried, you can dab a little remover onto a swab and gently roll it over the spot. For some stubborn spots, a little trick is to use a tiny bit of petroleum jelly on a swab and gently roll it over the stain; the pigment will often lift right off. If all else fails, there are specific skin stain removers available in the Lash & Brow Service Supplies section that can be a lifesaver.
Another common challenge is clients with very sensitive eyes who may get a bit of watery eyes during the service. Water is the enemy of a perfect, un-smeared tint. If you see a tear starting to form, gently blot it away with a tissue before it can travel and cause a run. Having a High-Quality Towel or lint-free tissue at the ready is a must.
Expanding Your Services: Lash Tinting as a Profit Center
Perfecting lower lash tinting not only enhances your skill set but also serves as an incredible, high-margin add-on service. Once a client experiences the magic of having their lower lashes tinted, they're often hooked. It's a quick service that can be easily integrated into a brow waxing, facial, or even a Hydrodermabrasion treatment. It's a fantastic way to boost your average ticket value and client satisfaction simultaneously.
Consider creating a "Lash Luxe" package that includes both upper and lower lash tinting, or bundle it with a brow shaping service. Your clients will love the convenience and the comprehensive results. And when you have a steady supply of Premium Lash Extensions & Supplies for Pros and all the essential Lash Lift & Perm supplies, you are truly a one-stop shop for all eye-enhancing needs.
When it comes to the lower lashes, the best practice is a combination of the right products, smart application techniques, and, above all, a calm and focused approach. You're not just tinting lashes; you're delivering a confidence boost. You're giving clients the gift of waking up looking refreshed and ready for the world. So, go ahead, perfect this skill, and watch the compliments (and referrals) roll in.
Remember, the journey to mastering any beauty treatment is a process. Each client is a new opportunity to refine your technique and deliver stunning results. With these best practices for tinting lower lashes without skin contact, you're well on your way to becoming the go-to lash tinting expert in your area. So, step into your treatment room, grab your Professional Cotton, Sponges, and Wipes for Salons & Spas, and create some lash magic that will have your clients absolutely beaming. Happy tinting!
