Smart choices, great results... that is the mantra every brow artist lives by, but let's be real for a second. We have all had that client slide into our chair, point at her completely uneven brows, and say, 'Just make them sisters, not twins.' Cue the internal panic. You know the one. The left brow arches like it's auditioning for a Broadway musical, while the right one is just kind of... there. Achieving true symmetry before you even think about opening that bottle of tint is the secret sauce to turning a good service into a transformative experience. At Pure Spa Direct, we believe that preparation is everything, and when it comes to Brow Tinting, mapping is your non-negotiable first step. It does not matter if you are using the most expensive Professional Lash and Brow Tint on the market; if your starting point is crooked, the result will be crooked. So, take a deep breath, put down the wax stick, and let us walk through the hilarious (and sometimes humbling) journey of mapping brows to perfection. Trust me, your future self and your clients will thank you.
Let us face it: eyebrows are like snowflakes—no two are ever exactly alike, and Mother Nature clearly has a favorite side. But here is the good news: you are the professional. You have the tools, the training, and the sheer willpower to trick the eye into seeing perfect balance. This is where Brow Mapping becomes your superpower. It is not magic; it is geometry. By using a few simple measuring tricks and the right Spa Tools & Implements, you can create a roadmap that guarantees symmetry every single time. And the best part? When you nail the shape before you even apply the Professional Lash and Brow Tint for Spas & Salons, the color just becomes the cherry on top of a perfectly structured sundae. So, grab your Magnifying Lights and your favorite brow pencil, because we are about to get technical, a little bit nerdy, and a whole lot of symmetrical.
Why Bother Mapping? The Horror Stories (and the Happy Endings)
I can hear some of you thinking, 'Abigail, I have been doing brows for years. I have a good eye.' And you probably do! But even the steadiest hand and the sharpest eye can fall victim to facial asymmetry. Humans are naturally lopsided. One eye is usually slightly higher, one nostril might be a smidge wider, and yes, one brow bone often sits higher than the other. If you tint without mapping, you are essentially painting a masterpiece on a crooked wall. I once watched a junior stylist skip mapping because she was 'in a hurry.' She ended up with a client who looked perpetually surprised on the left side and skeptical on the right. It was a look, but definitely not the look we were going for. Mapping removes the guesswork. It uses your client's unique bone structure as the guide, not your gut feeling. This is why professionals rely on a systematic approach, much like the precision found in Lash & Brow Enhancement Services for Professionals. When you take those extra three minutes to map, you ensure that the final result—whether you are using a gentle Brow Henna or a traditional tint—frames the face perfectly. Your client leaves happy, takes a million selfies, and tags your business. That is the power of preparation.
Tools of the Trade: What You Need to Map Like a Pro
Before we dive into the 'how,' let us talk about the 'what.' You cannot build a house without a hammer, and you cannot map a brow without the right gear. Luckily, Lash & Brow Service Supplies are our specialty. First, you need a good Brow Pencil or a white eyeliner pencil. White is great because it shows up on all skin tones without leaving a weird residue. Second, you need a spoolie. Please, for the love of all that is holy, brush those hairs up and out of the way. You cannot map through a forest of chaos. Third, grab a flexible ruler or a Mapping Thread. Some of us old-school artists still use the string method, and honestly, it is incredibly satisfying. Finally, do not forget your Professional Cleaners & Disinfectants for Salons and Spas because hygiene is hot, and we are all about that clean-girl aesthetic. Having these tools ready to go at your Nail Tables and Manicure Stations or brow station makes the workflow seamless. Remember, fumbling for a pencil while a client stares at you is a special kind of awkward we want to avoid.
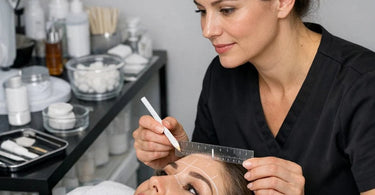
Step One: The Golden Ratio (Geometry Class Finally Pays Off)
Remember sitting in high school math, staring at the clock, and thinking, 'When will I ever use this in real life?' Surprise! Today is the day. Brow mapping relies on the 'Golden Ratio' of the face. Every face has three key points: the start (where the brow should begin), the arch (the highest peak), and the tail (where it should end). To find the start, take your ruler and align it vertically from the edge of your client's nostril (the outer edge of the nose ball, not the wing) straight up past the inner corner of the eye. Where it crosses the brow bone? That is where the brow should start. Mark it with your white pencil. Now, for the arch. Keep that ruler anchored at the nostril, but pivot it so it crosses the outer edge of the iris (the colored part of the eye). That intersection point is your arch. Finally, the tail. Pivot that ruler again so it runs from the nostril to the outer corner of the eye. Where it hits the brow bone is where the tail should end. Rinse and repeat on the other side. If you have done this correctly, your marks should look relatively balanced. If they do not, do not panic! That is just your client's anatomy talking. You can adjust slightly, but always default to the bone structure. For those of you who offer Brow Lamination Supplies for Perfect Brows, this mapping step is even more critical because lamination makes every single hair stand at attention, exposing any symmetry sins.
Step Two: Connecting the Dots (Without Making a Mess)
Okay, you have three dots on each side. Now what? Now we play connect-the-dots, but we are aiming for a smooth line, not a jagged lightning bolt. Using your pencil, gently draw a line along the bottom edge of the brow first. This is your guide for shaping. Then, map the top edge. The space between these lines is where the hair should live. Anything outside those lines is a candidate for removal via ItalWax - Wax or tweezing. Here is where the humor comes in: do not panic if the left side looks slightly thicker than the right. Remember, we are going for visual symmetry, not mathematical perfection. If one brow bone is higher, you might need to take a tiny bit more off the top of the higher brow or leave a smidge more on the bottom of the lower brow. You are an artist, not a photocopier. I like to step back and squint. Squinting blurs the details and lets you see the overall shape. If the shapes look similar while squinting, you have won the battle. If you need a little help cleaning up the strays, check out our selection of Waxing Supplies for Professionals to make the removal process quick and painless. A clean canvas is essential before you apply any Premium Lash Extensions & Supplies for Pros or tints.
Step Three: The Client Check-In (Communication is Everything)
Before you pick up that Brow Henna or tint, you need to have a conversation. Hand your client a hand mirror. Show them the map. Say something like, 'I have mapped out the shape based on your bone structure. See how this side has a slightly higher arch? I am going to balance that by filling in the tail a little thicker here.' Clients appreciate this. It makes them feel involved and prevents the 'surprise' factor when they sit up at the end. I once had a client who insisted her natural shape was 'perfect' and refused mapping. Fifteen minutes later, she looked like a surprised anime character. She learned her lesson, and so did I. Always get buy-in. It takes ten seconds and saves you a lifetime of bad reviews. Plus, while you are chatting, you can upsell them on some Pre & Post-Waxing Products or a Spa Essentials for Professionals retail item to take home. Symmetrical brows and retail sales? That is a double win.
Choosing Your Tint: Color Chemistry Meets Symmetry
Now that your map is perfect, it is time to talk tint. The beauty of a good map is that it acts as a 'color-by-numbers' guide. You know exactly where the pigment should go. For those hard-to-reach sparse areas, a high-quality Professional Lash and Brow Tint for Spas & Salons is your best friend. But do not just grab any bottle. Consider your client's skin tone and hair color. A cool-toned brunette might look muddy with a warm brown tint. A blonde might look washed out with a shade that is too dark. We carry an extensive range from brands like Intensive Tint and Refectocil Original. I am personally obsessed with Berrywell Cream Dye because it does not drip everywhere. Nothing ruins a good map faster than a rogue drip of tint sliding down a client's forehead. Apply the tint carefully within the lines you drew. Use a precise applicator—none of that sloppy, 'slap it on and pray' nonsense. We have plenty of Professional Wax Spatulas and Applicators for Salons & Spas that double perfectly for precise tint application. The goal is to saturate the hair, not stain the skin (unless you are doing a henna tint, which is a different beast entirely).
Common Mistakes That Make Us Giggle (and How to Fix Them)
Let us roast ourselves for a minute because we have all been there. Mistake number one: Over-tweezing before mapping. You pull out a hair, then another, then suddenly the brow is gone. You look like a startled ghost. Always map first, then remove. Mistake number two: Forgetting to exfoliate. If your client has dry skin or foundation caked on their brows, the tint will grab unevenly. Keep some Premium Skincare Products for Spas and Salons on hand for a quick prep. Mistake number three: Using a tint that is too dark. Just because a client asks for 'dramatic' does not mean 'sharpie marker.' Start with a lighter shade, you can always go darker. Mistake number four: The dreaded 'fish mouth.' This is when the tails of the brows angle down too sharply, making the face look sad. The tail should never go lower than the front of the brow. Keep that ruler handy! And finally, mistake number five: Skipping the Magnifying Lights check. You think it looks good from three feet away, but under the light? Yikes. Always double-check your work under bright, true-to-life lighting. If you do mess up, do not cry. Just grab a little Professional Cotton, Sponges, and Wipes for Salons & Spas and some makeup remover to clean up the edges. We have all been there.
Wrapping It Up: The Reveal and the Retention
The moment of truth. You wipe away the tint. You brush the brows up. You step back. Your client opens her eyes. If you followed these Brow Mapping Techniques, she should look like a million bucks. Her eyes should look more open, her face more lifted, and her soul more at peace. Symmetrical brows are not just about aesthetics; they are about confidence. When you nail it, you create a loyal customer. She will come back for her Lash Lift & Perm and brow tint every four to six weeks. To keep those brows looking fresh at home, recommend some Cuticle Oil (great for dry skin around the brows too) or a nourishing serum. And do not forget to direct them to your retail section for Must-Have Spa Retail Products for Enhanced Client Experience. So, the next time a client sits in your chair with two completely different eyebrows, do not sweat it. Grab your ruler, flash that winning smile, and show them the magic of mapping. You have got this. Now go forth and create some perfectly imperfect, stunningly symmetrical brows!