
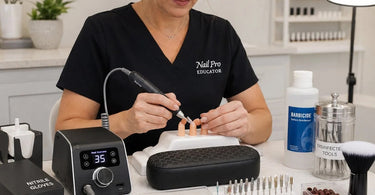
Better solutions, better outcomes... right? We all know that's the dream, but if you've ever spent your precious lunch break frantically searching for the right bit while a client waits, or if you have a drawer full of 'bargain' bits that just don't cut it, you know the struggle is real. Building a nail drill kit for training isn't just about grabbing the shiniest e-file; it's about curating a collection of tools that will be your trusty sidekicks. Think of it as assembling your own beauty Avengers—but instead of saving the world, you're saving nails from disasters like lifting, burning, and the dreaded 'oops, I filed too deep.'
Let\'s be honest: starting nail tech school or a new job is exciting, but staring at a massive catalog of e-file bits can feel less like a dream and more like studying for a final exam you didn't know you had. Carbide? Diamond? Ceramic? Mandrels? It sounds like we're building a spaceship, not a mani! But here's the secret that separates the pros from the panickers: a great kit is built piece by piece, with a focus on quality and functionality over quantity. By the time we're done, you'll know exactly what you need to create a kit that makes you feel confident, not confused, and ready to dazzle those practice hands. So grab a coffee (or a glass of wine—no judgment!), and let's build a kit that will make your instructors proud and your future clients rave.
Step 1: Choose Your Weapon (The E-File)
Before you can build a kit, you need the brains of the operation: your Nail Drill or e-file. This isn't just a purchase; it's an investment in your wrists and your sanity. Think of it like buying a car—you want something reliable, smooth, and that won't leave you stranded mid-service. Dipping Powder Systems can also be part of your services, so the drill you choose needs to handle removal and prep effectively. A professional-grade nail drill is your new best friend. Look for a lightweight, cordless option to save your back and keep you tangle-free, and a brushless motor that will keep its RPMs consistent even under pressure. This isn't just a fancy feature; consistent speed means safer, smoother filing with less heat, which means happy clients! Professional Nail Care Collections often include recommended e-files, making it easier to choose a trusted brand.
Step 2: The Bits and Pieces
This is where it gets fun (and a little confusing). Your drill is nothing without its bits. Starting with a high-quality Nail Brushes and Tools set is a good idea, but the bits are your actual workhorses. Don't buy a cheap 'variety pack' with 50 bits you'll never use. Instead, focus on the essentials that will get you through 90% of services. You need a solid starter set: think of it like a Nail Art Supplies set but for shaping and prep. You really should look for a kit that includes a Nail Files and Buffers system, but for your drill, you need a few specific bit types to cover all the bases .
Your 'starter pack' of bits should include a coarse carbide bit for removing product quickly and safely from enhancements, a medium diamond bit for refining and shaping the nail, and a fine diamond bit in a flame or tapered barrel shape for precision cuticle work and cleaning those tricky sidewalls . These are your bread and butter. The carbide bit is your heavy lifter, tackling bulk product like a champ. The diamond bits are your artists, allowing for fine-tuning and smooth finishes without damaging the natural nail. Professional Cleaners and Disinfectants are a must for keeping your drill bits in top condition, and are just as important as the bits themselves!
Step 3: Safety First, Always
Now that you have your tools, let's talk about keeping you and your clients safe. It's not just about technique—it's about protection. The first rule of Nail Club is 'Protect Your Lungs'. Nail dust is no joke. Make sure you invest in a high-quality Nail Dust Collector with powerful suction. This is non-negotiable. Your lungs will thank you in a decade .
Next up, sanitation. Metal tools like cuticle nippers and pushers should be medical-grade stainless steel because they can handle the high heat of an autoclave or prolonged soaking in disinfectant without rusting or pitting . A rusty tool isn't just gross; it's a health hazard. Also, don't forget your UV Sterilizers for an extra layer of safety and peace of mind. Using Protective Gloves and Masks is a great habit to start during training too, creating a professional routine for your future career.
Step 4: Prep and Finishing
Remember the famous saying: 'Nail art is 90% prep and 10% crying over a smudge?' Well, maybe not a famous saying, but it should be! A flawless manicure starts with immaculate preparation. A Nail Treatments for Healthy Nails selection can help you prep the natural nail, but you also need to know how to use your Manicure Essentials effectively. Your cuticle work and surface prep set the stage for polish and enhancements to last.
This is where your Pedicure Supplies and attention to detail shine. A good kit includes quality Nail Treatments like cuticle oils and creams. Proper prep also means mastering your files and buffers, whether manual or using your drill, to remove shine and create a 'rough' surface for better adhesion. Using the right products is crucial; for example, Premium Nail Polish will adhere better to a well-prepared nail surface. When you\'re just starting out, practicing on a Training Manikin with practice hands is a lifesaver for mastering your technique.
Step 5: The Gritty Details
Let's get into the nitty-gritty: grit levels. Think of file grits like sandpaper for your nails. A lower number means it's coarser, perfect for shaping and shortening. A higher number means it's finer, ideal for smoothing and buffing . A common rookie mistake is using a coarse grit on the natural nail plate—it's like using a chainsaw to trim a bonsai tree! Overfiling will lead to thin, weak nails and a very unhappy client.
You need the right grit for the right job. Your Nail Files and Buffers are your best friends here. For shaping, start around 180/180 grit. For refining and natural nail prep, a 240-grit file or buffer is your go-to . And when you start working with gels and acrylics, you'll use different grits for different stages, always finishing with a high-grit buffer for a smooth, glossy shine. It's like a fine art, and you're the artist!
Building Your Dream Kit
Building a better kit is a marathon, not a sprint. It can be so tempting to buy all the pretty things at once, but trust me, investing in quality over quantity is the secret to longevity and success. A kit built on solid foundations—a reliable Nail Drill, a core set of versatile bits, and top-notch sanitation—will allow you to work smarter, not harder. Plus, you'll look like a total pro when you whip out your perfectly organized kit.
Remember, your tools are an extension of your skill. They deserve love, care, and a good clean after every use. So, have fun building your kit, don't be afraid to ask more experienced techs for their must-haves, and embrace the learning process. Before you know it, you'll be a nail drill ninja, ready to take on the world—one perfect manicure at a time. Now, get out there and make some nail magic!
