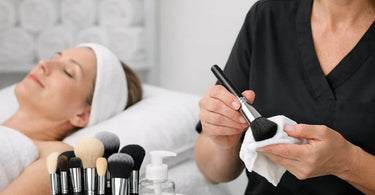
Smart choices lead to great outcomes... and let me tell you, nothing screams 'I have my life together' like a freshly cleaned set of synthetic makeup brushes. But in a busy spa, salon, or studio, those poor little bristles go through a lot. They get dunked in foundation, swirled in cream blush, and dragged through sticky concealers. Before you know it, they look like they survived a food fight. The good news? Cleaning and maintaining synthetic makeup brushes isn't rocket science. It's actually kind of satisfying once you get into a rhythm. And when your clients see you reaching for a spotless, fluffy brush instead of a crusty relic from 2019, they'll relax a little deeper into that chair. Let's turn brush maintenance from a dreaded chore into a quick, almost-meditative ritual that saves you money, protects your clients' skin, and makes you look like the pro you are.
We all know that feeling. You're mid-service, reaching for your favorite foundation brush, and you notice a little... texture. Maybe a slight stiffness. Or worse, a faint smell that doesn't match any of your products. That's your brush crying for help. Synthetic makeup brushes are absolute workhorses. They don't absorb product the way natural hair does, which makes them perfect for cream and liquid formulas. But that same non-porous quality means bacteria, oil, and old product just sit on the surface waiting to transfer to your next client's glowing complexion. Gross, right? Regular cleaning isn't just about appearances. It's about professional hygiene, preventing breakouts, and making sure every application is as flawless as the first.
Why Synthetic Bristles Deserve Your Love (And A Regular Bath)
Let's get real for a second. Natural hair brushes have their place, but in a high-volume spa or salon, synthetic is where it's at. They're durable, easy to sanitize, and they work beautifully with everything from liquid foundations to cream-based contour. But here's the secret: synthetic bristles are basically tiny plastic fibers. They don't have cuticles or scales like human hair. That means product doesn't get trapped inside—it clings to the outside. So when you clean them, the gunk slides right off like magic. No soaking required, no weird residue. Just a few minutes of gentle washing and they're good as new. The catch? You have to actually do it. And do it right. Harsh scrubbing, hot water, or bad drying techniques will ruin those bristles faster than a toddler with scissors.
What You'll Need For The Perfect Brush Cleanse
Before we dive into the step-by-step, let's gather your supplies. You probably already have most of this stuff in your back room or your home kit. Keep it simple. You don't need a dozen fancy gadgets. Just a few reliable tools and a little bit of elbow grease. Here's your shopping list: lukewarm water (not hot, not cold), a gentle liquid soap or dedicated brush cleaner, a silicone brush cleaning mat or a textured plate, clean white towels, and a drying rack or a slanted surface. That's it. Want to go the extra mile? Grab a small spray bottle with 70% isopropyl alcohol for a quick sanitize between deep cleans. Your clients' skin will thank you, and your Graham Beauty supplies will last twice as long.
Step One: The Pre-Rinse (Yes, It Matters)
Run your dirty brushes under lukewarm water with the bristles pointing downward. This is non-negotiable. If you point them up, water seeps into the ferrule—that's the metal part that holds the bristles—and loosens the glue. Loose glue means shedding bristles. Shedding bristles means angry clients finding little plastic hairs stuck to their cheeks. Keep that water flowing down and away from the handle. Gently swirl each brush under the stream until the initial gunk starts to wash out. You'll see the water change color. That's progress. That's victory. Take a moment to appreciate it.
Step Two: The Sudsy Massage
Squeeze a small drop of your cleanser onto your cleaning mat or into the palm of your hand. Swirl the damp brush in circles. Watch the magic happen. Old foundation, concealer, and powder will start to lift like a bad sunburn. For dense brushes like foundation buffers or flat tops, you might need to repeat this step. Don't be shy. Just don't be aggressive. Press too hard and you'll bend the bristles out of shape. Use gentle, circular motions. Rinse and repeat until the water runs clear. If you're using a dedicated silicone mat, those little nubs and ridges do all the hard work for you. It's like a car wash for your brushes.
Step Three: The Sanitize Shuffle
Once your brushes are visibly clean, it's time to kill any lingering bacteria. This is especially critical in a professional setting. Mix a very diluted solution of gentle soap and water, or use an alcohol-based spray. Lightly mist the bristles and let it sit for thirty seconds. Then do one final rinse. Avoid soaking the ferrule at all costs. That metal band is the brush's weak spot. Keep it dry and your brush will stay tight and intact. For an extra layer of protection between clients, keep a small spray bottle of 70% isopropyl alcohol at your station. A quick spritz and a wipe on a clean towel takes ten seconds and shows your clients you care about their safety as much as their brows.
Step Four: The Squeeze Test (No Twisting!)
After rinsing, gently squeeze the bristles with a clean, dry towel. Start at the ferrule and work your way to the tips. Never wring or twist. Twisting is the enemy. It stretches the bristles and destroys the shape. Just press and release like you're giving the brush a tiny hug. Repeat until no more water drips out. Shape the bristles back into their original form with your fingers. A little fluffing goes a long way. This is also a great time to check for any leftover product hiding near the base. If you see anything suspicious, go back to step two.
Step Five: The Drying Dance
Lay your clean brushes flat on a towel with the bristles hanging slightly off the edge of the counter. This allows air to circulate around all sides. Never stand brushes upright to dry. Water will drip down into the ferrule and ruin the glue. Gravity is not your friend here. Horizontal drying with a slight downward angle is the pro move. If you're in a hurry, point a small fan at them. Just don't use heat. Heat melts synthetic bristles. You'll end up with sad, curled, crispy brushes that look like they stuck their fingers in a light socket. Let them dry completely overnight if possible. Patience is a virtue, especially in the beauty wholesale world where quality tools are an investment.
How Often Should You Really Clean Them?
Here's where we separate the weekend warriors from the working pros. For personal use, a deep clean every one to two weeks is fine. For professional use in a busy barber shop, nail salon, massage studio, or waxing center? You should be cleaning your makeup brushes after every single client. Yes, every single one. I can hear you groaning from here. But here's the thing—it takes less than two minutes to do a quick sanitize between appointments. Keep a spray bottle and a stack of clean towels at your station. Wipe, spray, dry. Rotate through multiple brush sets if you have to. Your clients notice. They see you take that extra step. And they will rebook with you because you care about their skin.
The Deep Clean Schedule For Busy Pros
Between clients: Quick spritz and wipe with 70% alcohol. End of each day: A full wash with soap and water for any brushes that touched cream or liquid products. Weekly: A thorough deep clean for all brushes, including powder brushes and spoolies. Monthly: Inspect every brush for damage, shedding, or weird smells. Toss anything that looks sad. You can replace them affordably through premium skincare suppliers or stock up on professional cotton and must-have supplies to keep your kit fresh.
Common Mistakes That Kill Synthetic Brushes
Let me save you some money and frustration. Don't use hot water. It melts synthetic bristles and weakens the glue. Don't use dish soap or harsh detergents. They strip the bristles and leave a residue that feels weird on skin. Don't soak your brushes. Ever. Not even for a minute. The water will travel up into the ferrule and rust the metal or loosen the adhesive. Don't use a hair dryer. I know you're in a hurry. I know you have back-to-back appointments. But heat is death to synthetics. Don't store damp brushes in a closed case. That's how mold happens. And finally, don't share brushes without sanitizing. That's just basic hygiene, my friend. You wouldn't share a toothbrush. Don't share a foundation buffer.
Products That Make Brush Cleaning Easier
You don't need a hundred different cleansers. A gentle liquid soap like Dr. Bronner's or a dedicated brush shampoo works beautifully. Some pros swear by olive oil mixed with dish soap for a deep clean. I prefer a simple silicone mat with different textured zones. It's cheap, easy to sanitize, and it speeds up the whole process. For quick-drying between clients, a microfiber towel is your best friend. It wicks away moisture faster than cotton. And if you really want to level up, invest in a brush spinner. It's a little device that spins the brushes dry in seconds. No heat, no damage, just centrifugal force and a happy dance.
Storing Your Clean Brushes Like A Boss
Once your brushes are clean and completely dry, store them upright in a ventilated container. Avoid closed drawers or airtight bags. Airflow is everything. Separate clean brushes from dirty ones. Use different cups or containers so you never accidentally grab a used brush. If you travel between locations, invest in a brush roll with individual slots. It keeps the bristles protected and the shapes intact. And for the love of all that is fluffy, don't cram them into a makeup bag with a bunch of other products. That's how bristles get bent and handles get scratched. Treat your tools like the investments they are.
When To Say Goodbye To A Brush
Nothing lasts forever. Not even your favorite tapered blending brush. If the ferrule is loose, the bristles are shedding constantly, or the shape is permanently wonky, it's time to retire that brush. A shedding brush leaves little fibers on your client's face. Not a good look. A loose ferrule pinches skin. Also not a good look. And if you see any signs of mold or mildew? Toss it immediately. Don't try to save it. Your reputation is worth more than a twelve-dollar brush. Stock up on replacements from trusted spa essentials or professional spa apparel and equipment suppliers so you're never caught without a clean tool.
Bonus Tips For Specific Brush Types
Flat foundation brushes need extra attention at the base where product builds up. Use your thumb to gently press the bristles apart while washing. Angled contour brushes should be cleaned in both directions to get product out of the crease. Tiny detail brushes need a light touch. Use your fingertips instead of a mat. Spoolie brushes can be sprayed with alcohol and wiped on a towel. No need for a full wash every time. And if you use disposable sponges or compressed sponges, just toss them. No cleaning required. Easy peasy.
The Connection Between Clean Brushes And Happy Skin
You already know this, but it bears repeating: dirty brushes cause breakouts, irritation, and infections. Bacteria love old makeup. They feast on it. And then they party all over your client's freshly exfoliated skin. Regular brush cleaning reduces the risk of staph infections, pink eye, and fungal issues. It also makes your makeup application smoother. No more streaks. No more patchiness. Just beautiful, even coverage that makes your clients look like a million bucks. When your tools are clean, your work shines. And when your work shines, your reputation grows.
Making Brush Cleaning Part Of Your Daily Routine
The secret to not hating brush cleaning is to make it easy and automatic. Keep your supplies within arm's reach of your sink. Clean as you go instead of letting dirty brushes pile up. Play music or listen to a podcast while you work. Turn it into a relaxing wind-down ritual at the end of your shift. Light a candle. Pour some sparkling water. Wash those brushes like you're washing away the stress of the day. Your future self will thank you when you walk into a clean station every single morning.
So there you have it. The complete guide to cleaning and maintaining synthetic makeup brushes without losing your mind or your bristles. It's not hard. It's not expensive. It just takes consistency and a little bit of love. Your brushes will last longer. Your clients will stay clearer. And you will look like the absolute pro that you are. Now go forth and wash those fluffy little angels. They're counting on you. And so are the faces that sit in your chair.
)