Better outcomes, one smart choice at a time... Let's be real for a second. You wouldn't serve a client with a dirty spatula or skip washing your linens between appointments, right? So why does that favorite makeup palette of yours get a free pass on hygiene? I promise, I am not judging—we have all been there when we are running late and just need to touch up a lip—but as professionals, we have to hold ourselves (and our kits) to a higher standard. Today, we are diving deep into the sudsy, sanitized world of professional palette care. We are chatting about everything from pressed powders to creamy concealers, and I promise to sprinkle in a little humor so it doesn't feel like a lecture from your high school biology teacher.
I know what you are thinking: “Abigail, I just spent a small fortune on this professional-grade eyeshadow palette! I can’t just dunk it in water!” And you are absolutely right. You can’t. But neglecting to clean it is basically sending an engraved invitation to bacteria, yeast, and fungi to come live rent-free in your makeup. Gross, right? A study once found that almost 90% of in-use beauty products are contaminated with highly infectious bacteria. Yikes! Whether you are a freelance artist, a beauty blogger, or a spa owner offering bridal packages, clean palettes equal happy, zit-free clients. Let’s get to work.
Why Your Professional Reputation Depends On Clean Cosmetics
Listen, your talent is what gets clients in the door. But your hygiene standards? That is what keeps them coming back, and it stops them from posting a 1-star review about the mysterious rash they got after their glam session. When we skip sanitizing our cream makeup palettes, we are putting our clients at risk for breakouts, styes, and even full-blown skin infections. It takes two minutes to sanitize a palette properly. Two minutes versus a client screaming on social media about an eye infection? I know which one I am choosing.
Plus, there is the ick factor. Imagine a client watching you dip a brush into a crusty, messy palette that clearly hasn't seen love since the Obama administration. It does not exactly scream “luxury spa experience,” does it? Maintaining a pristine kit shows that you are a consummate professional who cares about every single detail. And honestly? A clean palette actually performs better. When you remove the layer of skin oils and dust, your pigments show up truer and blend smoother.
The Essential Cleaning Arsenal: What You Need Right Now
Before we start scrubbing, we need to gather the troops. You do not need a fancy lab, just a few standard supplies you can find right here at Pure Spa Direct. First and foremost, you need 70% Isopropyl Alcohol. This is the holy grail of makeup sanitation. It kills 99.9% of germs without ruining the integrity of your powder formulas. Pro-tip: 70% is actually better than 90% because it evaporates slower, giving it more time to actually kill those little microbes.
Next, grab some mixing bowls or small containers, a few disposable spatulas (these are lifesavers for scraping creams), and a stack of clean tissues or paper towels. You will also want a soft-bristled brush (an old, clean eyeshadow brush works great) for dusting off powders. If you are a high-volume artist, investing in a UV Sterilizer or a professional-grade disinfectant spray can be a total game-changer. It looks super impressive to clients, too.
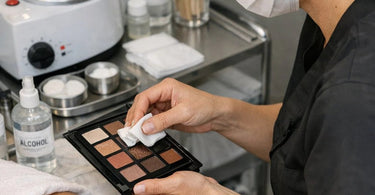
Powder Palettes: The Gentle Spritz Method
Powder palettes are actually the easiest to clean, which is great because they are usually the biggest and most expensive. You have your eyeshadows, blushes, bronzers, and setting powders. Here is the step-by-step routine to make them shine without turning them into mud.
Step 1: Open Air & Dust Off
Pop that palette open and take a soft, clean brush. Gently sweep away any “fallout” or loose powder sitting on the surface or in the crevices. You want a clean slate.
Step 2: The Spritz
Pour your 70% isopropyl alcohol into a small spray bottle. Hold it about 6 inches away from the palette and give the entire surface a fine mist. Do not drown it! You just want a light, even layer of moisture. You will see it evaporate almost instantly.
Step 3: The Wipe Down
While the palette is still slightly damp, take a tissue or a cotton pad and gently wipe the rims, the mirrors, and the outside casing. This gets rid of fingerprint oils and dust. Let the palette sit open for at least 10 minutes to ensure the alcohol has fully evaporated and done its job. Boom. Done. Wasn’t that easy?
Cream Palettes: The Surface Scrape & Sanitize
Okay, now it is time to address the elephant in the room: cream products. Cream foundations, concealers, and blushes are basically five-star hotels for bacteria. They are wet, jam-packed with oils, and every time you dip a brush in there, you are introducing dead skin cells and oils. But do not fear! We can fix this.
Step 1: Scrape the Top Layer
Take a clean, disposable spatula. Gently scrape off the very top layer of the cream. This removes the bulk of the bacteria that has settled there. It feels wasteful, but I promise it is better than a client getting a bacterial infection.
Step 2: The Alcohol Mist
Just like with the powders, give the surface a light mist of 70% isopropyl alcohol. Do not go too crazy here—too much liquid can break down the emulsifiers in the cream and change the texture. A light spritz is all you need.
Step 3: Smooth It Out
Use the back of your clean spatula to smooth out the surface of the cream. This makes it look brand new and ready for the next client. Allow it to air dry completely before closing the lid. If you close it while wet, you are just trapping moisture, which is exactly what mold wants.
The Smartest Investment: Silicone Mixing Palettes
Can I let you in on a little secret? The real professionals have stopped dipping directly into the pans altogether. The best way to keep your expensive beauty supply investment safe is to use a mixing palette. Silicone palettes are a total game-changer. They are non-porous, which means bacteria cannot hide in little scratches like they do on plastic or ceramic.
With a silicone palette, you simply squeeze or scoop a small amount of product onto the silicone surface. You mix your foundation or your lipstick colors right there. When you are done? You just wipe it down with alcohol, and it is spotless. You never contaminate the original product in the jar! It saves you money because you aren’t wasting product, and it saves your clients from cross-contamination. Plus, cleaning them is ridiculously easy—you can literally wash them in the sink with soap and water or wipe them with a disinfectant wipe. They are also way easier to hold than those slippery metal palettes. Do yourself a favor and grab a few. Your future self, and your clients' skin, will thank you.
Don’t Forget The Tools & Storage
Cleaning your palettes is only half the battle. You also need to sanitize the tools you use to touch them. If you clean your eyeshadow palette but then dig into it with a dirty, week-old brush, you have accomplished exactly nothing. You need to have a solid routine for your applicators and brushes.
For daily use between clients, use a brush cleanser or a spray alcohol solution. For your weekly deep clean, wash brushes with warm water and a gentle soap. Lay them flat to dry (never upright, as the water drips into the glue handle and ruins the brush!). As for storage, keep your palettes in a cool, dry place. Humidity is the enemy. If you work in a steamy spa environment, keep your kit zipped up with silica gel packets to absorb moisture. And please, please, please: no eating or drinking near your open makeup kit. Crumbs and coffee spills are not a good look for anyone.
How Often Should You Really Be Doing This?
We have covered the “how,” but the “how often” is where most people slip up. For personal use at home, sure, you can get away with a monthly deep clean. But for us professionals? The rules are stricter. You should be spot-cleaning your palettes (the alcohol spray method) after every single client. It only takes 30 seconds, and it protects you legally and ethically.
For a deep clean where you scrape the top layer off creams, aim for once a week or immediately if you notice product buildup. And if a client has a visible eye infection, pink eye, or cold sore? Do not just sanitize—discard any products that touched that area. It is not worth the risk of spreading it to the next client. Mark your calendars, set a phone reminder, do whatever you have to do to make this a habit. Your business depends on it.
There you have it, team. The not-so-secret secrets to keeping your professional makeup palettes looking fresh, clean, and ready for the red carpet. It takes a little effort, but it protects your clients, your reputation, and your wallet. Now, go forth and sanitize!