
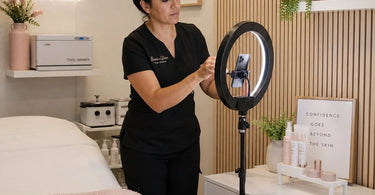
The first step to better outcomes is getting your work seen, and in today's digital world, that means creating a photo area that makes your talent pop. As a busy beauty pro, you already know that your work is incredible, but if your photos look like they were taken in a dimly lit dungeon, you are doing your business a serious disservice. I'm talking about the kind of photos that make a gorgeous balayage look like a muddy mess or a flawless waxing result get lost in the shadows. A dedicated, well-designed photo space isn't just a luxury anymore; it's the modern-day salon essential that helps you show off your skills, engage your clients on social media, and ultimately, book more appointments. Whether you're a solopreneur working out of a cozy studio or a bustling salon with limited square footage, this guide will show you how to maximize your space, perfect your lighting, and create a social media content creation station that seriously works for your business.
Most of us are already posting on social media, but there's a world of difference between hastily snapping a photo over a client's shoulder and creating content that makes potential clients stop scrolling. When someone searches hashtags like #balayage, #spaday, or #browlamination, they are looking for inspiration, and your content needs to be the one that stands out. Studies consistently show that over 50% of people become interested in a salon after seeing them on social media first, and that number climbs even higher with younger demographics . Your social media feed is your virtual storefront, and a killer photo area ensures that storefront is always looking its best, transforming your clients into brand ambassadors who can't wait to share their results.
Why You Absolutely Need a Dedicated Photo Space
Think of it this way: your photo area is your marketing engine. It's the place where you turn every great service into an opportunity for new client acquisition. When you create a space that's both easy and fun to use, you take the stress out of content creation, freeing you up to focus on what you do best: delivering amazing services. Plus, a professional-looking setup encourages your clients to snap their own pics and tag your salon, giving you a steady stream of user-generated content that doubles as powerful social proof. In the beauty industry, visuals are everything. If your photos don't reflect the quality of your work, potential clients will scroll right past you to someone else whose content does.
Step 1: The Art of the Backdrop – More Than Just a Wall
Your background is the canvas for your masterpiece. It should be clean, visually appealing, and complementary to your work. But what if you're working with a space the size of a postage stamp? Fear not, because small spaces can still pack a big punch.
One of the simplest and most effective moves is to claim a corner—a small, dedicated corner near a window if possible, or in an area with decent ambient light. This is your photo zone. It can be in a hallway, a quiet corner of your waiting area, or even right at your station . The goal is to make it out of the flow of foot traffic so you're not chasing clients around with a camera .
Now, how to style it? You've got options:
- The Clean Slate: A plain, crisp white wall is classic, timeless, and never goes out of style. It works for everything from hair transformations to nail art, ensuring the focus is entirely on your work.
- The Branded Accent Wall: Choose a color or wallpaper that matches your brand's aesthetic. A blush pink for a bougie boutique, a bold geometric print for an edgy barber shop, or a calming sage green for a serene spa. Just keep it from looking too “busy” or crowded so it doesn't distract from the subject .
- The Textured Touch: Think shiplap, exposed brick, a natural wood wall, or even a wall covered in artificial greenery (a floral wall is always Instagram gold!). This adds visual interest without overpowering the image .
For more ideas on creating a backdrop that's both functional and fashionable, browse our selection of Luxury Spa Furniture and Stylish Salon & Barber Furniture to find pieces that can double as chic backdrops.
Step 2: Lighting is Everything (Say Goodbye to the Dungeon)
If you only invest in one thing for your photo area, make it lighting. Natural window light is often the most flattering and is totally free, so if you can set up your area near a window, that is a major win . However, relying on Mother Nature isn't always reliable, especially when you're working late or on a cloudy day. This is where artificial lighting becomes your BFF.
Enter the Ring Light: The unsung hero of salon photography. A Ring Light provides consistent, shadowless, and flattering illumination. It's basically an airbrush in the form of a light. It creates a beautiful, even glow around the face, highlights the jawline, and makes hair color look incredibly shiny and dimensional . The bonus? Many ring lights allow you to mount your smartphone directly in the center, making it super easy to snap photos and record videos simultaneously .
When choosing a ring light, look for one with adjustable brightness settings and color temperatures (from cool to warm) . This gives you total control to get the perfect look for every shot. A good, portable ring light is a game-changer, especially when you're working with Portable Massage Tables or traveling for on-location shoots. And don't forget about LED Bright Lamps and Magnifying Lights—while they're essential for your services, they can also double as supplemental lighting for your photo area.
Step 3: The Golden Rule of Composition – Less is More
A cluttered photo is a surefire way to make your amazing work look amateur. The rule here is simple: keep it simple, keep it clean, keep it focused on the subject.
- Declutter, Declutter, Declutter: Make sure the area is free of stray hair clippings, dirty towels, and empty coffee cups. A messy workspace in a photo suggests messy work.
- Mind the Background: If your backdrop is a branded accent wall or wallpaper, make sure the pattern doesn't clash with the client's outfit or your work. The focus should be on the hair, nails, or skin.
- Styling Accessories (Props, Anyone?): A few carefully chosen props can elevate your shots. Think a sleek Professional Spa Apparel or Salon & Barber Apparel on display, or a beautiful High-Quality Towel artfully arranged. A chic Reception Furniture piece or a stunning Nail Salon Furniture element can also add a touch of luxury. But always remember, the client is the star—the props are just their supporting cast.
So, do you want to create that high-end look? When you produce clean, well-lit shots, you automatically raise the perceived value of your services. It's one of those magical things that speaks louder than words.
Step 4: Work With What You've Got (Even if it's a Closet)
I know, not all of us have a spacious room we can convert into a studio. But a small salon doesn't mean you can't have a phenomenal photo area. In fact, some of the best content comes from creative professionals who make the most of every inch.
Here are some genius ideas for maximizing a small space:
- Floating Stations and Shelves: Switching out bulky cabinets for Floating Shelves and floating counters can instantly create the illusion of more space by keeping the floor visually clear . This is a simple but effective way to make your photo area feel less cramped.
- Linear Wall Stations: Instead of having stations in the middle of the room, line them up against one wall. This keeps the center of the room open and makes the whole space look wider in photos .
- Oversized Statement Mirrors: A large arched floor mirror or a backlit mirror can make a small room feel double-sized in photos . It's a clever visual trick that adds depth and creates the perfect selfie backdrop. Plus, it's functional for your clients! For the ultimate in flattering light, look at Professional Salon Equipment that includes high-quality mirrors.
- Slim-Profile Seating: Opt for slim, airy chairs instead of chunky silhouettes. They take up less visual space and make the room feel more open, even if the measurements are the same .
- Dual-Purpose Spaces: A hallway can become a photo area during after-shot sessions. A corner near a window can serve double duty. The key is being intentional and having a setup that's ready to go .
Need furniture that helps with this balancing act? Our Top-Quality Equipment & Furniture for Spas & Salons selection is designed with both form and function in mind.
Step 5: Supercharge the Selfie (Make it Engaging)
Once you have your backdrop and lighting sorted, it's time to add some extra magic. A selfie wall is all about encouraging your clients to share their gorgeous results. The easier and more fun you make it, the more likely they are to do it .
- Make Your Brand Pop: Create a sign with your salon's Instagram and Facebook handles and include it in the background . This is free, organic advertising that gets your name out there every time a photo is shared.
- Remind Clients to Tag: Don't be shy about inviting your clients to tag your account and use your branded hashtag. You can even add a little sign next to the mirror that says, “Tag us for a chance to be featured!”
- Provide Some Props: A few carefully chosen props can make the selfie experience even more fun. Think fun hats, oversized sunglasses, or a cute sign. Match the props to your brand image for a cohesive feel. You can even showcase products you sell, like a stylish Bottles & Jars with a beautiful label.
- Creative Seating: Add a whimsical touch with a throne, a beach-style chair, or even a hanging swing that matches your backdrop's theme .
- User-Generated Content (UGC) is Gold: When your clients post their photos, share them to your own feed! UGC is one of the most powerful forms of social proof. It shows potential clients real results from real people, which builds trust and authenticity in a way that your own professionally curated shots can't always match. This is especially powerful if you're in a niche like Natural Sugaring Products or Professional Sunless Tanning, where seeing is believing.
This isn't just about having a pretty Instagram feed—it's about creating a marketing engine that turns every great transformation into a chance for new clients.
Step 6: Create Content That Converts
Now that you have a stunning photo area and the perfect lighting, the next step is to understand what kind of content drives bookings. This goes beyond just sharing a great photo. It's about telling a story that connects with your ideal client.
According to industry experts, authentic, relatable content often outperforms overly polished posts . So, instead of spending hours editing videos, try simply speaking to the camera. Show your process, share behind-the-scenes clips, and talk directly to your audience . For beauty businesses, this "FaceTime-style" content can build a powerful connection.
Influencer Bree Mesquit suggests a simple formula: start with a hook, identify a client pain point, present your service as the solution, build authority, and finish with a clear call to action . You should also tailor your content to the platform. For example, Instagram is great for detailed carousels showing a full appointment breakdown, while TikTok thrives on fast-paced, trend-driven educational clips .
Encouraging clients to use a unique, branded hashtag for your salon (like #Trangformations) creates a library of shareable content and strengthens your community . This is also where having the right Must-Have Spa Retail Products on hand to demo or gift can create extra shareable moments.
Your Photo Area Checklist
Ready to get started? Here's a quick recap:
- Find Your Spot: Claim a corner, a wall, or a hallway with decent lighting.
- Create a Killer Backdrop: Choose a clean wall, add some texture, or go for a trendy wallpaper.
- Invest in Lighting: A Ring Light is a must for consistent, flattering photos.
- Keep it Simple: A clean, uncluttered space ensures the focus is on your amazing work.
- Make it Fun for Clients: Add a branded sign, some props, and encourage them to tag you.
- Ready to Upgrade Your Equipment? When you're ready to elevate your entire salon or spa, remember that Pure Spa Direct has you covered—from Top Quality Massage Tables & Chairs to Professional Wax Warmers and everything in between.
Creating a better photo area in a small salon is not just about getting a good shot; it's about building a brand, engaging your community, and driving business growth. It's an investment that pays for itself by turning your daily wins into a powerful, visual marketing strategy. And the best part? With a little creativity and the right tools, even the tiniest space can become a social media superstar. So grab that Spa Essentials kit, set up your shot, and get ready to watch your bookings soar!
