
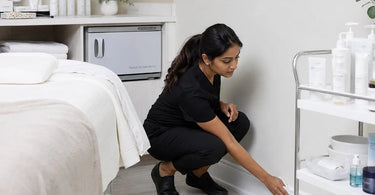
Your work, elevated... but is your baseboard game? Let's be real, darling. In the high-stakes world of beauty and wellness, we obsess over the perfect Facial Steamer temperature, the sharpness of our Professional Shears, Clippers, & Trimmers for Barbers, and the pristine clarity of our Magnifying Lights. But there is a dirty little secret lurking just below eye level. It is the dusty, grimy, product-splattered elephant in the room—or rather, the baseboard. We spend thousands on Luxury Spa Furniture and Professional Wax Warmers for Salons & Spas, yet we let the very foundation of our space crumble into a state of neglect. If you have been ignoring the grime on your baseboards, it is time for an intervention. A clean spa or salon is not just about the surfaces you touch; it is about every single inch your client sees. Today, we are diving deep into the murky waters of baseboard maintenance, and trust me, it is going to be a wild, slightly icky, but ultimately triumphant ride.
Let's face it, the modern spa and salon is a battlefield of products. We have ItalWax - Wax flying, Professional Hair Color dripping, and Cuticle Oil mysteriously migrating to places it should never be. This potent cocktail of oils, waxes, and powders settles on the lowest points of your walls, creating a sticky, unsightly mess. It is not just ugly; it is unhygienic. A baseboard caked in old wax or hair dye is a breeding ground for bacteria and a major turn-off for discerning clients.
But fear not, my fellow clean freaks! Conquering the baseboard is entirely achievable. It requires a strategy, the right tools, and a little bit of elbow grease. And who better to guide you through this than your friends at Pure Spa Direct, the one-stop wholesaler for all your professional needs? While we do not manufacture cleaning supplies, we are experts in sourcing the professional-grade tools that make the job easier and the results last longer.
Why Baseboards are the Unsung Heroes (and Villains) of Your Spa
Baseboards serve a crucial purpose. They protect your walls from kicks, furniture bumps, and moisture. In a salon or spa, they are the first line of defense against the Professional Cleaners & Disinfectants for Salons and Spas you use on the floor, and the various lotions and potions that escape your treatment table. However, because of their position, they are magnets for debris. Every time you sweep or mop, you are pushing dirt right up against them. Add in the static cling from High-Quality Towels and the fine dust from Nail Files & Buffers, and you have a recipe for disaster. Just as you would never reuse a Professional Cotton, Sponges, and Wipes for Salons & Spas on a client, you should not ignore the build-up on your trim.
Regular baseboard maintenance is not just about aesthetics; it is a non-negotiable aspect of sanitation. State boards often have specific regulations regarding the cleanliness of floors, walls, and yes, baseboards . A clean facility is a compliant facility. Plus, a pristine environment elevates the client experience. A client may not consciously notice a sparkling baseboard, but they will definitely notice a dirty one. It undermines the trust you have built and the premium services you offer, whether it is a Lash Lift & Perm or a Microdermabrasion treatment.
The Dirty Details: What You Are Up Against
Before we dive into the strategy, let's identify the enemy. In a product-heavy room, you are dealing with a unique trifecta of grime:
- Dust and Hair: The ever-present tumbleweeds of the salon world. Combined with Professional Hair Brushes & Combs for Stylists and trimmings, this creates a base layer of fuzz.
- Product Residue: This includes everything from wax drips and hair dye splatters to massage oil splashes and facial mist. Many of these products are designed to be sticky to perform their function, making them a nightmare to clean up once they have dried.
- Dusty Wax Grease: A beautiful, sticky film that forms when dust settles on product residue. It is the thing of nightmares and is incredibly hard to remove without the right approach.
This means that a simple wipe-down with a dry cloth just will not cut it. You need a multi-step process that breaks down the gunk and leaves your baseboards looking brand new.
Your Step-by-Step Guide to Baseboard Bliss
Here is the system we swear by. Arm yourself with some good music, a podcast, or a motivational speech, because you are about to get down and dirty.
Step 1: The Great Dry-Offensive
Before you introduce any moisture, you need to remove loose debris. Grab your vacuum with the brush attachment and run it along the top edge and face of the baseboard. This will suck up the dust bunnies and hair clumps. For those hard-to-reach nooks and crannies, a soft-bristled brush is your best friend. This initial step prevents you from creating a mud-like paste when you add liquid.
Step 2: Mix Your Miracle Solution
Now it is time to get wet. For most painted baseboards, a few drops of mild dish soap in a bucket of warm water works wonders. It cuts through light grease and is gentle on paint. However, for the heavy-duty grime you are likely dealing with, you might need something stronger. A solution of warm water and a professional-grade degreaser is ideal for cutting through the wax and oil build-up.
Pro Tip: Avoid using harsh chemicals like bleach, as they can damage your paint and affect indoor air quality. Also, be wary of solutions that are too acidic, like pure vinegar, as they can dull the finish on some paints .
Step 3: The Damp Cloth Technique
Dip a microfiber cloth into your cleaning solution and wring it out until it is damp, not dripping. Excess water can seep behind the baseboard and cause swelling or mold. Wipe down the baseboard in sections, working from the top down. Pay special attention to the top edge and the bottom groove. This is where the most grime collects.
Step 4: Detail the Details
Your baseboards likely have grooves and decorative trim. This is where a soft toothbrush or a small detailing brush comes in handy. Dip it in your cleaning solution and scrub the crevices gently. For stubborn scuff marks, a melamine foam eraser (like a Magic Eraser) is a miracle worker. Just be gentle, as it is mildly abrasive and can dull a high-gloss finish . For the tiny gaps between the baseboard and the wall or floor, use a cotton swab for precision cleaning .
Step 5: Rinse and Dry
Once you have scrubbed, it is time to rinse. Use a clean, damp cloth (with just water) to wipe away any soapy residue. Follow up immediately with a dry microfiber cloth to absorb any remaining moisture. This step is crucial to prevent water spots and streaks, ensuring a flawless finish. Remember to change your rinse water frequently. Using a dirty rag to rinse will defeat the purpose of the whole exercise!
The Secret Weapon: Repelling Future Grime
You have scrubbed, you have wiped, and you are feeling victorious. But the battle is not over. The key to making your life easier is prevention. Here is a hack that will change your life: after your baseboards are sparkling clean and dry, wipe them down with a dryer sheet. The anti-static properties of the sheet repel dust, meaning your hard work will last much longer .
Another fantastic tool is a good-quality duster with an extendable handle. Regularly dusting your baseboards (perhaps during your weekly deep clean) will prevent heavy build-up, saving you from this intense scrubbing session every month . And remember, the cleaner your Hygienic Table Paper for Waxing, Spa & Massage Tables and floors are, the less debris will migrate to your baseboards.
Room-by-Room Strategy
Different rooms in your facility require slightly different approaches.
- Waxing and Hair Removal Rooms: These are the high-risk zones. Professional Stripless Hard Wax and oils can splatter. You will likely need a degreaser for these areas and a scrubbing brush. Consider using a plastic guard or painter's tape along the baseboard in high-traffic areas to catch the drips during busy days.
- Nail Salons: Nail dust and polish are the primary culprits. A vacuum with a HEPA filter is essential here to capture the fine dust from Acrylic Nail Supplies and buffers. Be vigilant about spills from Premium Nail Polish, as they can be hard to remove once dry.
- Massage Therapy Rooms: While there is less 'splatter' here, the air is often rich with moisture and essential oils from Aromatherapy Supplies. This can cause a sticky film to develop on the baseboards. A regular wipe-down with a gentle soap and water solution is usually sufficient.
Your New BFFs: Products from Pure Spa Direct
While we do not sell cleaners directly, we supply the tools that make cleaning and the services that cause the mess a breeze. Think about it: the fewer spills you have in the first place, the easier your cleaning routine becomes. Using high-quality, precisely formulated products from our brand partners can reduce drips and messes. For instance, using a top-tier Professional Wax Warmers for Salons & Spas with a temperature control minimizes the risk of overheating and dripping ItalWax.
Furthermore, organizing your space effectively helps. Using our Must-Have Spa Retail Products for Enhanced Client Experience display solutions can prevent messy products from being scattered around treatment rooms. And when you are ready for the deep clean, our range of Professional Spa Apparel ensures you are comfortable and protected while you work.
Ultimately, the secret to clean baseboards is a consistent routine. Whether you are a Spa Masters devotee or love the innovation of Prosana, the truth is that a sparkling baseboard is a testament to the professionalism of your entire establishment. So, put on your game face, grab your microfiber cloths, and get ready to show those baseboards who is boss. Your clients will thank you, and your space will radiate a purity and elegance that speaks volumes before a single service is even performed. Now go forth and conquer that grime!
