
Your next step to success starts now... by ensuring your lash adhesive is stored properly and ready to perform at its peak. Let's face it, there's nothing quite like the sinking feeling of preparing for a full day of lash clients, only to find your trusty adhesive has turned into a thick, unusable mess or, even worse, is failing to bond correctly halfway through a set. As lash artists, we pour our hearts (and a significant amount of precision) into every single set of lashes we create. The quality of our work, our client retention, and our professional reputation hinge on the performance of that tiny, crucial bottle of lash adhesive. It's the unsung hero of our service, and like any diva, it has very specific demands. If you treat it right, it will reward you with flawless, long-lasting lashes. But if you neglect its needs, it will stage a dramatic rebellion, leaving you frustrated and your clients unhappy. So, let's dive deep into the art and science of lash adhesive storage, turning a potential source of chaos into a consistent, foolproof part of your daily routine. We're going to banish the storage drama for good, and maybe even have a laugh along the way!
If you've been in the lash game for more than five minutes, you know that lash adhesive is a fickle beast. It's a cyanoacrylate-based adhesive, and its entire lifecycle is a delicate dance with its environment, particularly temperature and humidity . Think of it like a high-maintenance houseplant that you're terrified of killing, except this one costs way more and directly affects your income. The minute you open that bottle, the clock starts ticking, and the battle against moisture and temperature fluctuations begins. Many lash artists consider keeping lash adhesive storage more consistent to be the holy grail of the lash industry. Let's be real; we've all had those days where the glue seems to have a mind of its own. One minute it's perfect, the next it's stringy, or it's taking forever to cure, and you're left staring at your client with a look of sheer panic.
So, how do we tame this beast? First, you need to understand its enemy: moisture and heat. Your lash adhesive cures through a chemical reaction with moisture in the air . This is great when we're talking about that perfect environment your trainer told you about—optimal humidity around 40-60% and a stable temperature of 68-75°F . But when you're not working, that same moisture is slowly degrading your adhesive inside the bottle. It's like leaving a carton of milk out on the counter; it's just going to go bad a lot faster. The same principle applies to your lash adhesive. The consistent rule from nearly every expert is to store your adhesive in a cool, dark, and dry place . Your car, a sunny windowsill, or near a radiator are all absolute no-go zones that will drastically shorten the life of your glue .
The Golden Rule: Airtight is Alright (and Necessary!)
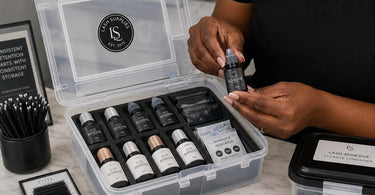
One of the simplest yet most effective ways to maintain consistent lash adhesive storage is to invest in a good airtight container. Think of it as a protective bunker for your precious glue. The primary goal is to create a micro-environment that minimizes the glue's exposure to the ambient humidity that can wreak havoc on its shelf life . You want to seal it off from the outside world as much as possible. There are several great options available, ranging from purpose-made lash glue storage pots to vacuum-sealed containers. Some lash artists even use a simple ziplock bag filled with uncooked rice to absorb moisture and keep the glue bottle secure and upright . The rice acts as a natural desiccant and provides a stable, cushioned environment for your glue, especially if you're a mobile lash artist.
When you choose an airtight container, always make sure it's clean and dry before you place your adhesive bottle inside . You'd be surprised how much of a difference a tiny bit of moisture in the container can make. Many of these containers, like the popular Lash Locker Pro or similar designs, come with a removable foam insert to hold up to three glue bottles securely and prevent them from rattling around, which is perfect for organizing your Lash & Brow Service Supplies . They often include an activated carbon deodorizer pack or a space for a desiccant pack to further control the moisture levels inside . Remember to replace that desiccant pack every 2-3 weeks for maximum effectiveness . This simple step alone can be a game-changer, extending the life of your glue and ensuring it's ready to perform at a moment's notice.
The Great Fridge Debate: To Chill or Not to Chill?
Ah, the age-old question: should you store your lash adhesive in the refrigerator? The answer, like most things in the beauty world, is a nuanced “it depends.” For unopened adhesive, refrigeration is generally a great idea. Storing unopened glue at a stable cool temperature, around 5-10°C (41-50°F), can significantly extend its shelf life, sometimes up to 12-15 months . However, and this is a HUGE 'however', once you open that bottle, the rules change entirely. A regular kitchen refrigerator is an absolute no-go for opened adhesive . The high humidity inside a standard fridge will cause condensation to form inside the glue bottle, introducing the very moisture you're trying to avoid and rapidly curing the glue from the inside out . This will effectively ruin your expensive adhesive.
If you're absolutely determined to use refrigeration for your opened adhesive, you need a dedicated mini-fridge or wine cooler set to a stable room temperature, around 68-74°F, and even then, you must store the glue inside a completely airtight container to protect it from any moisture . The safest and most recommended method is the “come to room temperature” rule. If you do refrigerate an unopened bottle, you must take it out and let it sit, still sealed in its pouch, for 30 to 60 minutes before you open it . This allows the glue to slowly acclimate to room temperature, preventing condensation. For many professionals, the hassle and risk of condensation outweigh the benefits, and they prefer to simply store opened glues in a cool, dark drawer in an airtight container. For the best and most consistent results, follow the guidelines of your specific adhesive brand, as they know their formula best .
Daily Rituals: The Care and Feeding of Your Lash Adhesive
Beyond the big-picture storage strategies, your daily habits are what truly make the difference in keeping lash adhesive storage more consistent. Think of this as your glue's daily skincare routine, but with much less moisturizer. First and foremost, always, always, always store your adhesive bottle upright . When you lay it on its side, the glue can pool around the nozzle, leading to clogs, uneven dispensing, and a giant sticky mess. This also prevents air from entering the bottle as easily. After each use, it's non-negotiable: you must clean the nozzle and the inside of the cap . Use a clean, lint-free wipe to gently wipe away any excess glue residue from the tip and the threads of the cap. This prevents the cap from getting glued shut and ensures a perfect seal every time.
Another crucial step is to gently squeeze the bottle to remove any air bubbles from the nozzle before you put the cap back on . This might sound a little extra, but it creates a slight vacuum that can help keep the glue fresher. The cap is your first and best line of defense! Let's be real, we've all been there after a long day, thinking, "I'll just wipe it later," only to come back to a glued-shut cap that's impossible to open without risking an explosion of adhesive. Don't risk it! A quick clean-up is a small investment that pays off hugely in saved time and frustration. And don't forget to shake your adhesive well before each use! Vigorous shaking mixes all the ingredients properly, ensuring a consistent formula and optimal performance .
Conquering the Elements: Humidity and Temperature Fluctuations
Even with perfect storage, the environment in your lash room plays a massive role in your adhesive's performance. If your room is too humid, your glue will cure too fast, potentially bonding before you've properly placed the lash . If it's too dry, the glue will cure too slowly, leading to poor retention and a longer appointment time . This is where monitoring your room's conditions becomes critical. Invest in a reliable hygrometer and thermometer to keep a constant eye on your room's stats . You want to aim for that sweet spot of 40-60% humidity and a stable temperature between 68-75°F. If you're in a dry climate, a small humidifier can be a lifesaver. If you live in a more humid area, you'll likely need a dehumidifier or to rely heavily on your air conditioning .
This is where the concept of 'consistent lash adhesive storage' really comes full circle. Your storage environment and your work environment are two halves of the same whole. If you store your glue perfectly but then work in a humid sauna, your glue will still struggle. The best approach is to create a controlled environment for both storage and work. Make sure your adhesive has at least an hour to acclimate to your work room's temperature before you start lashing, especially if you've been storing it in a cooler spot or taking it out of a bag . This will help prevent your glue dot from becoming stringy and unpredictable. It's also wise to have a couple of different adhesives on hand for different seasons or environments. A slow-drying adhesive can be your best friend in the hot summer months, while a faster one is ideal for the cooler, drier winters .
Finally, remember the golden rule of adhesive: it does not last forever. Once opened, most lash adhesives have a lifespan of 4 to 8 weeks, depending on the brand and how well you care for it . Mark the date you opened the bottle on the side and track its age! As the bottle gets older, its consistency will change, and it will become less effective. If you notice the glue has become thick, stringy, or is drying inconsistently, it's time to thank it for its service and replace it. Using an old or poorly stored adhesive is a false economy; the cost of a new bottle is far less than the cost of a frustrated client and a bad reputation. By mastering these storage and handling techniques, you're not just preserving a product, you're investing in the consistency of your work and the happiness of your clients. Now go forth and store with confidence!
)