
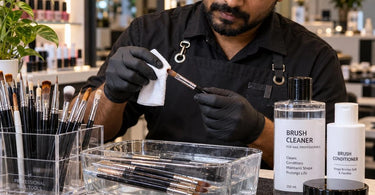
Maximize client happiness with this product care guide that will save you from the tiny heart attack of reaching for your favorite detail brush only to find it has transformed into a stiff, uncooperative stick. We have all been there. You finish a beautiful set, you are riding that post-service high, and then the next morning your brush feels like it was used to stir concrete. It is the worst. But here is the good news: keeping your nail brushes soft, pointed, and ready for action between services is absolutely achievable. You just need a few pro habits and the right tools from your friends at Pure Spa Direct.
We know you are busy. Between clients, color changes, and the endless search for that one file you just had in your hand, brush maintenance can slide to the bottom of the priority list. But your brushes are the paintbrushes of your artistry. When they are stiff, splayed, or gunked up, your work suffers, your hand hurts, and your clients can feel the difference. Let us walk through exactly how to keep your Nail Brushes & Tools in pristine condition, so every service feels as good as the first.
Why Do Nail Brushes Get Stiff in the First Place?
Before we get into the fixes, let us talk about the why. Understanding the root cause is half the battle. Nail brushes harden because leftover product, whether that is acrylic monomer and powder, gel polish, or traditional lacquer, cures or dries inside the bristles [citation:7]. If you pause too long between beads, if product creeps up into the ferrule (the metal bit that holds the bristles), or if you store your brush without cleaning it properly, that residue solidifies [citation:10]. Once that happens, the bristles stick together, lose their flexibility, and refuse to form a point.
The type of brush matters too. A natural hair brush, like a Cuccio Kolinsky sable brush, is beloved for its ability to hold a sharp point and control acrylic, but it is also more delicate [citation:18]. Synthetic brushes, often used for gel, are more resilient but can still get gummy if you are not careful. The common enemy for all of them is neglect. Leaving product to sit, even for an hour, is asking for trouble.
The Golden Rule: Clean Little, Clean Often
This is the number one habit that separates technicians with beautiful brushes from technicians who are constantly buying replacements. Do not wait until the end of the day or the end of the week to clean your brush. The best cleaning happens in the tiny gaps between beads or between color applications [citation:7].
For acrylic brushes, the between-bead micro-clean takes about ten seconds. Wipe the brush gently on a lint-free pad to remove excess product. Dip just the tip into clean monomer (keep a separate dish of clean monomer for this purpose, away from your working monomer). Wipe again, and reshape the brush to a point with your fingers [citation:7]. That is it. Do this after every single bead, and your brush will stay flexible all day long.
For gel brushes, the process is similar but uses a gel cleanser or a clear base coat. Wipe the brush on a lint-free wipe, run it through a bit of clear gel or cleaner to remove pigment, wipe again, and reshape [citation:9]. Never let gel cure in the bristles. Keep your brush away from the lamp while you are working, and never leave it sitting on the table where stray UV light might find it [citation:20].
Choosing the Right Cleaning Solution (This Matters More Than You Think)
Not all cleaners are created equal, and using the wrong one can actually make the problem worse. For acrylic brushes, monomer is your everyday friend. It is gentle, it conditions the bristles, and it will not dry them out [citation:2]. Acetone is a harsh solvent. It works quickly on stubborn residue, but it strips natural oils from Kolinsky hair and can cause the bristles to become brittle and splay over time [citation:7][citation:18]. If you do use acetone for a deep clean on a synthetic brush, follow it up with a brush conditioner or a dip in monomer to restore softness [citation:2].
For gel brushes, a dedicated gel cleanser or isopropyl alcohol is the safest choice. Nail polish remover (acetone-based) can work for traditional polish brushes, but test it first on a small area to make sure it does not damage the bristles [citation:10]. A good rule of thumb: if you would not want it on your own skin, think twice before soaking your brush in it.
Proper Storage: The Step Everyone Skips
You have cleaned your brush. Now what? Do not just toss it in a drawer. Storage is where brushes go to die if you are not careful. The cardinal rule is: never store your brush bristle-down [citation:5]. Standing a brush on its head in a cup or holder puts constant pressure on the bristles, causing them to bend and splay permanently. Instead, store your brushes horizontally or with the bristles facing up [citation:5].
A brush case, roll, or dedicated holder is a worthwhile investment. It protects the bristles from dust, debris, and accidental damage. Keep your brushes away from direct sunlight and heat sources, both of which can dry out the bristles and loosen the glue in the ferrule [citation:5][citation:12]. The ferrule needs protection too. If it gets bent or loose, the entire brush becomes unstable. Use the protective caps that come with your acrylic and gel brushes consistently [citation:5].
Looking for a safe place to keep your tools organized? A dedicated Must-Have Supplies setup or a Professional Nail Care Collections station can help you keep everything within reach and protected.
The Weekly Deep Clean (Yes, You Need One)
Daily cleaning removes surface residue, but a deeper clean once a week will keep your brushes performing at their peak. Fill a small container with the appropriate cleaning solution. For acrylic brushes, use monomer. For gel brushes, use a brush cleaner formulated for gel [citation:5].
Soak only the bristles, not the entire ferrule, for a few minutes. Do not leave your brush soaking overnight, as this can loosen the glue that holds the bristles together [citation:5]. After soaking, gently work the bristles between your fingers to release any trapped product. You will see the solution turn cloudy, which is a satisfying sign that gunk is coming out. Rinse with fresh cleaner if needed, then reshape the bristles carefully with your fingers. Lay the brush flat or hang it bristles-down to dry completely [citation:10].
For natural hair brushes, a tiny drop of brush conditioner keeps the bristles supple and prevents them from becoming brittle. Synthetic brushes do not need conditioning, but they still benefit from that weekly deep clean to maintain their performance [citation:5].
What to Do When Your Brush Is Already Stiff
Okay, so your brush is already hard. Do not panic, and do not throw it away just yet. If it is not rock-hard, you can often save it. For acrylic brushes, soak the bristles in fresh monomer for five to ten minutes. Use a wooden cuticle stick to gently tease softened acrylic out of the bristles. Wipe clean, repeat a short soak if needed, reshape, and let it rest [citation:7].
For bent or splayed bristles, warm water can work wonders. Heat a small bowl of water (not boiling, just warm to hot) and dip just the bristles, being careful not to submerge the ferrule. Let them soak for ten to fifteen minutes. The warm water relaxes the fibers. Gently blot on a lint-free towel and reshape with your fingers. Lay flat to dry [citation:15].
If your brush is genuinely rock-hard and the bristles are falling out or the ferrule is loose, it might be time to let it go. A worn-out brush makes your work harder and your results less precise. Professional technicians often replace their most-used brushes every few months [citation:5]. Keep backups on hand so you are never caught mid-service without a working tool.
Know When to Say Goodbye
Even with perfect care, brushes do not last forever. Watch for these signs that it is time to retire a brush: bristles that splay out and will not hold their shape even after cleaning, a loose or wobbly ferrule, bristles that fall out during use, permanent bends or kinks, or stiffness that will not soften with deep conditioning [citation:5].
Do not feel guilty about replacing a worn-out brush. Think of it as investing in the quality of your work and the comfort of your hands. A good brush is a professional tool, and it deserves to be treated like one. Keep your Manicure Essentials stocked with backups so you are always prepared.
Your Brushes Will Thank You (And So Will Your Clients)
Here is the thing: when your brushes are soft, pointed, and clean, everything gets easier. Your acrylic beads glide on smoothly. Your gel lines are crisp. Your nail art looks sharper. Your hand does not cramp from fighting a stiff brush. And your clients notice the difference in the quality of your work.
So take those ten seconds between beads. Do the weekly deep clean. Store your brushes properly. Your brushes will last longer, your work will look better, and you will save money on replacements. That is a win-win-win. And if you need to restock your brush collection or find the perfect cleaning supplies, you know where to find us. We have everything you need to keep your tools and your talent in top form.
)