Do more with less effort... especially when it comes to scrubbing those stubborn tint stains off your favorite service trays. Picture this: you have just delivered the most flawless brow tint of your career. Your client is beaming, her arches are on fleek, and you are feeling like the Picasso of pigmentation. You turn around to clean up, and BAM! Your pristine white service tray now looks like it lost a fight with a grape juice factory. We have all been there, staring at those dreaded, permanent-looking splotches while cursing the beauty gods. But what if I told you that those unsightly stains are not a professional rite of passage? At Pure Spa Direct, we are all about working smarter, not harder, so let us dive into the art of preventing tint stains on your trays, saving your sanity and your budget.
Let us be real for a second: a stained service tray just screams “I gave up on life.” It is the visual equivalent of serving a five-star meal on a chipped plate. For the discerning spa and salon professional, every detail matters, right down to the tools you use and how they look. A clean, unstained tray not only looks more professional but also signals to your clients that you value hygiene and attention to detail. After all, if you cannot keep a simple plastic tray clean, what else might you be neglecting? So, take a deep breath and put down that bottle of industrial-strength bleach. We have got the inside scoop on how to prevent tint stains on service trays, turning your cleanup routine from a nightmare into a breeze.
Why Tint Stains Happen in the First Place (And Why It's Not Your Fault)
Before we start talking about prevention, let us break down the enemy. Professional tints, like our Professional Lash and Brow Tint for Spas & Salons, are designed to be highly pigmented and durable. That is what makes them so fantastic for clients. They dye hair and skin efficiently because they are packed with color molecules that bind to keratin. Unfortunately, those same molecules are also incredibly attracted to the porous surfaces of plastic and silicone trays. Heat, time, and a little bit of oxidation can cause the pigments to settle into microscopic scratches or open pores on the tray surface, creating a chemical bond that is tough to break. It is not a reflection of your cleaning skills; it is a simple chemistry problem. But as they say, knowledge is power, and knowing why it happens is the first step to stopping it.
Tip #1: Choose the Right Tray from the Start
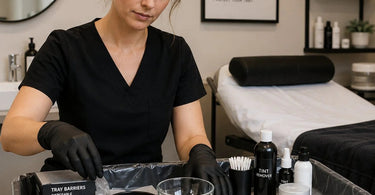
Prevention begins before you even open that bottle of tint. Not all service trays are created equal. If you are using a cheap, porous plastic tray, you are basically inviting the tint to move in permanently. Instead, look for trays made of non-porous materials like high-quality glass, stainless steel, or a medical-grade plastic specifically designed to resist staining. At Pure Spa Direct, we are all about providing you with the best Spa Essentials for Professionals, and your service tray is the unsung hero of your station. Investing in a high-quality mixing palette or tray can save you a world of heartache. For mixing your tint, consider using disposable paper palettes or silicone mixing cups that can be thrown away after a single use. It might seem wasteful, but compared to the cost of replacing stained trays constantly, it is an economical and hygienic choice.
Tip #2: Prep Your Tray Like You Prep Your Client
You always prep your client's skin before applying a tint, right? You cleanse, you apply a barrier cream, and you make sure the environment is perfect for the product to adhere. Why should your tray be any different? Before you mix your Refectocil Original or Intensive Tint the professionals choice in lash brow tinting, do a quick prep on your tray. A simple trick is to wipe the mixing area with a tiny amount of barrier cream or petroleum jelly. This creates a protective film that prevents the tint from directly contacting the tray's surface. Just be careful not to get any of that cream into your tint mixture, as it can interfere with the dye process. A clean, dry tray is a happy tray, but a protected, clean, dry tray is a genius-level move.
Tip #3: The Immediate Cleanup Rule
This is the golden rule of preventing tint stains on service trays. The longer the tint sits on the tray, the more time it has to bond with the material. As soon as you are done applying the tint to your client's brows or lashes, do not let it just sit there while you wait for the processing time. Take the tray to the sink and give it a quick rinse under cold water. Hot water can actually set the stain, so always start with cold to flush away the loose pigment. A quick 30-second rinse is often all it takes to remove 90% of the mess before it becomes a crisis. If you are in the middle of a service, keep a small bowl of water or a spray bottle filled with water nearby to spritz the tray immediately. Think of it as speed dating for stain prevention; get in and out quickly before things get too serious.
Tip #4: The Right Cleaning Agents Make All the Difference
When it comes to cleaning, your grandma's advice of “a little elbow grease” is not going to cut it. You need the right chemistry. Avoid using harsh abrasives like steel wool or scouring powder, as they will create microscopic scratches on the tray, giving the tint more places to hide next time. Instead, reach for a professional-grade cleanser formulated for beauty tools. Graham Beauty and Professional Cleaners & Disinfectants for Salons and Spas offer fantastic options that break down pigments without damaging the surface. For stubborn spots, a magic eraser type sponge can be a lifesaver, as it gently lifts the stain without scratching. If you are using a cream or liquid tint, a little bit of oil-based makeup remover can sometimes break down the pigments enough to wipe them away. Just remember to thoroughly wash away any residue before your next use.
Tip #5: Embrace the Power of Disposables and Liners
Sometimes, the best way to prevent a stain is to not let the tray get dirty in the first place. Hello, disposable tray liners! These are thin, flexible sheets made of plastic or foil that you place directly on top of your service tray. You mix your tint on the liner, and when you are done, you simply peel it off and throw it away. Your tray remains completely untouched, pristine, and ready for the next client. It is a brilliant, time-saving hack that also adds an extra layer of sanitation to your service, especially when paired with a fresh pair of Protective Gloves & Masks for Salon and Spa Professionals. We carry a variety of these liners and other Applicators & Spatulas that are essential for a clean, professional service.
Tip #6: The Deep Clean Routine for Stubborn Stains
Okay, so you did not get to it in time. It happens to the best of us. You now have a tray that looks like a modern art piece. Do not panic. There are ways to bring it back from the brink. For non-porous trays, you can create a paste using baking soda and water and apply it to the stain. Let it sit for a few minutes, then scrub gently. The mild abrasiveness of the baking soda helps lift the pigment. For tougher stains, you can try a specialized plastic stain remover or a soak in a diluted bleach solution (only if the tray is bleach-safe, of course). For silicone trays, you can sometimes bake them in the oven at a low temperature to release the oils and pigments (but please, do your research on the specific product first!). The goal is to break down the chemical bond, and sometimes that requires a little patience and the right salon disinfectant.
Tip #7: Rotate Your Stock and Stay Organized
Just like you would not use the same toothbrush forever, you should consider rotating your service trays. Have a few dedicated trays on hand so you are not rushing to clean one in between clients. If a tray gets a particularly stubborn stain, set it aside for a deep clean and grab a fresh one. An organized station is an efficient station, and efficiency is money in the bank. Stock up on Bottles & Jars and Mixing Bowls to keep everything in its place. Remember, a clutter-free workspace is a happy workspace, and a happy workspace leads to happy clients. By keeping a steady supply of clean, unstained trays, you are always putting your best foot forward.
Conclusion: Stop the Stain, Save Your Sanity
Let us face it, removing Tint Stains from your Service Trays is nobody’s favorite part of the day. But by incorporating these simple, proactive tips into your workflow, you can minimize cleanup time, extend the life of your equipment, and maintain that flawless, professional image your clients expect. It all comes down to being mindful during the mixing process, cleaning quickly, and using the right tools and products for the job. Here at Pure Spa Direct, we are committed to helping beauty professionals like you look and perform your absolute best. Whether you are a Master Esthetician, a Master Barber, or a Master Nail Technician, we have the wholesale supplies you need to succeed.
So, go ahead, mix that perfect shade of brown, create those show-stopping lash lifts, and transform your clients with confidence. With these stain-busting strategies in your back pocket, you can keep your service trays looking as fresh and clean as the faces you work on. Now, get out there and make some beauty magic! And if you need to stock up on all your salon essentials, from Waxing Supplies for Professionals to Premium Skincare Products for Spas and Salons, you know exactly where to find us. Happy tinting!