Better solutions, better outcomes... or at the very least, less time spent chipping mystery gunk off your equipment with a credit card, right? Let's be real for a second: running a busy spa or salon is a whirlwind of back-to-back Brow Lamination appointments, rushed lunch breaks, and the eternal hunt for that one specific spatula you *know* you just had. In the middle of all that glorious chaos, your Professional Wax Warmer is the unsung hero of your studio. It sweats over a hot pot all day so you don't have to. But look. We have to talk about the elephant in the room. Or rather, the crusty, multi-layered, geological-fossil of hardened wax clinging to the rim of your otherwise flawless machine . I know you see it. I see it. Your clients definitely see it when they sneak a peek at your table. It's time to tackle that gunk, babe. And spoiler alert: it takes way less time than the drama you are building up in your head.
Welcome back to the Pure Spa Direct blog, where we take the mess out of the money-makers. If you have been avoiding the deep clean because you think it requires industrial solvents and an engineering degree, I am here to save your manicure. Cleaning your wax warmer isn't just about aesthetics—though, let's be honest, a clean station makes you feel like the boss you are. It is about safety, extending the life of your equipment, and keeping that wax silky smooth for your clients. Whether you are team ItalWax or loyal to Cirepil, a dirty pot ruins the vibe. So grab a paper towel, put on your favorite playlist, and let's get this bread—err, wax—off your machine.
The "Why" Behind the Grime (And Why We Can't Ignore It)
Before we dive into the gritty details, let's validate your struggle. Wax gets messy because it is a sticky, delicious goo when hot and a concrete fortress when cold. When you pull that applicator out too fast, or when a client flinches during a stripless hard wax pull, the wax drips. It lands on the rim, drips down the side, or worse, seeps into the crevices of your warmer . Over time, that buildup isn't just ugly; it's unhygienic. Warm, dark, sticky places are where bacteria goes to throw a party, and we did NOT RSVP to that event. Plus, if you are using higher-end wax strips and rolls, you want that wax at the perfect temp. A caked-on warmer heats unevenly. A clean warmer equals happy wax, happy clients, and happy you. We are also talking about state board compliance here, folks! Many regulations require the exterior of wax pots to be cleaned daily to prevent contamination . So let's keep that license safe and shiny.
The Golden Rule: Unplug That Baby (Please!)
Okay, drill sergeant moment. I know you are tempted to leave it on because "warm wax wipes easier." Stop it. Right now. Put the metal scraper down and step away from the outlet. Cleaning a wax warmer while it is still plugged in is a recipe for a burned hand, a melted uniform, or a shocking experience you definitely don't want to explain to the fire marshal . Turn the unit off and unplug it. Let it sit for about 15-20 minutes. We want the wax to be solid enough to scrape, but warm enough to be pliable. Think the texture of cold butter, not frozen steak. If your pot is empty and you turn it on by accident, you can actually burn out the heating element . So, safety first, jokes second.
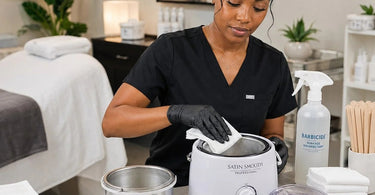
Method 1: The Daily Wipe Down (The No-Fuss Clean)
You are slammed. You have a wax spatula in one hand and a latte in the other. I get it. The daily clean should take 60 seconds. Once your warmer is off and slightly cooled, grab a wad of sturdy paper towels. Do not use that cheap stuff that disintegrates on contact. Now, wipe the rim. Wipe the lid. Wipe the outside where you inevitably dripped wax while chatting with Carol about her vacation. For the inside rim, use a cotton round or a popsicle stick wrapped in a paper towel . If there is a little wax residue left, spritz a bit of isopropyl alcohol (70% or higher) on a fresh towel and give it a final swipe. This disinfects and degreases . That is it. Done. Now you can clock out and not feel guilty.
Method 2: The Weekly Deep Clean (The "Glow Up")
Sunday night. Glass of wine. A true crime podcast. It is time to show that wax warmer who is boss. If you haven't cleaned it all week (no judgment, we have all been there), you are going to need a few tools. Grab your applicators and spatulas (plastic or wooden, not metal!), a bottle of baby oil or mineral oil, some cotton balls, and a dedicated professional cleaner like Depileve cleaner if you have it .
Step 1: The Big Scoop. Turn the warmer on low for just a few minutes to soften the top layer. Turn it OFF and unplug. Using a disposable wooden stick, scrape the big chunks of wax off the rim and out of the pot. If the wax inside is clean (no hair, no dust), you can save it. If it looks cloudy or smells weird, toss it! Sanitation is non-negotiable .
Step 2: The Oil Slick. Take a paper towel and soak it with baby oil or mineral oil. Wipe down the entire rim. Oil breaks down the wax polymers, turning that rock-hard mess into a slippery goo. For the tight lip around the heating element, use a cotton swab dipped in oil. Let it sit for two minutes. You should see the wax literally sliding off .
Step 3: The Sanitizer. Now that the wax is gone, we need to kill the germs. Take a fresh cloth and spray it with isopropyl alcohol. Wipe the entire unit—inside and out. This removes the oily residue and ensures the surface is hygienic for your next waxing service .
Step 4: Dry & Air Out. Leave the lid off. Let the warmer sit for an hour to ensure all the alcohol evaporates. Never seal a damp machine. We don't want mold joining the bacteria party.
The "Oops, I Used Metal" Emergency Fix
Did you scratch it? It happens. Maybe you grabbed a metal tool because the wax was winning. Now you have a scratch. Don't panic. Superficial scratches aren't the end of the world, but deep grooves are bacteria traps. If you scratched a stainless steel pot, you can buff it gently with a very fine grit sandpaper (1000+ grit) used dry, just to smooth the edges. If you scratched a non-stick coating, it is time to start saving for a new unit because the non-stick is compromised . Next time, stick to plastic or wood!
How to Handle The Dreaded Burnt Wax Smell
If your warmer smells like a science experiment gone wrong, you likely have wax stuck to the heating element itself. This requires a more delicate touch. Unplug the unit and let it cool completely. Turn it upside down over a trash can (if it is portable). Use a hairdryer on high heat to melt the wax from the bottom coils. Wipe immediately. If the wax is burned onto the element permanently, it will always smell. Unfortunately, that is the universe telling you to upgrade to a newer model, like a digital roll-on wax cartridge system or a fresh Spa Masters warmer from our site.
Pro-Tips for the Lazy (Or Efficient) Professional
We love a life hack. Here is how to prevent the mess before it starts.
- Can Liners: Did you know you can buy disposable liners for your wax pot? It is like a trash bag for your wax. When it gets dirty, you just lift it out. Zero scrubbing. Find them in our Waxing Accessories & Removers section.
- The "Twist" Pull: When removing the applicator or the client's hand from soft wax, do not yank it straight up. Twist your wrist. This breaks the surface tension and stops that long, stringy drip from hitting the rim . It takes practice, but it saves hours of cleaning.
- Collars are King: Silicone wax warmer collars fit over the top of your pot. They catch 90% of the drips. You just peel off the silicone, snap it to crack the wax, and rinse it in the sink. Game. Changer.
Beyond the Warmer: Don't Forget Your Station
While you are in cleaning mode, look around. Is your massage table sticky? Did you spill pre-wax oil all over the table paper? A clean wax warmer deserves a clean station. Wipe down your spa tools, sanitize your high frequency machines, and for the love of all that is holy, change that towel steamer water . Your future self will thank you when you walk into a fresh, clean room on Monday morning.
The Bottom Line (And a Little Tough Love)
Cleaning your professional wax warmer is not the worst part of the job; it's the part of the job that protects your investment. You wouldn't let your hair shears rust, right? Don't let your wax warmer crust over. If your machine is looking rough, maybe you just need new gear. Check out our massive selection of wax warmers, bulk wax deals, and complete waxing kits. We have everything from Lycon to Waxness. Now go forth, scrape that wax, and keep being the clean, mean, hair-removing machine you were born to be. You've got this.
)