Quality transforms your business. But let's be real, honey: nothing screams 'high quality' quite like handing a client a nail brush that looks like it fought a glitter bomb and lost to a ghost from a microbiology lab. We've all been there. You're mid-manicure, reaching for your trusty brush to sweep away that last bit of cuticle dust, and you catch a glimpse of it. There it is. A little... something. Maybe a speck of old polish. Maybe a shade of beige that Mother Nature never intended. And suddenly, your client's polite smile freezes. Your soul leaves your body. You start mentally calculating the cost of moving to a new city and opening a 'Tiny Spoon' museum just to escape the shame.
Let’s hit the emergency stop button on that horror movie scene. You are a professional. Your Professional Nail Care tools are an extension of your artistry and your ethics. A dirty nail brush isn't just gross; it's a petri dish with a handle, and it's the fastest way to turn a loyal customer into a Yelp reviewer with a vendetta. Today, we are going to channel our inner germ-fighting fairy godmother and learn exactly How To Properly Sanitize A Professional Nail Brush. Grab your lab coat (or your favorite stained apron), and let’s deep dive into the sudsy, squeaky-clean truth.
Why Your Little Brush Is A Big Deal (Don't Panic!)
Okay, take a breath. That slightly crunchy, definitely not-pink-anymore brush isn't a bio-weapon yet. But think about everything it touches. It scrapes up dead skin cells (lovely), flicks away nail dust (gross but necessary), and sometimes takes a swan dive into the bottom of your bowl of soapy water. That's a three-course meal for bacteria, fungus, and things that should only exist in a sci-fi channel original movie. Professional Cleaners and Disinfectants exist for a reason, and your nail brush is begging for a spa day of its own.
The good news? You don't need a hazmat suit. You just need a routine, the right products, and a tiny bit of elbow grease. I promise it's easier than convincing your barber that you actually meant to ask for 'a little off the top' and not a buzz cut. Let's break down the steps so you can sleep soundly, knowing your brushes are cleaner than your dating history.
Step One: The Great Pre-Cleanse (Get The Chunky Stuff Out)
Before we bring out the big guns (disinfectants), we need to get physical. Literally. Take your sad, crusty nail brush and tap it firmly against the side of a trash can. Bang it a few times. Enjoy the thwacking sound. It's surprisingly therapeutic. This loosens up the big chunks of dust, dead skin, and whatever that mystery crumb is. Next, run it under warm running water. Use your fingers to massage the bristles and dislodge any stubborn party guests. You're basically giving your brush a pre-rinse before its bubble bath. Don't skip this! Trying to sanitize a brush that's covered in debris is like trying to mop the floor without sweeping first. You're just pushing mud around. For top-notch supplies to make this whole process easier, you know we have you covered with all your Manicure Essentials.
Step Two: The Sudsy Scrub (Soap Is Your BFF)
Now we get to the fun part: the actual washing. Grab a small bowl (not the one you use for your lunch, please) and fill it with warm water and a few drops of a good antibacterial soap or a dedicated Spa Tool cleaner. Swish the brush around like you're a witch making a cleanliness potion. Then, take the brush and scrub it against the palm of your gloved hand. Yes, you should be wearing gloves. We're not animals. Work up a good lather, making sure the soap gets deep into the bristles. Rinse thoroughly. If the water looks like a swamp monster's tears, repeat the process. We're aiming for clear water and fluffy, squeaky bristles. This step removes the oils, waxes, and residual products that can shield microorganisms from your disinfectant. Think of it as stripping the bed before laundry day. You wouldn't put a dirty duvet cover in the wash, would you? (Okay, maybe you would, but we're trying to be professional here.)
Step Three: The Disinfectant Dunk (The Magical Germ-Death Pool)
Here is where the magic happens. Washing cleans, but sanitizing/disinfecting kills. You need a hospital-grade disinfectant that is specifically made for salon tools. Check your local state board regulations, but generally, you want an EPA-registered disinfecticide. Follow the mixing instructions to the drop. Seriously. If it says one ounce, don't get cocky and add two. You're not making a spicy margarita. Pour your mixed solution into a plastic or glass container. Submerge your Nail Brushes and Tools completely. Walk away. Set a timer for the exact contact time listed on the bottle (usually 10 minutes). Do not guess. Do not 'eyeball it.' Bacteria do not respect your intuition. While you wait, go check your Towel Steamer or fold some linens. When the timer goes off, remove the brush with clean tongs or gloved hands. Rinse it thoroughly with clean, warm water to remove any chemical residue. Nobody wants chemical burns on their cuticles.
Step Four: The Artisanal Drying (Patience, Grasshopper)
This is the step that everyone, and I mean everyone, messes up. You cannot put a wet brush back in a drawer. You cannot put a wet brush back in a sealed plastic container. That is how you raise a science experiment that will earn you a doctorate in 'Eww.' After rinsing, shake that brush like it owes you money. Flick it a few times. Then, place it bristles-down on a clean, dry, paper towel. You can also stand it up in a well-ventilated area. If you have a UV Sterilizer that has a drying function, even better! But time and gravity work just fine. Let it dry completely. Not 'kinda dry.' Not 'I'll just blot it.' Completely dry. This can take a few hours, which is why you need several brushes in rotation. A dry environment is a dead environment for microbes. Wet bristles are a party bus for bacteria.
The Holy Grail: The Daily vs. The Weekly Ritual
Daily Cleaning (Quick & Dirty - But Actually Clean)
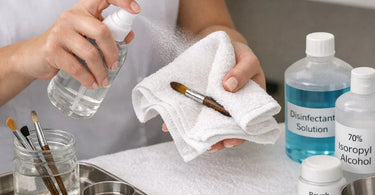
After each client, you should be doing a 'quick clean.' Rinse the brush under hot water, scrub with soap for 30 seconds, rinse, spray with a rapid disinfectant spray (like a 70% isopropyl alcohol solution in a spray bottle), and let it air dry before the next client. This prevents cross-contamination and keeps your brushes from looking like they've survived a war.Weekly Deep Clean (The Full Monty)
Once a week (or daily if you're a high-volume shop), follow the full four-step process above: pre-clean, soap wash, disinfectant soak, and complete drying. This is the non-negotiable, this-is-how-we-stay-open, my-license-depends-on-it clean. Do not skip it. Your state board inspector will not find your 'But I was really tired!' excuse as charming as I do. While you're at it, make sure your entire station is gleaming. Check out our Professional Cleaners & Disinfectants to keep your whole salon spotless.The 'Oops, I Ruined It' Checklist (When To Say Goodbye)
Sometimes, no amount of scrubbing can save a relationship. Or a nail brush. Here's how to know when to break up with your bristle buddy and order a fresh pack from Spa Masters or Prosana via Pure Spa Direct:
- The Melted Plastic Monster: If you accidentally soaked it in pure acetone or a harsh chemical and the handle is now sticky or the bristles look like a melted troll doll. Toss it.
- The Stubborn Shadow: You've cleaned it 47 times, but the base of the bristles is still permanently stained a concerning color. Bacteria can hide in those stains. Bye-bye, brushy.
- The Shedding Scandal: If every time you use it, your client ends up with more bristles on their nail bed than dust. It's time to retire it to the trash hall of fame.
- The Funky Smell: If it smells like a high school gym locker even after a deep clean, the microbes have won. Surrender and replace.
Pro-Tips From A Slightly Neurotic Nail Tech (That's Me!)
- Multiple Brushes: You need at least 5-10 nail brushes. One for each station and a few backups for the wash rotation. It's not a luxury; it's a sanity saver. Check out our Nail Files & Buffers while you're stocking up on brushes.
- Label Your Brushes: Use a label maker or a bit of colored tape to mark brushes for 'natural nails' vs. 'acrylic fills' if you want to get super fancy about cross-contamination. You do you, germaphobe queen!
- Avoid Wooden Handles: Wood is porous and holds onto moisture and germs like a sponge. Stick to plastic or silicone handles for brushes that are fully submersible and easy to sanitize.
- The Sonic Cleaner Hack: Some pros love throwing their brushes (plastic ones only!) into an ultrasonic jewelry cleaner with disinfectant solution. It gets deep into the bristles. Just make sure your brushes are rated for it.
Real Talk: Sanitization vs. Sterilization vs. My Sanity
Let's get our terms straight so you can sound smart at your next industry happy hour. Cleaning (soap and water) removes dirt and grime. Sanitizing (the chemical soak) reduces bacteria to a safe level. Sterilizing (autoclave) kills absolutely everything, including bacterial spores. For a nail brush, proper sanitization is the industry standard. You don't need an autoclave for your brush. You just need a good routine and high-quality disinfectants. Save the autoclave for your metal cuticle nippers. Which reminds me... if you aren't properly sanitizing your Pedicure Supplies and metal implements, we need to have a very different, much more serious conversation.
And speaking of serious, let's look at some of the fabulous brands we carry that make this whole process easier. Whether you need new brushes or the perfect sanitizer, Pure Spa Direct has your back. We don't make the stuff (we're distributors, not manufacturers), but we sure do know how to find the best of the best for you. Need a new Nail Table and Manicure Station to display those sparkling clean brushes? Boom. Need High-Quality Towels to dry your hands after all this scrubbing? We got you. How about a Professional Gel Polish to apply with those clean tools? Yes, ma'am. Our Top-Quality Equipment & Furniture ensures your whole space is as clean and inviting as your tools. Check out our ItalWax, Berodin, or Waxness for the hair removal side of your business, because your waxing tools need love, too! And for the love of all that is holy, please don't forget to sanitize your Body Brushes, Loofahs & Puffs. It's a whole ecosystem of cleanliness!
So, there you have it. The not-so-glamorous, completely essential guide to not being 'that' salon. The one with the icky brushes. You are better than that. Your clients deserve better than that. Your Nail Art Supplies may be flashy, but your hygiene should be flawless. Now go forth, sanitize with vigor, and may your brushes always be fluffy and your clients be loyal. You've got this. And if you need supplies, you know where to find us. We'll be over here, soaking our own metaphorical brushes and trying to get the glitter out of our hair.
)