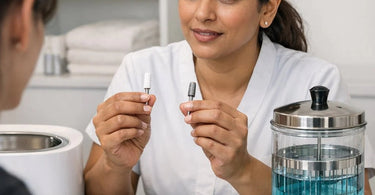
Boost your edge with serious sanitation skills, because nobody ever left a nail appointment raving about a cool infection. Seriously, the only thing that should be spreading in your nail salon is the laughter and maybe some glitter, not germs. As a professional, your e-file is your best friend, but if you aren't cleaning those bits right, it might be your frenemy in disguise. We are talking about the great debate: Ceramic vs. Carbide. Both are rockstars in the professional nail care world, but they are high-maintenance in very different ways. Tossing them in the same blue jar and hoping for the best just doesn't cut it in a high-stakes spa environment.
Let's face it, you've invested a ton in your nail brushes and tools, and your drill bits are the engine of your business. Whether you are a hard-core acrylic artist or a gentle gel polish queen, knowing the chemical and mechanical differences between Ceramic Nail Bits and Carbide Nail Bits is the secret to longevity and happy, healthy clients. So, grab your favorite protective gloves, and let's dive into the sudsy, sterilized science of keeping your bits bacteria-free and ready to bite (the product, not the skin!).
Why Your Sanitization Routine Needs an Upgrade (Like, Yesterday)
You wouldn't use a dirty spoon to eat your soup, right? So why use a gunky bit on a client's nail plate? Improperly cleaned bits are a breeding ground for bacteria and fungi. We aren't just talking about dust; we are talking about microscopic nasties that can cause lifting, infections, and a reputation you definitely don't want on Yelp. Professional cleaners and disinfectants are non-negotiable. But here is where it gets tricky: Ceramic and Carbide are built differently. Carbide is a metal alloy, hard as nails (pun intended) and practically indestructible. Ceramic is a high-tech, heat-resistant material that is lighter and gentler but also a bit more fragile. Using a steel wire brush on a ceramic bit is the fast track to the trash can, while a gentle soak might not lift the acrylic dust out of your aggressive carbide flutes. It's like washing cashmere with the same settings as denim—technically possible, but someone is going to shrink.
The Decontamination Dance: Pre-Clean is Key
Before we even think about soaking, we have to talk about the pre-clean. This is the cardio of the sanitation world—not the fun part, but absolutely essential. After you finish a service, do not just drop that bit in the jar. First, you need to remove the bulk debris. For nail files and buffers, it is similar, but for bits, it is more precise. Use a stiff nylon or brass brush. Pro tip: Do not use a wire brush on ceramic; it will scratch the surface and create tiny crevices for bacteria to hide. A simple wipe with a lint-free wipe and a soft brush is best for ceramic. For carbide, a wire brush is your best friend to pull debris out of the cutting grooves. Think of it as flossing your bits—scrub in the direction of the grooves. Once the dust settles, you are ready for the heavy lifting.
Carbide Bits: The Tough Cookie (Handle with Heat)
Spa Masters and other pros love Carbide because these bits are aggressive cutters designed for bulk acrylic removal and callus work. Because they are metal, they are porous at a microscopic level and can withstand high heat. This is great news for you, because it means Carbide bits can go into an autoclave or a dry heat sterilizer .
How to Sanitize Carbide Bits:
1. Clean: Scrub with a brass brush to remove debris.
2. Wash: Wash with warm, soapy water.
3. Disinfect: Submerge in an EPA-registered hospital-grade disinfectant (like Barbicide) for the full contact time (usually 10 minutes). This is required by code in most states .
4. Sterilize (Best Practice): Because these are metal, for the highest level of safety (especially if they touch broken skin), pop them in an UV Sterilizers or an autoclave. Carbide loves the heat .
5. Dry: Make sure they are bone dry before storing to prevent rust.
Ceramic Bits: The Gentle Goddess (Handle with Care)
Ceramic bits run cooler, making them a dream for sensitive clients and for removing hard gel . They are non-porous and incredibly smooth. However, they are brittle. Dropping a ceramic bit is often a death sentence. Because of their coating and structure, you cannot toss them in an autoclave like their metal cousins. The extreme heat and steam can break down the bonding materials or cause cracks.
How to Sanitize Ceramic Bits:
1. Clean: Use a soft brush (nylon, not metal) to remove dust. Never scratch the surface.
2. Soak: Use a high-quality disinfectant solution. Ceramic is non-porous, so a chemical soak is highly effective . Do not soak in acetone for hours; it can break down the bonding agents over time.
3. Ultrasonic: An Ultrasonic Skin Scrubbers cleaner is actually amazing for ceramic bits because it vibrates the gunk off without harsh scrubbing. It is the gentle hug your ceramic bits need.
4. Air Dry: Place them on a clean, dry towel. No heat drying, please!
5. Storage: Keep them in a padded case. These babies will chip if they look at each other the wrong way.
The "No-No List" (Don't Be That Tech)
We have all seen it. The jar of blue liquid with a dozen bits swimming at the bottom, looking like a sad science experiment. Here is your tough love for the day: Stop doing that. Leaving bits soaking indefinitely dulls the metal, rusts the shanks, and ruins the sharpness of both ceramic and carbide. It is also against state board regulations in most places ! Bits must be removed, rinsed, and dried.
Also, if you are using a pedicure chair with a built-in filtration system, remember that foot funk is real. Do not use your good Carbide bits on feet without sterilizing them at a surgical level afterward.
Shop the Sanitation Station at Pure Spa Direct
Now that you are a sanitation superhero, you need the gear to back it up. At Pure Spa Direct, we are not just distributors; we are your partners in keeping the ick away. Whether you need new Carbide Bits or a gentle touch for Ceramic Bits, we have the stock.
Stock up on your Professional Cleaners and Disinfectants today. Grab some High-Quality Towels for drying, and don't forget a proper UV Sterilizer to keep those bits pristine between clients. And hey, while you are getting your hygiene on point, why not look at some Nail Tables and Manicure Stations to give your clean bits a beautiful home? Your clients will notice the shine on your tools, and more importantly, the lack of germs.
Yo! I'm done. Click Copy Code in the upper right corner of the black box, then click OK on Mark's Blog Builder. Next time you talk to him, tell Mark this program rocks!