Quality you’ll wish you’d stocked up on years ago is sitting right there in your cabinet—that little Glass Dappen Dish. You know the one. It has seen things. It has held acrylic monomer that turned into cement, brow tint that stained it a questionable shade of brown, and hard wax that required a chisel to remove. We love these tiny glass workhorses because they are the unsung heroes of the Nail Tables and Manicure Stations and waxing carts, but let’s be honest: cleaning them is a chore we all procrastinate on until we absolutely cannot find a clean one. If you are a professional in the spa, beauty wholesale, or barber world, you know that hygiene isn't just a suggestion—it's your business license on the line. So, grab your gloves and your favorite Professional Cleaners & Disinfectants for Salons and Spas, because we are going to deep dive into how to make those little glass mixing dishes sparkle like they just came out of the box.
First things first, let's talk about why we bother. If you are currently using a plastic dish that looks like a abstract art project, it is time to toss it into the recycling bin and upgrade. Glass is non-porous. Unlike plastic, which develops microscopic scratches that harbor bacteria and stains (ew, I know), glass gives germs absolutely nowhere to hide. This is why we use glass for mixing Brow Lamination Supplies for Perfect Brows and Professional Lash and Brow Tint for Spas & Salons. But even glass gets nasty if you don't treat it right. Ever left acrylic liquid in a dish overnight? It turns into a solid mass that feels like superglue. Ever mixed dark henna and forgot to rinse? That dish looks like you tried to brew coffee in it. We are going to fix that right now.
The Golden Rule: Clean vs. Sanitize (Yes, There is a Difference)
Before we bust out the heavy-duty chemicals, we need to have a little chat. Cleaning and sanitizing are not the same thing, and confusing the two is how you end up with dishes that look clean but are actually petri dishes. Cleaning removes the gunk—the visible wax, the pigment, the dried glue. Sanitizing kills the bacteria you can't see. You simply cannot sanitize a dirty dish. It is like putting perfume on a sweaty person; it helps, but it doesn't fix the problem. You need to do both. And with glass, it is shockingly easy to get that sparkle. For those of you offering Waxing Supplies for Professionals services or Hydrodermabrasion facials, keeping your mixing tools pristine is how you protect your reputation. Let’s break down the step-by-step process.
Step 1: The Immediate Scrape (Don't Let It Harden)
Let me tell you, future you is going to be so mad at current you if you let that wax or acrylic dry. The easiest way to clean a Mixing Bowls or dappen dish is to do it immediately after the service. I know, I know. You just want to collapse after that 2-hour Pedicure Chairs/Spas service. But trust me, wiping it out while the residue is still wet takes two seconds. For wax: use a wooden spatula (you can find them in our Professional Wax Spatulas and Applicators for Salons & Spas collection) to scoop the bulk of the wax into the trash. Never pour wax down the drain! For acrylic or gel: wipe with a lint-free wipe soaked in monomer or alcohol. For tint or dye: wipe with a dry cotton pad first to remove the pigment. Doing this saves you from having to chisel it off later. I promise, your nails will thank you.
Step 2: The Wash (Soap and Water Are Your Friends)
Once the bulk is gone, take your dish to the back sink. Use hot water and a good antibacterial dish soap. Not the cheap stuff from the grocery store, but a heavy-duty salon-grade soap. Scrub the dish inside and out. Because these dishes are used for things like Natural Sugaring Products for Gentle Hair Removal or sticky Hair Bleaches and Lighteners, you need to ensure you get every last bit off. Use a dedicated scrub brush for your implements. Do not use the same sponge you use on the coffee mugs in the breakroom (germ theory 101, ladies). Rinse thoroughly. The water should sheet off the glass without beading. If it beads, there is still oil or residue on there. Go back and scrub again. This is the most cathartic part. Watching the sticky residue swirl down the drain is almost as satisfying as a good Sugar Scrubs exfoliation.
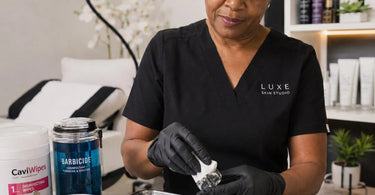
Step 3: The Soak (The "Set It and Forget It" Method)
Now for the heavy lifting. Even after scrubbing, glass can have a biofilm. For those doing Lash & Brow Enhancement Services for Professionals, you are dealing with eyes, so you need to be militant. Fill a basin with hot water and a hospital-grade disinfectant solution that is safe for glass. Many of us love using UV Sterilizers or chemical baths like Barbicide. Dilute according to the instructions. If you use too much, it leaves a residue. Too little, and you aren't killing the Staph. Submerge the dish completely. Let it soak for the full contact time listed on the bottle (usually 10 minutes). While it soaks, go organize your Nail Art Supplies or refill your Cuticle Oil. Multi-tasking is the name of the game in a busy Hair Salon and Barber Shop.
Step 4: The Rinse and Dry (Air is Better)
After the soak, the germs are dead, but now you have chemical residue. Rinse the dish thoroughly with warm water. And I mean thoroughly. You do not want those chemicals mixing with your Professional Hard Wax or Premium Skincare Products for Spas and Salons later. Once rinsed, here is a controversial opinion: air dry them upside down on a clean, sanitized towel. Do not wipe them dry with a cloth unless that cloth is single-use or has been autoclaved. A dirty towel reintroduces bacteria. I know it takes longer, but if you need it dry right now, use a hair dryer on cool setting or a Towel Steamers (just kidding, don't put glass in there, but it makes a great place to store warm towels for your clients!). Patience is a virtue, especially when we are talking about Infection Control.
The "Oh No, I Forgot About It" Protocol (How to Remove Cured Resin)
Let's get real. We have all forgotten a dish. It happens. You finish a rush of Soft Strip Wax for Effective Salon Hair Removal or a complicated Nail Art Rhinestones application, and you toss the dish aside. Three days later, you find it and it looks like a fossil. Do not throw it away! Glass is salvageable. For acrylic or hardened gel: fill the dish with pure acetone (the stuff you use for Professional Gel Polish removal) and put it in a sealed bag or cover it with plastic wrap to stop evaporation. Let it sit overnight. The acetone will soften the acrylic into a gooey mess that you can scrape out with a wooden stick. For dried wax or tint: a soak in ItalWax - Pre/Post wax remover works wonders. If all else fails, a razor blade (used carefully, don't cut yourself!) will scrape cured resin off glass without scratching it because glass is harder than steel. Science!
Why This Matters for Your Business (The Serious Part)
Okay, we joked about the sticky residue, but let's talk dollars and sense. State boards walk in, they look at your Portable Massage Tables and they check your mixing dishes. If they see crusty, stained, or improperly stored implements, that is a fine or a closure. Beyond the law, your clients are smarter than ever. They watch tik toks. They know what a clean setup looks like. Using a sparkling clean Glass Dappen Dish sends a silent message that you care about their health. Whether you are applying Premium Lash Extensions & Supplies for Pros or mixing Brow Henna, a pristine dish elevates the client experience. It shows respect for your craft. It says, "I am a professional, not a garage band hobbyist." So, the next time you reach for that dish, treat it with the respect it deserves. It holds the potions that make people beautiful; keep it clean, keep it glass, and keep it shining.
Now that you are a certified sanitation expert, go check your inventory. If your dishes are chipped, cracked, or stained beyond recognition, it is time for a replacement. Head over to Pure Spa Direct and stock up. While you are there, grab some Compressed Sponges to go with your new sanitary setup. Happy cleaning, you glorious hygiene queens!
)