Boost your business with this now... because nothing kills a relaxing lash appointment vibe faster than a client wondering if your tweezers have seen more action than a frat house sponge. Let's be real, ladies. In the world of lash extensions, your tweezers are your ride-or-die. They are the extension of your hands, the Michelangelo's brush to your lash masterpiece. But here's the tea: even the most expensive, perfectly weighted, Instagram-famous tweezers are useless—and frankly, disgusting—if they aren't properly sanitized. We aren't just playing beauty shop back here; we are performing medical-adjacent procedures around someone's eyeballs. The margin for error isn't just slim; it's the width of a single lash. So, grab your favorite hospital-grade disinfectant and your sense of humor, because we are about to deep dive into the squeaky-clean world of tweezer hygiene. Your clients' eyes (and your liability insurance) will thank you.
Have you ever dropped a tweezer on the floor mid-service and felt that cold sweat trickle down your spine? You look at the client, she looks at you, and we all know that the "five-second rule" is a myth invented by toddlers and college students. For a professional, that tweezer is now considered a biohazard until proven otherwise . It is moments like these that separate the hobbyists from the high-volume, high-trust Lash & Brow Enhancement pros. Standardizing your sanitation protocol isn't just about passing a health inspection; it is about building a brand that screams "I respect your eyeballs." Let's get into the nitty-gritty (which we will then immediately scrub away) of how to keep your tools in fighting shape.
Why Your Tweezers Are Dirtier Than You Think (Even If They Look Clean)
Visual cleanliness is a liar. Seriously, it is the ultimate catfish of the beauty world. You might wipe a smear of lash adhesive off your tweezers and think, "Looks good to me!" But bestie, no. Microscopic bacteria, old adhesive residue, and even tiny skin cells love to hide in the serrations and the pivot joint of your favorite pair of Lash & Brow Service Supplies. If you skip the deep clean, you aren't just risking a slipped grip; you are risking a nasty eye infection like conjunctivitis or a stye. And let me tell you, a client posting a picture of her red, angry eye on Yelp is the absolute worst kind of viral marketing . We want our work to go viral for the right reasons—like that incredible brow lamination or a mega-volume set—not because we turned someone's eye into a science experiment. Proper hygiene is the silent, sexy secret behind every successful lash artist's chair.
The Lingo Lesson: Cleaning vs. Sanitizing vs. Sterilizing
Before we start scrubbing, we need to get our terminology straight. Walking into a salon back room and mixing these words up is like asking for a "perm" when you actually want a "relaxer." The results are not the same. First, we have Cleaning. This is the physical removal of goop, oil, and glue using soap and water. Think of it as taking out the trash so you can actually see the floor. Next is Sanitizing/Disinfecting. This uses an EPA-registered chemical to kill the vast majority of germs on a surface . It is perfect for your countertops and wax warmers. However, for our lash tweezers? We need the big guns. We need Sterilization. Sterilization is the nuclear option. It kills literally everything, including bacterial spores that survive a regular sanitizing cycle. For reusable metal tools that get near the eye, sterilization is the law in many states, not just a suggestion .
Step 1: The Immediate Aftercare (Don't Let the Glue Win)
You just finished the most bomb set of Premium Lash Extensions & Supplies. The client looks like a Disney princess. Do NOT just toss your tweezers in a drawer. Lash adhesive is like that toxic ex who refuses to leave—if it dries, it is incredibly hard to get off. Immediately after your service, take a lint-free wipe saturated with a lash adhesive remover or high-grade alcohol and gently wipe the tips of your tweezers . Be careful not to get it in the hinge! That can wash out the lubricant. You want to remove the bulk of the sticky residue while it is still fresh. Place the used tool in a designated "dirty" container. Do not mix dirty tools with clean ones. That is just chaos, and we don&t support chaos in a stylish salon.
Step 2: The Deep Clean (Scrub-a-Dub-Dub)
Once you have a minute to breathe (and probably a sip of coffee), take your tweezers to a dedicated utility sink—not the one where you wash your coffee mugs, please. Using hot, soapy water and a small brush (a clean toothbrush works wonders), scrub every inch of the tweezer . Open and close them. Scrub the hinge. Scrub the tips. You are looking for any visible debris to vanish. This step is vital because if you throw a dirty tweezer into a sterilizer, you are essentially baking the dirt onto the metal. It is like trying to put on a face mask over a pound of foundation; it just doesn't work. Rinse them thoroughly and dry them with a clean, lint-free towel.
Step 3: The Gold Standard - Autoclave Sterilization
Now we are talking pro-level. An UV Sterilizer is great for holding onto clean tools, but for true sterilization of metal tweezers, an autoclave is the way to go . An autoclave uses high-pressure steam to get your tools squeaky clean. If you run a busy studio, you should invest in a tabletop autoclave. Place your clean, dry tweezers in sterilization pouches (the kind with the color-changing indicator), seal them, and run the cycle. Once they are done, leave them in the sealed pouch! That pouch keeps them sterile until you open it for the next client. This is the medical-grade standard that builds immediate trust. When a client sees you open a fresh pouch, they know you mean business .
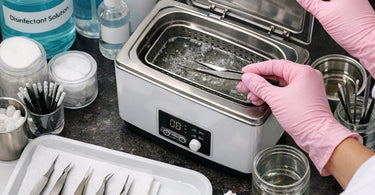
Step 4: The Chemical Bath (For When You Don't Have an Autoclave)
If you aren't ready to invest in an autoclave yet, or if you are dealing with tools that can't handle high heat, a chemical sterilization soak is acceptable, provided you are meticulous. You will need a hospital-grade disinfectant like Barbicide . Read the label! That pink liquid isn't just for decoration; it requires a specific dwell time (usually 10 minutes) to actually kill the germs. You cannot dip them for 30 seconds and call it a day. That is just "jalapeño business"—spicy and disappointing. Fully immerse the tweezers in the solution for the entire contact time. After the time is up, you must rinse them with sterile water or distilled water to remove the chemical residue . Pat them dry completely with a sterile lint-free wipe. Remember, if they are wet, bacteria can grow back.
Step 5: Drying and Storage (The Final Frontier)
Wet + Dark = Bacteria Party. Do not store your tweezers wet. Moisture is the enemy . After rinsing, dry them thoroughly. But don't just toss them loosely in a drawer where they will clang against other tools and dull the tips. For disinfected (non-sterile) tools, use a dedicated, dry, covered container. For sterilized tools (in the pouches), store them in a clean cabinet away from dust. For your daily drivers that are sanitized between clients, consider a UV sterilizer cabinet. These are perfect for storing your Professional Lash and Brow Tint brushes and tweezers while keeping them bathed in germ-killing UV light until their next appointment .
Daily & Weekly TLC for Your Expensive Friends
Lash tweezers are an investment. A good set of Lash & Brow Service Supplies can run you a pretty penny, so treat them like the precision instruments they are. Daily: Check the alignment. Close them against a light source. Do the tips meet perfectly? If there is a gap, your grip is compromised. Weekly: Check for rust or mineral deposits, especially if you have hard water. If you see any, a little oil (specifically sewing machine oil or a sanitizer-safe lubricant) on the hinge can work wonders. And for the love of all that is holy, do not drop them . Dropping a tweezer on a tile floor is a great way to misalign the tip instantly, turning your $30 precision tool into a pair of rusty pliers.
Final Checklist: The Sanity Saver
To make sure you never slip up, print this out and tape it to your mirror. Did you: 1. Wipe the glue off immediately? 2. Scrub with soap and water? 3. Run the autoclave cycle (or 10-minute chemical bath)? 4. Rinse and dry completely? 5. Store in a sterile pouch or UV cabinet? If you answered yes, you are a hero. If you skipped step three, we need to talk. You wouldn't reuse a face mask, and you shouldn't reuse "not quite clean" tweezers. Your Professional Cotton, Sponges, and Wipes are single-use, but your metal tools need that deep, loving care to last.
Stock Up Your Sanitation Station at Pure Spa Direct
You can't build a 5-star hygiene routine with dollar-store supplies. Pure Spa Direct is your one-stop shop for everything you need to keep your Salon & Spa Bedding and your tools immaculate. Whether you need replacement tweezers, high-quality disinfectants from brands like Dukal or Intrinsics, or a brand new UV Sterilizer, we have your back. We even carry the best towels and table warmers to make your client's experience so relaxing they won't even notice you obsessively sterilizing your tools. Because at Pure Spa Direct, we know that clean is the new black. Now go forth, sanitize like a boss, and keep those peepers perfect!
%20Guide%20to%20Flawless%20Hygiene)