Because efficiency is everything in our world, we professionals simply cannot afford to have a tool down, especially not a high-quality professional nail brush. You know the feeling. You are mid-service, creating a flawless pink and white, and you reach for your favorite Kolinsky sable brush only to find it stiff, crusty, and looking like it just lost a fight with a glob of liquid monomer. We have all been there. Before you toss that expensive brush in the bin and cry over the investment (seriously, those brushes are pricier than a good dinner date), take a deep breath. There is hope for that hardened soldier yet. We are going to walk through how to resurrect your beloved tools without destroying those precious natural bristles, because ruining a sable brush should be a crime punishable by having to clean the wax pots for a month.
In the fast-paced environment of a busy nail salon, your acrylic nail supplies are only as good as the tools you apply them with. A professional sable brush (especially the holy grail, Kolinsky sable) is designed to hold just the right amount of liquid and create that perfect bead. But acrylic monomer dries fast, and if you blink, it hardens deep in the ferrule. We aren't just cleaning a mess; we are performing a surgical rescue mission. So grab your gloves, put on your favorite playlist, and let us save those bristles.
Why You Cannot Just Use Acetone (Seriously, Don't Do It)
I know what you are thinking. “But Doug, acetone eats through everything! Why can’t I just dip it in the professional nail care remover?” Because, my friend, acetone is the enemy of natural hair. While it dissolves acrylic, it also strips the natural oils from sable and kolinsky hairs, leaving them brittle, dry, and frizzy. You might get the hard acrylic off, but you will be left with a broomstick instead of a precision tip. We want a brush that snaps back into a point, not one that looks like it stuck its finger in an electrical socket. Always reach for a dedicated brush cleaner or fresh monomer first. Your brush will thank you by not disintegrating in your hand.
The Gentle Soak: Using Monomer To Melt The Mess
If you have a little bit of time and a lot of love for your brush, this is the safest method. You need a small mixing bowl or dappen dish (preferably glass so it doesn't tip over). Pour just enough fresh acrylic liquid (monomer) to cover the bristles. Here is the golden rule: Do not let the monomer touch the ferrule (the metal part). If monomer (or any liquid) gets inside the ferrule, it will loosen the glue and your hairs will start falling out like a shedding dog in summer. Soak the bristles for about 20-30 minutes. You will see the hard chunks starting to soften. Once they look like soft jelly, use a orangewood stick or a clean applicator to gently scrape the gunk away. Rinse in monomer again, and lay flat to dry. Never stand them on their handle to dry—gravity pulls the water into the ferrule. We hate wet ferrules here at Pure Spa Direct.
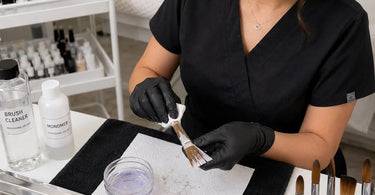
When Time Is Money: The Professional Brush Cleaner Method
Let us be real. You do not have an hour to wait for monomer to work. You have a client waiting for that ombre set. This is where a high-quality Spa Masters or specific Professional Brush Cleaner comes in clutch. These are formulated to break down hardened acrylic faster than monomer, but they are gentler than acetone. Pour a small amount into a metal or glass dappen dish. Dip just the bristles (again, avoid the ferrule!) and swirl gently. You will see the acrylic lifting almost immediately. Use a lint-free wipe to wipe the bristles clean, applying firm pressure from the ferrule out to the tip. You want to push the acrylic out, not jam it deeper into the brush. Repeat until the wipe comes away clean. This is the preferred method for techs working with dipping powder systems for salons and acrylics alike.
The Masters Brush Cleaner: The Soap That Saves Lives
Has your brush been sitting in the drawer for three weeks? Is it so hard you could use it as a nail form? We need heavy artillery, but safe heavy artillery. This is where The Masters Brush Cleaner and Preserver enters the chat. This stuff is magic. It is a soap that cleans, conditions, AND restores. Wet your brush with warm water (I know, water and acrylic usually don't mix, but bear with me). Swirl the wet bristles onto the surface of The Masters soap. Work it into a lather. You need to massage the soap into the base of the bristles. It will feel like you are giving your brush a spa day. Rinse and repeat. Sometimes it takes three or four cycles to pull all the old pigment and acrylic out of the base. The best part? It leaves the hair conditioned and soft. It is perfect for maintaining your nail brushes and tools after a long shift.
Reshaping: The Final (And Most Important) Step
Okay, the acrylic is gone. You did it. But now your brush looks like a frizzy mess. Do not panic. While the bristles are still damp, you need to reshape the tip. Use a clean, dry towel or a piece of paper. Place the brush in the towel and roll it while pulling gently. You are trying to reform that sharp point that allows you to get right up to the cuticle line without flooding the zone. I like to put a tiny drop of cuticle oil on my fingers and run it through the bristles before rolling. This mimics the natural oils lost during cleaning. A little cuticle oil goes a long way to keeping the hair supple. Once it is perfectly shaped, let it dry flat overnight. In the morning, it should snap back into shape like it just had an espresso shot.
Prevention: How To Avoid This Mess Next Time
I know you are busy. I know wax is dripping and the towel steamer is beeping. But you must clean as you go. Keep a dappen dish with brush cleaner on your station at all times. Every time you set your brush down, swirl it in the cleaner. Do not leave it sitting in the monomer pool. Do not let it bake under your LED bright lamp. Acrylic cures faster with heat, so if you set your brush near the lamp, you are flash-curing the product into the bristles. Also, store your brushes with the protective plastic sleeves on them. Dust and debris settling on a wet brush is a recipe for disaster. Treat your tools like the luxury investments they are, and they will pay you back in flawless applications.
At the end of the day, a clean brush is a happy brush, and a happy brush means happy clients who arent complaining about lumps in their acrylics. We have thousands of options to keep your salon and spa business running smoothly. From replacement brushes to bulk monomer, we are your wholesale partner in crime.
Now, go save those sable hairs. You’ve got this.
)