Clients demand excellence - deliver it... but let’s be honest, the glitter that makes their nails look like a disco ball is the same glitter that makes you want to throw your nail polish remover across the room. You know the scenario: a client walks in with ten little sparkle bombs, thinking a quick swipe will do the trick. Then you’re left scrubbing like you’re trying to win a gold medal in a friction competition, watching the cotton balls shred into a million pieces while the glitter just laughs at you. It’s not just annoying; aggressive scraping and harsh chemicals are a one-way ticket to peeling, brittle nails and unhappy clients. Fear not, because we at Pure Spa Direct have the ultimate guide to banishing stubborn glitter while keeping the nail plate healthier than a kale smoothie. We’re going to share the secrets, the tools, and the hilarious mishaps to avoid so you can be the hero your clients desperately need.
Let’s face it, glitter polish is the glitter bomb of the beauty world—it goes everywhere, stays forever, and seems to multiply when you least expect it. But as a professional, your job isn't just to make nails look pretty; it's to keep them strong and healthy underneath all that sparkle. Using the wrong technique is like using a chainsaw for surgery—effective at removal, but messy and destructive. We’re going to break down the science of why glitter sticks like glue and give you the step-by-step process to remove it with the grace of a ninja and the care of a specialist. Whether you're running a high-volume Nail Salon or offering luxury Manicure Essentials, mastering this skill will save you time and your clients' nails. Get ready to upgrade your game, save your sanity, and maybe even have a little fun doing it.
Why Glitter Polish is the Final Boss of Nail Removal
Have you ever tried to remove glitter and ended up with hands that look like you fought Edward Cullen in a jewelry store? There’s a reason for that. Unlike standard lacquer that sits on the nail surface, glitter particles are usually suspended in a tougher, more adhesive polymer base. These particles create a physical barrier that resists solvents. While a standard remover can slip between the molecules of a regular polish, that chunky glitter acts like tiny little shields, blocking the remover from fully contacting the polish base. Plus, to get that intense sparkle, manufacturers often use multi-layer application, meaning you are trying to dissolve several layers of heavy-duty plastic. It is the final boss of the nail world, and if you just try to hack and slash (or rub and scrub), you will lose HP (Healthy Plate) fast.
Understanding this is half the battle. Once you realize that you aren't fighting a monster, just a logistical problem, you can stop being aggressive and start being smart. The goal is to break down the bond without friction. This is where our professional-grade tools come into play. You need the right chemistry and the right technique to tell that glitter, "Your reign of terror is over."
The Dynamic Duo: Acetone and Patience
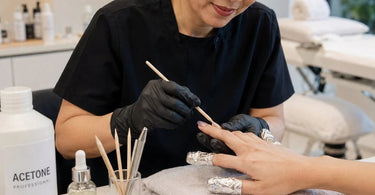
When it comes to heavy artillery, Acetone is your best friend and your client’s dry cuticles' worst enemy. In the professional world, 100% pure acetone is the gold standard for removing stubborn products like glitter, hard gels, and dip powders . It works by breaking the chemical bonds of the polish, turning that concrete-like glitter into a goopy mess that slides right off. However, with great power comes great responsibility. Acetone is a drying agent. It strips natural oils, which means if you leave it on too long or don't follow up with hydration, those cuticles are going to look like the Sahara Desert . That is where your post-care routine saves the day.
Don't even think about using those "gentle" non-acetone removers for a full-coverage chunky glitter. You will be there until the store closes, and the client will hate their life. Non-acetone is great for a quick change of sheer polish, but for sparkles? Bring out the big guns. Just remember to reinforce the importance of aftercare. Keep a bottle of high-quality Cuticle Oil at every station. Make it a ritual: the second the glitter is gone, the oil goes on. It seals the deal and makes the client feel pampered, not stripped.
The Foil Wrap Method: Your Golden Ticket
If there is one technique you need to tattoo on your brain, it is the foil wrap method. This isn't just a hack; it is the industry standard for a reason . You know those moments when a client watches you work, and you want to look like a wizard? This is it. Grab your Professional Cotton Products (pads or balls work great), soak them in 100% acetone, and place them directly on the nail plate. Then, take a small square of aluminum foil and wrap it tight around the fingertip. This does two things: it prevents the acetone from evaporating (keeping the area wet), and it traps the body heat, which accelerates the chemical reaction .
Let it sit for about 10 to 15 minutes . Go do a lash refill, grab a coffee, or chat about the reality TV drama from last night. Do not rush this. When you unwrap the foil, instead of a hard shell of glitter, you should see the polish lifting off the nail in one solid piece. If it isn't sliding off easily, do not force it. Rewrap and wait another five minutes. Forcing it is what damages the plate. We want that polish to surrender peacefully. After removal, use a gentle Nail Brush to clean up any residue from the sidewalls without scratching the nail bed.
The Buff and Break Method: Prepping the Battlefield
Sometimes, even the best polish forms a "seal" that is just too tight. If the glitter has a thick top coat (as it should for a smooth finish), that top coat acts as a raincoat against your remover. To let the acetone in, you need to break the seal. Use a fine-grit file or a buffer—gently. Do not go to town like you are sanding a deck. You just want to rough up the surface, creating micro-abrasions that allow the acetone to penetrate the layers . Think of it as opening a few windows so the fresh air (acetone) can get inside. This reduces the soak time significantly and prevents the need for aggressive scraping later.
This technique is especially great for clients who layer their glitter thickly for events. Pair this step with some Nail Files and Buffers from your kit. Remember, we are buffing the product, not the natural nail. If you see the pink of the nail bed, you've gone too far. Light hands make light work—and happier, healthier clients.
Tools of the Trade: Don't Scrape, Push!
Alright, let’s talk about tools. If I walk into your station and see a metal scraper being used like an ice pick on a frozen windshield, we are going to have words. Metal pushers are for cuticles and hard skin, not for scraping soft, dissolved polish . When you use a sharp metal tool on the nail plate, you are carving into the natural keratin. This leads to ridges, weakness, and a surface that won't hold new polish evenly. Instead, after the soak, use a wooden orange stick or a rubber-tipped cuticle pusher. These materials are softer than the nail plate, so they can nudge the dissolved glitter off without damaging the surface.
Make sure your Nail Tables and Manicure Stations are stocked with plenty of these safe tools. The motion should be a gentle push, not a scrape. If the glitter is resisting, it isn't ready. Put the stick down and step away from the nail! Go back to the foil wrap. A little bit of liquid soap mixed with the acetone can sometimes help with lubrication, but the golden rule remains: if it's not coming off, it's not ready. Let the chemistry do the work, not your arm muscles.
The Mistakes That Make Us Cry (Laughing)
We’ve all been there. Maybe you tried to rush and ended up wrapping the foil so tight the client lost circulation in their finger. Or perhaps you used a cotton ball that was too dry, and when you unwrapped it, the glitter had just sort of... melted into a sticky, sparkly mess that glued the foil to the nail. One of the biggest sins is using a low-quality remover. If you buy cheap remover, the glitter wins. Also, avoid the "twist and rip" method. Twisting the foil off like you're starting a lawnmower grinds the polish particles into the nail plate, leaving scratch marks. Always unwrap gently and wipe in the direction of nail growth.
Another comedy of errors? Forgetting the Hygienic Table Paper and spilling acetone all over your brand-new Nail Salon Furniture. Acetone is a solvent that can eat through finishes and plastics. Always have your workspace clear and covered. We want your salon to look professional, not like a chemistry lab explosion. Keep the spills contained, and your furniture will stay Instagram-worthy for years.
The Finishing Touch: Post-Removal Hydration
Congratulations, the glitter is gone! Now, do not just slap on a base coat and call it a day. The nail plate and the surrounding skin are dehydrated. They need a drink. This is where your retail magic happens. Apply a generous amount of Cuticle Oil and massage it in. Vitamin E and Jojoba oil are excellent for this. Then, use a rich hand cream or a warm towel treatment to seal the moisture. If you have a Towel Steamer nearby, a warm steamed towel wrapped around the hands for thirty seconds feels like heaven and opens the pores for deeper hydration.
This isn't just nice to do; it's necessary. Clients remember how their hands feel when they leave. If they leave dry, they blame you. If they leave soft, they rebook. Plus, you can sell them the Cuticle Oil you used! "This is what saved your nails today—you can take it home for $15." Boom. Retail therapy. This step transforms a simple glitter removal from a chore into a luxurious Spa Body Treatment for the hands.
Upgrading Your Nail Service Arsenal
While we are on the subject of nails, let’s ensure your entire setup is ready for battle. Glitter removal is just one part of a healthy nail regime. At Pure Spa Direct, we stock everything you need to ensure your clients' nails stay strong. Don't forget to recommend a strengthening base coat for the next visit. Brands like CND and OPI offer treatments that repair the nail plate after a heavy polish removal. Also, consider investing in Professional Gel Polish that actually removes cleanly when you use this technique. The quality of the product you take off is directly related to the quality of the product you put on.
If you find yourself dealing with glitter disasters daily, maybe it’s time to look at your Premium Nail Polish collection. Sometimes, the "stubborn" nature of the removal is due to a bad batch of cheap polish. Stocking high-quality brands ensures a better experience for you and the client. And always, always keep your Professional Cleaners and Disinfectants handy to wipe down those foil pieces and tools once you are done. Hygiene is as important as hydration.
Conclusion: You've Got This!
Removing stubborn glitter polish doesn't have to be the worst part of your day. By shifting from scrubbing to soaking, using 100% acetone, and mastering the foil wrap, you can save time, save your wrists, and save your clients' nails. The next time a client walks in with that chunky, chipped, two-week-old holiday sparkle, don’t sigh. Smile. You know exactly how to handle it. You are the professional, the problem-solver, the glitter-guru. And when you need the best tools to do it—from Massage Lotions to High-Quality Towels and Professional Wax Warmers (for those waxing emergencies), remember that Spa Masters and Pure Spa Direct have your back. Now go forth, banish that glitter, and make those nails shine—without the damage.
)