The easiest way to achieve greatness in the world of professional waxing is to keep your tools sparkling clean, but nobody wants to choke on toxic fumes while doing it! If you\'ve been dreading that post-client cleanup because it feels like you\'re entering a chemical warzone, we hear you. The reality is, harsh wax pot cleaners can be as unpleasant for your senses as they are for the environment, and frankly, who has time for that? We\'re diving deep into the world of savvy salon sanitation with a game-changing guide on how to sanitize non-disposable waxing pots without chemicals. This isn\'t just about being a little more green; it\'s about saving your sanity, your lungs, and your precious waxing supplies from unnecessary wear and tear. We\'re about to turn a tedious chore into a quick, breezy step that keeps your spa equipment pristine without a single whiff of harsh solvents.
Let\'s be real for a second: the wax pot is the heart of your waxing station, and just like any heart, it deserves to be treated with love (and maybe some baby oil). We\'re here to spill the tea on the best-kept secrets of the industry, proving that you don\'t need a cabinet full of questionable chemicals to achieve hospital-grade cleanliness. Whether you\'re rocking a top-tier Professional Wax Warmer or a multi-purpose unit, these techniques will keep you running like a well-oiled machine. So, put down the toxic spray, step away from the bleach, and let\'s get into the nitty-gritty of keeping your waxing supplies for professionals in tip-top shape. Trust us, your nose and your clients will thank you.
Why You Should Ditch the Chemical Cleaners for Your Wax Pot
We\'ve all been there. You finish a service, you\'re on a high from a great wax, and then you look at your pot. It\'s messy, sticky, and you know the drill. You reach for the commercial wax remover, the one that smells like it could strip paint off a battleship. You spray it, wipe it, and feel a little dizzy. Sound familiar? Chemical cleaners are not only harsh on your sinuses, but they can also be incredibly harsh on your wax warmer. Over time, solvents can cause plastic components to crack, dull finishes, and generally shorten the lifespan of your hardworking professional salon equipment . Plus, the lingering smell can be a real turn-off for clients who are trying to relax.
When you switch to chemical-free methods, you\'re not just making an eco-friendly choice; you\'re making a smart business investment. It\'s a simple swap that saves you money on replacement parts and keeps your workspace smelling fresh and inviting. Many wax warmers for salons and spas are designed to last for years, and a gentle cleaning routine is the key to longevity. In fact, a lot of the industry\'s leading experts are already on board with this. A popular waxing professional from Michigan has been sharing her tricks, proving that oil-based methods are not only effective but also a total game-changer for busy professionals .
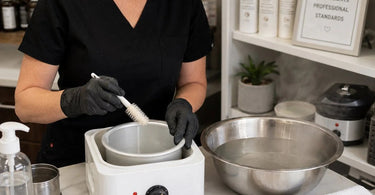
Meet Your New Best Friend: Oil Based Wax Cleaning
If you\'ve never used oil to clean a wax pot, get ready to have your mind blown. It is a total game-changer. The fundamental rule of cleaning wax is that \"oil wins out every time.\" This isn\'t just a catchy phrase; it\'s chemistry. Wax is an oil-based substance, and using a natural oil to dissolve it is the most effective and gentle way to break it down . It works like a charm on both the surface of the pot and the rim, leaving it clean without the abrasive effects of chemical solvents.
For the ultimate in simplicity, mineral oil or even basic baby oil are the MVP choices. They are affordable, odorless, and incredibly effective. Why spend big bucks on branded chemical removers when a bottle of baby oil from the drugstore does a better job without the headache? It\'s the best-kept secret in the beauty industry. A little oil goes a long way, so a single bottle can last for months of daily cleaning. It\'s economical, efficient, and totally professional.
The Step-by-Step Process: Sanitizing Without Harsh Chemicals
Alright, let\'s get into the nitty-gritty of the process. You don\'t need to be a scientist to master this technique, but you do need to follow these simple steps to ensure your pot is perfectly sanitary and ready for the next client. This process works perfectly for complete waxing kits and individual units alike.
1. Prep and Safety First
First things first, safety is a must. Never, ever try to clean a wax pot while it is still on and heating. That is a recipe for burns and a very bad day. Turn off your wax warmer and unplug it. Let the wax cool for a minute or two, but don\'t let it solidify completely. Cleaning is easiest when the wax is warm (not piping hot!), so you\'ll want to catch it when it has a slightly soft, pliable texture .
Use a protective glove or a towel to hold the pot if it\'s still a bit warm. The goal is to avoid burns and keep your hands safe. This is about cleanliness, not creating a workplace injury. As you\'re cleaning, keep in mind that this is also a great time to check your professional wax spatulas and applicators to ensure they are also sanitized and ready to go.
2. Scoop Out the Excess Wax
Before you go in with your oil, you need to get rid of the bulk of the wax. Use a clean wooden spatula or a silicone scraper to scoop out the big chunks from the center of the pot. You don\'t need to get every last tiny speck; you just need to remove the bulk of the product. This prevents the oil from becoming a giant, gloopy mess. Dispose of this wax in the trash.
If you have a lot of clean wax leftover, you can store it in a container to be remelted later. However, always prioritize hygiene; if the wax looks dark, cloudy, or contaminated, toss it. Your clients are paying for a premium service, and reusing \"grungy\" wax just isn\'t it.
3. The Oil Application Magic
Now for the fun part. Take a paper towel or a soft, lint-free cloth and apply a generous amount of mineral oil or baby oil to it. You don\'t want it dripping, but you want the towel to be thoroughly saturated. Wipe down the inside of the pot, the rim, and even the sides. You\'ll see the wax start to dissolve and slide right off .
Keep wiping until all the visible wax residue is gone. The oil essentially breaks the bond the wax has with the metal or silicone surface. It\'s really that easy. For stubborn spots, let the oil sit for a minute to work its magic.
4. Wipe Clean and Sanitize
After you\'ve dissolved the wax, you\'ll be left with a greasy pot. This is normal! Take a clean, dry paper towel and wipe away the oil. You\'ll see that it takes the last of the wax residue with it. To ensure the pot is completely sanitized, you can take one more step.
Mix a solution of water and a splash of white vinegar. Dampen a cloth with this mixture and give the pot a final wipe down. Vinegar is a natural disinfectant that neutralizes bacteria without the need for toxic chemicals. Follow up with another dry cloth to make sure the pot is completely dry before you add fresh wax . For those using professional cleaners and disinfectants, this ensures they aren\'t overpowered by wax residue.
Beyond the Pot: Sanitizing Your Tools and Applicators
While your wax pot is the main event, don\'t forget the supporting cast. Your tools need love too! Always use quality wax strips and rolls and ensure your tweezers are properly sterilized. For reusable tweezers, the golden rule is an autoclave or barbicide, but if you\'re in a pinch, a thorough scrub with isopropyl alcohol is a solid alternative.
Remember the mantra: avoid the double dip! Never, ever reuse a spatula. It\'s the cardinal sin of waxing and a surefire way to introduce bacteria. As one expert in the field pointed out, the proper temperature to actually kill bacteria in wax is around 100 degrees Celsius (212°F), which would be scalding hot and dangerous for skin . Therefore, relying on heat alone to sanitize the pot is a myth. Once you\'ve cleaned the wax away, using the oil method effectively sanitizes the surface without needing to blast it at unsafe temperatures.
Making the Switch: Why Your Clients (and Wallet) Will Appreciate It
Adopting a chemical-free cleaning routine isn\'t just about avoiding a headache; it\'s about elevating your entire brand. Today\'s client is more eco-conscious than ever, and the demand for sustainable, gentle practices is huge. As highlighted by industry trends, clean beauty and green practices are the new glam . When clients see you using natural, non-toxic methods, it reinforces that you care about their health and well-being.
By keeping a clean, sterile environment using these techniques, you\'re also ensuring the longevity of your expensive equipment. That ItalWax or Starpil pot you splurged on will stay looking shiny and new for years. Plus, you\'ll have a salon that smells like a luxury spa, not a janitor\'s closet. If you\'re looking to expand your inventory, check out our collection of waxing accessories and removers to complement your new routine.
Cleaning your wax pot doesn\'t have to be a chore you dread. With a little oil and some elbow grease, you can quickly and efficiently sanitize your equipment, leaving you more time to focus on what you do best: making your clients feel beautiful. Remember, a clean station is a happy station, and a happy station means repeat business.