Your success story starts here... with a tiny brush and a whole lot of creativity! If you've ever stared at a nail art brushes set like it was a magic wand (because, let's be honest, it kinda is), you're not alone. These little tools can transform plain nails into mini masterpieces—but only if you know how to wield them like a boss. Whether you're a salon pro or a nail newbie, this guide will turn you into a brush-wielding ninja in no time. Spoiler: There's a *right* way to hold that striper brush, and no, it's not like a burrito.
Let's dive into the wild world of nail art brushes, where fine lines, florals, and ombré effects are just a flick of the wrist away. By the end of this, you'll be painting like Picasso—if Picasso specialized in tiny canvases and glitter gradients.
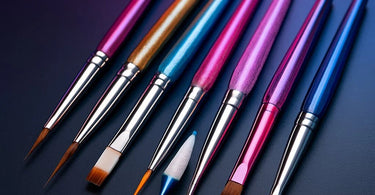
The Nail Art Brush Lineup: What Each One Does (Besides Look Cute)
First things first: Not all brushes are created equal. Your nail art set probably came with a squad of different shapes and sizes, each with its own superpower. Here's the breakdown:
- Detail Brush: The MVP for intricate work. Think lace patterns, teeny-tiny dots, or writing "I woke up like this" in 2-point font.
- Striping Brush: Long, thin, and perfect for—you guessed it—stripes. Also great for creating stems in floral designs or framing French tips.
- Angled Brush: Your go-to for crisp lines and filling in corners. Ideal for geometric designs or cleaning up edges like a perfectionist.
- Dotting Tool: Okay, fine, it's not a brush, but it's often included in sets. Use it for polka dots, flower centers, or pretending you're playing Connect the Dots.
Pro tip: Label them if you're the type who forgets which brush is which (no judgment—we've all been there).
Brush Care 101: Don't Be That Person with Crusty Brushes
Nothing ruins a flawless design faster than a brush that's stiff with dried polish. Here's how to keep your tools in manicure-ready shape:
- Clean Immediately: Wipe brushes on a lint-free pad soaked in acetone after *every* use. Procrastination leads to bristle clumps—aka nail art tragedy.
- Store Right: Lay brushes flat or bristles-up in a holder. Storing them bristles-down is like standing on your head after eating tacos—just don't.
- Deep Clean Weekly: Soak bristles in acetone for 10 minutes, then reshape with your fingers. It's like a spa day for your tools.
Bonus: Well-maintained brushes last longer, which means more money in your pocket for nail bling. Priorities.
Pro Techniques to Steal (Because Practice Makes Pinterest-Worthy)
Now for the fun part—let's get painting! Here are three game-changing techniques to try:
1. The "No-Stress Stripes" Trick
Dip your striper brush in polish, then lightly drag it across the nail in one confident motion. If you mess up, swipe with acetone and a precision applicator—no one has to know.
2. Flower Power in 2 Steps
Use the dotting tool for petals (five dots in a circle), then the detail brush to add a stem. Boom—instant botanist.
3. Ombré Like a Boss
Paint two colors side by side on a mixing surface, then gently swirl the angled brush where they meet. Apply to nails with a dabbing motion for a gradient that's *chef's kiss*.
Final Tip: Confidence Is Your Best Tool
Even if your first attempt looks more "abstract art" than "elegant design," keep going. Every pro started somewhere—probably with a blob that vaguely resembled a heart. Ready to upgrade your toolkit? Browse our nail art collection and start creating!