Your work deserves great tools... and if you've ever struggled with creating crisp, clean lines in your nail art, the Nail Striping Tape Applicator is about to become your new best friend. This little gadget is a game-changer for salon professionals who want to elevate their nail designs without the frustration of freehanding perfect lines. Whether you're a seasoned nail artist or just starting out, mastering this tool will save you time, reduce mistakes, and leave your clients raving about your precision. Plus, it's so easy to use, you'll wonder how you ever lived without it!
Let's dive into the nitty-gritty of how to use this magical tool to create stunning nail art that looks like it took hours (but really only took minutes).
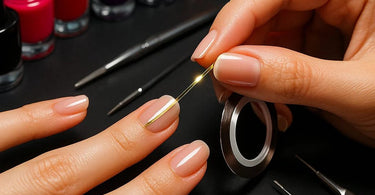
What Exactly Is a Nail Striping Tape Applicator?
Before we get into the how-to, let's talk about what this tool actually is. The Nail Striping Tape Applicator is a precision tool designed to help you apply thin, adhesive-backed striping tape to nails with absolute accuracy. Unlike trying to place tape with tweezers (and inevitably sticking it to your fingers instead of the nail), this applicator holds the tape securely and allows you to position it perfectly every time.
It's perfect for creating:
- Clean geometric designs
- French manicure accents
- Racing stripes
- Plaid patterns
- Any design that requires straight lines
Step-by-Step: How to Use Your Nail Striping Tape Applicator Like a Pro
Now for the good stuff! Here's exactly how to use this tool to create flawless nail art:
1. Prep the Nail
Start with a clean, dry nail. Apply your base color and let it dry completely. If you're using gel polish, cure it properly. There's nothing more frustrating than applying perfect tape only to have it mess up your wet polish!
2. Load Your Tape
Cut a small piece of nail striping tape (about 1-2 inches is usually plenty). Insert one end into the applicator's grip, leaving just a tiny bit exposed to stick to the nail.
3. Position and Apply
Hold the applicator like a pen and gently press the exposed tape onto the nail where you want your line to start. Slowly roll the applicator along the nail, allowing the tape to adhere as you go. The beauty of this tool is that you can adjust pressure and angle as needed.
4. Secure and Trim
Once your tape is perfectly positioned, press it down firmly along its entire length. Use small scissors or nail clippers to trim any excess at the edges of the nail.
5. Seal It In
Apply your top coat to seal the tape in place. For gel polish users, cure according to your system's instructions. Pro tip: apply the top coat in smooth strokes parallel to the tape to avoid lifting it.
Pro Tips for Nail Striping Tape Perfection
Now that you know the basics, here are some professional secrets to take your tape game to the next level:
- Mix and match: Combine different colors of tape for dynamic designs. Our nail art supplies collection has every color you could dream of.
- Layer it up: Create dimensional designs by applying multiple layers of tape in different directions.
- Combine techniques: Use tape as a stencil for gradients or ombre effects, then remove it before the polish dries completely.
- Fix mistakes: If a piece of tape isn't straight, you can gently lift it with the applicator and reposition it before pressing down firmly.
Why Every Salon Needs This Tool
If you're still on the fence about adding this to your manicure essentials, consider these benefits:
Time savings: What used to take 10 minutes of painstaking tweezers work now takes 30 seconds.
Client satisfaction: Perfect lines every time mean happier clients and better tips.
Creative freedom: When the technical part is easier, you can focus more on the artistic side of nail design.
Professional edge: This is one of those tools that separates amateur-looking work from salon-quality results.
Pair Your Tape Applicator With These Must-Haves
To really maximize your nail art potential, consider adding these complementary products to your toolkit:
- Professional gel polish for long-lasting designs
- Precision nail files for perfect nail prep
- LED curing lamps for quick drying
- Detail brushes for adding freehand accents
Troubleshooting Common Tape Issues
Even with this amazing tool, sometimes things don't go perfectly. Here's how to handle common problems:
Tape won't stick? Make sure the nail surface is completely dry and free from oils. You might need to gently buff the surface or use a dehydrator before applying polish.
Tape lifting after application? Try pressing it down more firmly with an orangewood stick before applying top coat. Also, make sure you're using enough top coat to fully seal the edges.
Can't get straight lines? Practice on a nail wheel first. The more you use the applicator, the more natural the motion will feel.
Take Your Nail Art to the Next Level
The Nail Striping Tape Applicator is one of those simple tools that can dramatically improve your work with minimal effort. It's affordable, easy to use, and delivers professional results every time. Whether you're creating simple accent nails or intricate geometric designs, this tool will help you work faster and more precisely.
Ready to upgrade your nail art game? Stock up on Nail Striping Tape Applicators and all the supplies you need from our professional nail care collection. Your clients (and your sanity) will thank you!