Do your best work, every time... and let us be real for a hot second (pun absolutely intended). There is nothing that kills the vibe of a perfectly good Tuesday like a client yelping because your dual-chamber wax warmer decided to cosplay as a volcano. Or worse, watching your expensive, silky hard wax turn into a lumpy, unspreadable mess that looks more like cold grits than a luxurious hair removal treatment. We have all been there. You are rushing between a brow wax and a Brazilian, and suddenly you are playing a guessing game with a dial that seems to have a mind of its own. But here is the tea, my friend: guessing is a business killer. At Pure Spa Direct, we believe you should be spending your energy on perfecting your lash lift technique or recommending the perfect sugar scrub to a client, not playing Russian roulette with a heating element.
Proper temperature calibration for your dual-chamber unit isn't just a technical chore; it is the secret sauce to client retention, safety, and actually making money. When one side holds your low-temp ItalWax hard wax beads and the other holds your strip wax, you are essentially running two different restaurants out of one kitchen. You wouldn't cook a steak at the same temperature as a souffle, right? Exactly. So, grab your infrared thermometer (and maybe a glass of wine), because we are about to turn you into a temperature-controlling genius. No burn scars, no wasted product, and definitely no tears.
Why Your Dual-Chamber Warmer Thinks It Is a Drama Queen
Let us break down the science before we break out the tools. A dual-chamber wax warmer is a beautiful thing. It saves space, keeps your station organized, and allows you to offer both hard and soft wax services without a cluttered countertop. But here is the catch: hard wax and soft wax are divas with totally different needs. Hard wax, the gentle giant that grips the hair and not the skin, likes to be warm and cozy, think a thick honey consistency. If it gets too hot, it becomes brittle and feels like lava on sensitive areas. Too cold? It becomes thick, chunky, and refuses to spread, making removal a painful tug-of-war for your client . Soft wax, on the other hand, needs to be significantly hotter because it has to stay thin enough to spread in a sheer layer and penetrate the hair follicle. If your soft wax isn't hot enough, it stays gloppy, picks up too much skin, and leaves a sticky residue that ruins your Sunday. Getting this right is why we look for top-quality equipment and maintain it like the workhorse it is.
The Goldilocks Zone: Temperature Ranges That Actually Work
Forget what your cousin's hairdresser's neighbor said about wax temps. We are going by the book (and the manufacturer specs). For most professional hard waxes, you are looking for a sweet spot between 125°F and 145°F (approximately 51°C to 63°C) . At this range, it should peel off cleanly without shattering. For soft strip wax, you generally need a higher heat, usually between 158°F and 167°F (70°C to 75°C), to maintain that fluid, runny texture that allows for a super-thin application . However, and this is a big however, always always always check the specific wax brand you are using. Some modern, high-tech waxes like Lycon or Starpil have unique melting points. Sticking a thermometer in there isn't being obsessive; it is being a pro.
The Step-by-Step Guide to Calibrating Your Dual-Chamber Warmer
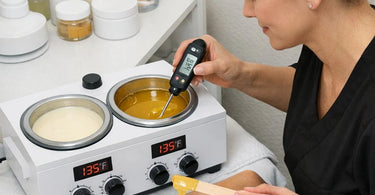
Okay, enough chit-chat. Let's get our hands dirty (metaphorically, please wash your hands). You are going to need a few things: a high-accuracy digital thermometer with a probe (do not use the candy thermometer from your Thanksgiving pecan pie), a little bit of patience, and about 30 minutes of downtime. Do not trust the dial on your machine. Those are often just loose estimates. They measure the heating coil, not the actual wax, and there can be a shocking difference .
Step 1: The Clean Slate
First, make sure both chambers are clean. Old, burnt wax residue acts as an insulator, throwing off your readings. Pop out those metal cups if your wax warmer allows it and give them a good wipe down. You want a fresh start.
Step 2: Fill and Melt
Fill each chamber with the specific wax you use in that side. Turn the unit on and set the dials to what you think is your medium range. Let the wax melt completely. For hard wax beads, this might take 30-45 minutes. Do not rush this. Trying to calibrate half-melted wax is like trying to ice skate uphill. While you wait, why not browse our selection of retail products to boost your sales?
Step 3: The Deep Stir and Probe
Once melted, stir the wax gently with a disposable spatula. Wax can have hot and cold pockets. Now, insert your thermometer probe into the center of the wax, ensuring it does not touch the bottom or the sides of the metal pot. Wait for the reading to stabilize. Write down that number.
Step 4: Compare and Adjust
Look at your dial setting versus the actual temp. If your dial says 140 but your thermometer reads 160 (hello, burns!), you know you need to crank it down. Most digital units have a calibration mode, but for standard analog dials, simply adjust the knob and wait 10-15 minutes for the temperature to re-stabilize. Repeat this process until the thermometer matches your desired working temp .
The Tech Upgrade: Why Your Old Knob Might Need a Break
If you find yourself fighting your machine every single day, it might be time to look at an upgrade. The technology in professional wax warmers has come a long way from the finicky pots of the early 2000s. Modern units, like the Spa Masters digital series or the sleek designs from Berodin, offer precise digital readouts. Some dual-chamber models even allow you to set exact temperatures for each side independently, taking the guesswork completely out of the equation. Look for features like smart thermostats that maintain heat with less fluctuation . Investing in high-quality equipment saves you money on wasted wax and protects your reputation.
Real-World Troubleshooting: When Things Go Wrong
Let's play a game of What is That Noise? If your wax is smoking, you have left it on high overnight, and you need to turn it down immediately (and probably replace that wax because the formula is compromised). If the wax is pulling away from the sides of the pot but looking like soup in the middle, your thermostat might be failing, or you might have a thick layer of carbonized wax at the bottom acting as a frying pan . Hard wax that cracks when you try to peel it means it is too cold. Wax that drips everywhere and slides off the spatula like water means it is too hot. Listen to your tools! And for the love of all that is holy, always test a drop of wax on the inside of your wrist before you go near a client's eyebrow or bikini line. Your wrist is your best thermometer.
Conclusion: Consistency is Queen
Look, you have enough stress in your life running a business, dealing with no-shows, and untangling towel steamers that decided to break on a Saturday. Your wax warmer should not be one of those stressors. By taking 20 minutes this week to properly calibrate your dual-chamber unit, you are setting yourself up for smoother services, happier clients, and a lot less waste. You are ensuring that the wax applicators glide like a dream and the wax strips peel off without a fight. So, find that thermometer, put on your favorite playlist, and show that warmer who is boss. Your clients will feel the difference, your bookings will go up, and you will officially be the chillest, most professional waxer in town. Now go get that perfectly calibrated honey consistency!
)