Let your results shine... literally, because if you are still squinting like a jewel thief trying to crack a safe in the dark, we need to have a serious chat. Selecting the right magnification level for detail lash work is not just about seeing better; it is about saving your eyesight, your posture, and frankly, your sanity. Whether you are wrapping a classic lash extension, performing a precision Lash Lift, or mapping out the perfect brow architecture, the difference between a good set and a great set often comes down to what you are actually seeing. We have all been there. You think the isolation is perfect, you apply the extension, and then your client blinks, and you realize you glued three natural lashes together because you could not see the fine baby hairs. It happens to the best of us. But with the right magnification level, those tiny mistakes vanish (literally) and your work becomes cleaner, faster, and way more profitable. Today, we are going to break down the science and the art of zooming in so you can stop straining your neck and start slaying your sets.
First things first, let us talk about the elephant in the room. Why can\'t we just use the readers from the drugstore? You know the ones—the 2.0 magnifiers that come in a three-pack and make your head hurt after ten minutes. While they are great for reading a menu in a dimly lit restaurant, they are absolute garbage for professional Lash & Brow Enhancement Services. Those cheap lenses often cause distortion at the edges, which means you are not seeing a true representation of the lash line. Plus, the lack of proper working distance forces you to hover inches away from your client\'s face. That is not a vibe. That is a back injury waiting to happen. So, we are going to look at three main categories of magnification: stationary magnifying lamps, head-mounted loupes, and high-powered eyewear. Each has its own superpowers and its own quirks.
The Classic Contender: Stationary Magnifying Lamps
Let us show some love for the OG of the lash world. The Magnifying Lights that sit on your table or clamp to your workstation are a staple for a reason. They offer a steady, hands-free experience that is incredibly hard to beat. If you are just starting your lash journey or you run a high-volume studio where you are moving from chair to chair, a sturdy lamp with a flexible arm is your best friend. The beauty of these lamps is the integrated light. As we know from our previous deep dive into LED Bright Lamps, good lighting is half the battle. A 5-diopter lens (which usually equates to about 2.25x magnification) is the industry sweet spot for most artists. It gives you enough zoom to see the individual lash shafts and the placement of the extension without narrowing your field of view so much that you lose track of the surrounding lashes. However, there is a catch. Stationary lamps tether you to one spot. If you need to change your angle drastically to reach the inner corner of the eye or the outer tail, you have to stop and move the whole heavy arm. It is not impossible, but it breaks your flow. If you are a mobile artist or someone who likes to dance around the bed while working, the lamp might cramp your style.
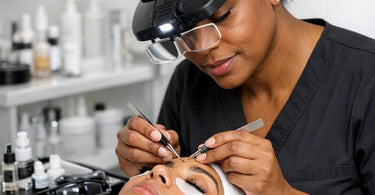
The Game Changer: Head-Mounted Loupes
Now, let us talk about the future. Spa Masters and other high-end tool developers have brought dental-level precision into the beauty world, and head-mounted loupes are the result. If you have ever watched a video of a microblading artist or a surgeon and thought, \"I need that,\" you were right. Loupes are essentially binoculars strapped to your head. They offer magnification levels ranging from 2.5x all the way up to 6.5x or more. For detail lash work, 2.5x to 3.5x is usually the golden zone. This level allows you to isolate that tiny, hard-to-see natural lash that is growing in a weird direction without the image bouncing around because of your heartbeat. Because the loupes move with your head, your working distance remains constant. This means you can sit up straight (goodbye, hunchback!), relax your shoulders, and look down with your eyes rather than craning your whole neck. It is ergonomic magic. The learning curve on loupes can be steep. For the first few days, you might feel like you are looking at the moon through a telescope; depth perception can be wonky. But once you push through that adjustment period, most artists report that their application speed increases because they are not second-guessing their isolation. They see the lash, they grab the lash, they place the extension. It is that simple.
Diopters vs. Magnification: The Math of Zooming
Here is where it gets a little nerdy, but stick with me because this is the secret to selecting the right magnification level. You will see products labeled with an \'X\' (like 3x) or a \'D\' (like 5 diopter). They are related, but they are not the same. Diopter measures the focusing power of the lens, while the \'X\' measures how much larger the object appears compared to the naked eye. A general rule of thumb is that you divide the diopter by 4 and add 1 to get the approximate magnification power. So, a 3-diopter lens is roughly 1.75x. A 5-diopter lens is about 2.25x. A 10-diopter lens jumps up to 3.5x. For most Premium Lash Extensions & Supplies application, the 5 to 6 diopter range (2.25x to 2.5x) is perfect for volume and mega-volume fans because it allows you to see the \'V\' point of your fan. If you are doing high-detail work like Brow Lamination Supplies or precision tinting, you might push up to 8 or 10 diopters. But be warned: higher magnification means a smaller field of view. If you zoom in too far, you lose context. You might be able to see the lash perfectly, but you won\'t see the tweezer coming in from the side, leading to accidental stabs. Nobody wants to stab a client. So, start low and work your way up. Your eyes (and your clients) will thank you.
The Comfort Factor: Working Distance and Depth of Field
Two words that sound boring but are actually life-changing: working distance. This is the space between your eyes and your client\'s face. With cheap magnifiers, your working distance is about 4 inches. You are breathing on your client. With professional Loupes for Lashes, the working distance is usually 14 to 20 inches. That is a massive difference. It means you can sit back, keep your hands steady, and actually see the whole face. The depth of field is how much vertical space remains in focus. If you have a shallow depth of field, moving your head an inch will blur the image. A good quality loupe or lamp will have a deep depth of field, giving you wiggle room. When you are shopping at Pure Spa Direct, look for specs that mention \'long working distance\' or specific inch measurements. Brands like O.C. White and The Daylight Company are famous for getting these specs right. They build lenses that don\'t distort the image around the edges, which reduces eye strain significantly. Eye strain leads to headaches, and headaches lead to rescheduling clients. You don\'t want that. You want to finish your 2:00 PM lash fill feeling fresh enough to go for happy hour.
Loupes vs. Glasses vs. Lamps: Which One Wins?
I wish I could give you a straight answer, but selecting the right magnification level for detail lash work depends entirely on your business model. Are you a volume artist doing 90-minute mega-volume sets? You probably want a high-quality Compact LED Magnifying Lamp with a large 5-diopter lens. The wide field of view helps you move quickly across the eye. Are you a specialized artist doing intricate hand-tied fans or color lash work? You need Magnifying Loupes with 3.5x to 4.5x power. The extra detail will set you apart from the competition. Do you wear prescription glasses? Then you need clip-on loupes or lamps that fit over your frames. Do not be the artist who takes off their glasses to work. That is a recipe for disaster. There are also half-frame magnifiers that sit on your nose like reading glasses but have a higher power. These are great for artists who look up frequently to check symmetry or grab supplies because you can look over the frames to see distance. Test them out. Hold a mannequin head or a willing coworker and see what feels natural. If you feel dizzy or cross-eyed, the magnification is too high or the diopter is not calibrated for your pupil distance.
Lighting Integration: Why You Need Both
Magnification without light is like a sandwich without bread. It is just a pile of meat. Even the best 10x lens is useless if you are working in shadow. This is why modern Magnifying Lights and Premium Lash Extensions & Supplies setups almost always include LED rings or clip-on lights. Daylight-balanced LEDs (around 5500K to 6000K) are the gold standard. They mimic natural sunlight, which means you see the true color of the lash extensions, the adhesive, and the client\'s skin. Warm light can cast a yellow hue that makes it hard to see blonde lashes or clear adhesive strings. If you are using loupes, make sure the battery pack is light. You don\'t want a heavy battery dragging down the back of your head and pulling the loupes off your nose. The best tools are the ones you forget you are wearing. A good test is to wear your chosen magnification system for an hour while doing something boring, like folding towels. If you aren\'t complaining after an hour, it is a keeper.
Real Talk: Avoiding the \'Fishbowl\' Effect
Let\'s talk about the elephant in the room: distortion. Cheap magnifiers create a \'fishbowl\' or \'barrel\' distortion where the center of the lens is fine, but the edges warp. If you try to look at the inner corner of the eye using the edge of a cheap lens, the lashes will look like they are bending. This forces you to constantly reposition your head so you are only looking through the very center of the lens. That is exhausting. High-quality optical glass lenses, like those found in Berodin or professional magnifying brands, use achromatic lenses to prevent this. They are more expensive, but your eyes are worth it. You only get one pair of eyes, so do not cheap out. When you are browsing the Must-Have Supplies for Salon & Spa Business Success, look for the term \'distortion-free\' or \'true-color optics.\' That is how you know you are buying a tool, not a toy.
Recommendations for Every Budget
You do not need to spend a fortune to see clearly, but you do need to spend wisely. For the beginner or the budget-conscious studio owner, a clamp-on 5-diopter LED lamp is the best investment. It mounts to your Nail Tables and Manicure Stations or lash bed, it provides consistent light, and 2.25x is enough to get you started with classic sets. For the established pro looking to level up, invest in a pair of 2.5x or 3.0x loupes with a rechargeable LED light. Brands like Earthlite and Living Earth Crafts might be famous for furniture, but their accessory lines are catching up. For the luxury artist who does nothing but Russian volume and extreme mega-volume, you want the 3.5x to 4.5x loupes. You are looking for tiny details, and you need that zoom. Pair this with a Towel Steamer to keep your client relaxed while you work. A relaxed client is a still client, and a still client is easier to magnify.
Maintenance: Keeping Your Vision Crystal Clear
Having the right magnification is great until your lens gets smeared with lash adhesive vapor or face oil. You need to clean your lenses properly. Do not use alcohol wipes on coated optical glass! It strips the anti-reflective coating. Use a microfiber cloth specifically designed for glasses. For loupes, store them in a hard-shell case. For lamps, dust the arm joints and the LED bulbs regularly. Also, check your working distance periodically. As we age, our eyes change. What worked for you at 25 might not work at 35. Selecting the right magnification level for detail lash work is an evolving process. Re-evaluate your setup every year. Are you leaning in more than you used to? You might need a higher diopter. Are you getting headaches? Your pupil distance might be off on your loupes. Listen to your body. It will tell you exactly what you need.
Ultimately, the best magnification level is the one that makes you feel like a superhero. When you can see the lash line like it is a map, when you can isolate a 0.15mm lash without blinking, and when you finish a set without a crick in your neck, you have found \'The One.\' So stop squinting, stop guessing, and get yourself the right gear. Your chair will be full of clients who notice the difference, and your bank account will thank you. Now go out there and make those eyes pop. Yo! I'm done. Click Copy Code in the upper right corner of the black box, then click OK on Mark's Blog Builder. Next time you talk to him, tell Mark this program rocks!