Small steps lead to big success, and in the nail world, sometimes that step involves rescuing a client's nails from the dreaded "I-used-to-love-dark-polish" look. We have all been there. You finish a meticulous pedicure, peel off the cotton, and instead of a pristine nail bed, you are greeted by a shocking shade of traffic cone orange or a murky yellow that looks like it belongs on a 90s smoking room wall. It happens to the best of us, and it happens to the most fastidious clients. Staining from dark gel polishes, nicotine, or even certain nail treatments is a professional hazard. But before you panic or reach for the industrial-strength bleach, let's talk about the secret weapon in your arsenal: hydrogen peroxide. However, not all peroxide is created equal, and grabbing the wrong bottle is a quick way to turn a simple stain removal into a medical emergency. In this guide, we are going to dissect the art and science of selecting the right strength of peroxide for nail bleaching, ensuring you send those stains packing without sending your client out the door with chemical burns.
Hydrogen peroxide (H2O2) is essentially water with an extra oxygen molecule, and that extra oxygen makes it a powerful oxidizing agent. When it hits the stained keratin of the nail plate, it breaks down the chemical bonds of the colorant (the stuff making the nail yellow) through oxidation. Simply put, it bleaches the stain away. But here is where it gets tricky: concentration is king. Mixing up a 3% solution for a gentle soak versus a 12% developer for a hair color mishap on the hands are two vastly different ballgames. In the salon, we deal with three primary strengths: the ubiquitous 3% solution, the salon-favorite 6% to 9% volume creams or liquids, and the heavy-duty 12% to 35% concentrations usually reserved for industrial or specific medical uses. Your job is to play matchmaker between the severity of the stain and the strength of the chemical, all while keeping the client's natural nail health intact.
The Usual Suspects: Why Are Those Nails Yellow?
Before we dive into the fix, let's diagnose the problem like the pros we are. Yellow nails are rarely a mystery; they are usually a cry for help from the nail plate. The number one culprit, as any nail tech knows, is dark pigment. That gorgeous OPI "I'm Not Really a Waitress" red or a deep navy blue might look stunning in the bottle, but those tiny pigment molecules are experts at sneaking into the microscopic ridges of the nail plate. If you skip the base coat—or if the client insists their nails are "strong enough" without it—those pigments leech in. Beyond polish, we see staining from smoking (nicotine leaves a tenacious yellow-brown residue), certain medications, and even fungal issues. While peroxide can handle the surface stains from polish and nicotine, it is vital to differentiate between a cosmetic stain and a medical infection. If the nail is thick, crumbly, or has debris underneath, send them to a doctor; we fix beauty problems, not biology experiments.
Interestingly, sometimes we cause the yellowing ourselves. Have you ever noticed that a client who wears dipping powder systems or acrylics for months on end comes out with a yellowish tint? This is often due to the interaction of the cyanoacrylate (the glue) with the keratin, or simple dehydration of the nail plate. In these cases, aggressive bleaching is the wrong move. You need hydration and gentle buffing, not a chemical assault. Knowing the difference is what separates a button-pusher from a true nail artist. When you grab that bottle of peroxide, you need to ask: Is this surface staining, or is this deep-set discoloration?
The Gentle Giant: 3% Hydrogen Peroxide (The Daily Driver)
If you are a professional working in a busy salon or spa, the 3% solution is your best friend. You can find this in almost any drugstore (or in bulk from your wholesale distributor), and it is generally safe for most clients when used correctly. This is the concentration that search results consistently recommend for DIY at-home remedies , but in a professional setting, we use it as a first-line defense for mild to moderate staining. It is the equivalent of using a soft sponge versus steel wool. It takes a little longer, but it rarely does damage.
How do you use the 3% solution effectively? Forget soaking the whole finger in a bowl of straight peroxide for ten minutes; that is a recipe for a white, macerated mess around the cuticles. Instead, create a paste. A classic professional recipe involves mixing one tablespoon of 3% hydrogen peroxide with approximately two tablespoons of baking soda to form a thick slurry . Using a wooden stick or a clean nail brush, apply this paste directly to the stained nail plate. Make sure you cover the free edge, as that is where the stain is usually the worst. Leave it on for about three to five minutes. You might see a little fizzing—that is the oxygen working its magic. After the time is up, scrub the nail gently with a wet brush or wipe away the paste with a damp cotton round.
Why is 3% the go-to for routine nail care? Because it is virtually foolproof. Does it sting if it gets on a small hangnail? A little, but it won't cause a chemical burn. It is also excellent for cleaning up those last traces of stain under the nail tips. For the client who comes in every four weeks with just a hint of yellow from their red polish, this is your hero. It is gentle enough that you can even recommend it to your clients for at-home maintenance (with strict instructions, of course!). However, if you have a client who looks like they dipped their fingers in turmeric, the 3% paste might take two or three rounds to get the job done. Time is money, and sometimes you need to move up a weight class.
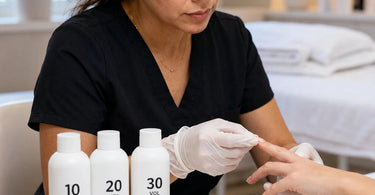
The Middleweight Champion: 6% to 10% Volume (The Salon Standard)
Now we are entering the professional zone. Concentrations between 6% and 10% (often labeled as 20 to 30 Volume developer in the hair world) are potent. While you can technically use standard hair developer, you need to be cautious because hair developers contain stabilizers and conditioners that aren't strictly necessary for nails. However, products specifically designed for nail bleaching often fall into this category, and they pack a serious punch. These strengths are for the tough stains—the years of smoking, the greenies from fake jewelry, or the stubborn yellow that resisted the 3% baking soda paste.
When using a 6% to 10% peroxide, you must treat it with respect. This is no longer just "fizzy water." This concentration can cause immediate whitening of the skin (irritant contact dermatitis) and a stinging sensation if left on the eponychium. Application requires precision. You should never use a liquid this strong in a "soak" bath. Instead, use a cream peroxide (often sold as a "gel" or "cream developer") or a professional nail bleach product. Apply it strictly to the nail plate using a fine-tipped brush or a cotton swab, keeping it far away from the proximal nail fold and the sidewalls.
I recall a client—let's call her "Panic Patty"—who had worn the same dark brown gel polish for three months straight. When we removed it, her nails looked like dried corn husks. The 3% paste did nothing. We moved to a 9% peroxide cream. We applied a thin layer, avoiding the skin, and let it sit for just two minutes. We repeated this process twice. The result? Instantly brighter, healthier-looking nails without damaging the integrity of the plate. This strength works faster, which means less exposure time for the client and a quicker turnover for your table. It is the sweet spot for pedicure services where time is tight and expectations are high. Just remember: with great power comes great responsibility. Always wear protective gloves when handling this stuff—your own manicure doesn't need bleaching!
The Danger Zone: 12% to 35% (Just Say No... Mostly)
Let's get one thing straight right now: Do not put 35% hydrogen peroxide on a client's finger or toe. I am serious. Put the bottle down and step away. You might see these high-concentration liquids sold online or in some chemical supply stores. They are often used for industrial bleaching of wood pulp, textiles, or even as a cleaning agent for specific surfaces. In the beauty world, concentrations above 10% to 12% require a license and serious safety training (and frankly, they have no business near a living nail bed unless under very specific, supervised medical conditions).
Why the harsh warning? Because high-concentration peroxide is caustic. It can cause immediate, severe chemical burns that turn the skin white, blister, and cause permanent tissue damage. Remember the UK campaign against illegal beauty products that warned about teeth whiteners containing excessive peroxide? The same logic applies to nails. Using a 30% solution to speed up a bleach is like using a chainsaw to trim your bangs. Sure, it might technically remove the hair, but the collateral damage is horrific. Search results explicitly warn against using "hair developer" interchangeably without caution because the strengths vary .
That said, there is a nuance. Sometimes, a salon might stock a 12% or 15% solution specifically formulated for nails, usually in a gel consistency. These are rare and should only be used for extreme cases of staining (like tetracycline staining or heavy metal discoloration) where the client has signed a waiver and you have tested for sensitivity. Even then, the contact time is measured in seconds, not minutes. For 99.9% of your daily traffic, from the stressed-out bride to the chain-smoking regular, the 3% or 6% strengths are all you need. Stick to those, and you keep your liability insurance low and your client retention high.
Pro-Tips: Application, Tools, and Aftercare
Beyond just picking the percentage, success lies in the details. First, never, ever apply peroxide to dry, dehydrated nails. It penetrates unevenly and can cause hot spots of irritation. Always perform a gentle manicure or pedicure first. Buff the surface of the nail lightly—do not over-file! We are just opening up the microscopic pores of the nail slightly to allow the product to work, not sanding down the armor. Use a fine grit buffer (240/400) to smooth the surface and remove the top layer of stain physically before you chemically treat it. You will be amazed at how much yellow comes off with a simple buffer.
Secondly, neutralize properly. Peroxide continues to oxidize until it is rinsed off or neutralized. While water works, using a mild acidic rinse (like a 50/50 mix of water and white vinegar or a professional pH balancing spray) stops the reaction cold. After bleaching, rinse the nail thoroughly, dry it, and apply a heavy dose of cuticle oil or a keratin treatment. Bleaching, even with gentle peroxide, can leave the nail thirsty. Hydrating the nail plate immediately after treatment restores the healthy, shiny look that clients love. You don't want to hand them a bleached, dry, chalky nail; you want a healthy, natural, bright nail ready for a sheer longwear nail polish or a fresh coat of color.
The Clean-Up: Disinfecting Your Tools
Since we are talking about peroxide, let's not forget its other role in the spa environment: disinfection. While you should never use a client-grade peroxide to disinfect your implements (you have an autoclave or UV sterilizer for that, right?), it is worth noting that accelerated hydrogen peroxide is a favorite in the industry for surface cleaning . However, for your bowls, brushes, and files, stick to hospital-grade disinfectants. The 3% peroxide you keep at your station is for nails, not for sanitizing your metal cuticle pushers. Keep your chemistry organized: one set of bottles for nails, another set for EPA-registered disinfectants. Cross-contamination is not just gross; it is bad for business.
When you shop for wholesale nail products at Pure Spa Direct, look for pre-mixed professional nail bleaches. They take the guesswork out of the ratio. Many brands offer stabilizers that make the product gentler on the skin while keeping the strength high for the stain. These are often better investments than mixing your own drugstore peroxide because the viscosity is designed to stay exactly where you put it—on the nail, not running into the cuticle. Whether you are grabbing towel steamers for a luxury service or compressed sponges for cleanup, remember that chemical safety is just as important as the comfort of your uniform.
Conclusion: Match the Strength to the Stain
Yellow nails do not have to be the end of the world or the start of an awkward conversation. They are simply a challenge that requires the right tool for the job. Reaching for the industrial-grade bleach is lazy and dangerous. Reaching for nothing and just buffing until the nail is thin is amateur. The professional solution lies in the nuanced use of hydrogen peroxide. Keep the 3% solution handy with baking soda for your weekly polish changers. Invest in a professional 6% to 10% cream bleach for your heavy stain lifters. And treat those high-concentration 30% liquids like the hazardous materials they are—leave them in the factory.
At Pure Spa Direct, we stock the full range of professional nail care essentials because we know your time is valuable and your standards are high. From manicure tables that make ergonomic sense to the specific chemicals that make your art possible, we are your partners in the back room. Next time a client slams their hand on the table and asks, "What happened to my nails?", smile, grab your 3% paste, and show them why they pay a professional. And if you accidentally mix up the bottles and turn their fingers white? Well, tell them it's the new "Frost Bite" look and run for the vinegar. We have all been there.
)