Eyelash perming is a transformative service that offers clients beautifully curled lashes, enhancing their natural beauty without the daily hassle of curlers or extensions. As a professional, mastering the use of an eyelash perming kit is essential to deliver safe and stunning results. This comprehensive guide will walk you through each step, ensuring your clients leave with lashes that make them feel fabulous.
Preparation: Setting the Stage for Success
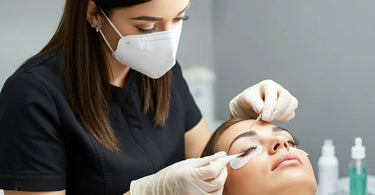
Before diving into the perming process, it's crucial to prepare both your tools and your client:
- Sanitize Your Tools: Ensure all implements are thoroughly cleaned to maintain a hygienic environment.
- Client Consultation: Discuss any allergies or sensitivities, and explain the procedure to set clear expectations.
- Remove Eye Makeup: Gently cleanse the client's eye area to eliminate makeup, oils, and impurities that could interfere with the perming solution.
Step 1: Selecting and Applying the Silicone Rods
Choosing the appropriate rod size is vital for achieving the desired curl intensity:
- Select the Rod Size: For clients with heavy, thick lashes or those who prefer a more relaxed curl, consider using large-sized perm rollers.
- Secure the Rods: Apply a small amount of adhesive to the back of the rod and position it along the lash line, ensuring it adheres well to the eyelid.
Step 2: Adhering Lashes to the Rod
With the rods in place, it's time to position the lashes:
- Apply Perm Glue: Use a quality adhesive to coat the rods, then gently lift and press the lashes onto the rod, ensuring they are straight and evenly spaced.
Step 3: Applying the Perm Lotion
The perm lotion is the magic potion that alters the lash structure:
- Apply Perm Lotion: Using a micro brush, apply the perm lotion to the midsection of the lashes, avoiding the tips to prevent over-processing.
- Processing Time: Cover the eyes with plastic wrap to maintain warmth and allow the lotion to process for 10-15 minutes, depending on the hair's thickness./li>
Step 4: Applying the Setting Lotion
This step locks in the new curl:
- Remove Perm Lotion: Gently wipe away the perm lotion using a clean cotton pad.
- Apply Setting Lotion: Apply the setting lotion in the same manner as the perm lotion, covering the same areas.
- Processing Time: Allow the setting lotion to process for 10-15 minutes.
Step 5: Nourishing the Lashes
After chemical processing, it's essential to nourish the lashes:
- Apply Nourishing Lotion: This step hydrates the lashes, restoring moisture and shine.
Step 6: Cleaning and Final Touches
Bringing it all together for the final reveal:
- Remove Residue: Use a gentle cleanser to remove any remaining product from the lashes and eye area.
- Remove the Rods: Carefully detach the rods, ensuring not to pull on the lashes.
- Final Inspection: Check the lashes for uniformity and make any necessary adjustments.
Aftercare Advice for Clients
To maintain the longevity of the lash perm:
- Avoid Water and Steam: Advise clients to keep their lashes dry for the first 24 hours to allow the curl to set properly.
- Gentle Handling: Encourage gentle cleansing and advise against using oil-based products around the eyes.
Recommended Products
For optimal results, consider using the following products available at Pure Spa Direct:
- Vlash Curl Lock Lash Perm Kit: This comprehensive kit includes single-use packs of perm lotion, setting lotion, nourishing lotion, and cleaning lotion, ensuring freshness and effectiveness for each application.
- Advanced Eyelash Perm Rollers: Available in large size, these rollers are ideal for clients seeking a more relaxed curl, especially those with thicker lashes.
By following this step-by-step guide and utilizing high-quality products, you can master the art of eyelash perming, offering your clients stunning, long-lasting curls that enhance their natural beauty. Remember, practice makes perfect, and each client is unique—adjust your technique to meet their individual needs for the best results.