Boost efficiency with this must-have item: a good old-fashioned patch test. I know, I know, it doesn't sound as glamorous as a shiny new Facial Steamer or a vat of delicious-smelling Sugar Scrubs, but trust me, this little skin check is the real superhero of your brow service toolkit. Think of it as the bouncer at the door of your brow party—its only job is to keep trouble out and make sure everyone inside has a fabulous, reaction-free time. Skipping this step? That is a fast track to turning a relaxing brow transformation into a scene from a horror movie, complete with swelling, itching, and one very unhappy customer. So, grab your favorite mixing bowl and let us get into the nitty-gritty of keeping those arches safe, stunning, and free from drama.
Ladies, let's be real. You have invested in the comfiest Pedicure Chairs/Spas and the most luxurious Bulk Wax Deals. You have a waiting list longer than a CVS receipt. But are you protecting your business and your clients' skin from the silent killer of brow services? That pesky little allergen found in many tints, PPD (Paraphenylenediamine), does not care how good your lighting is. It does not care about your five-star Yelp rating. It just wants to cause a rash. That is why we bow down to the power of the patch test [citation:3]. We are going to walk through this step-by-step, so you can be the hero your clients' eyebrows deserve.
Why We Patch: More Than Just a Legal CYA
Before we dive into the how, let's talk about the terrifying why. In many places, patch tests are not just a good idea—they are the law [citation:1][citation:6]. But even if the Magnifying Lights aren't looking, you should be doing it. Allergies are sneaky little beasts. A client might have had their brows tinted a million times before, but immune systems change, medications change, and suddenly, that old faithful tint is public enemy number one [citation:1][citation:8]. A patch test is your crystal ball. It lets you peek into the future and see if that beautiful Professional Lash and Brow Tint for Spas & Salons is going to cause a reaction. Plus, your liability insurance probably demands it. Does your policy cover you if you skip the test? Probably not. Let us keep the lawsuits away and keep the laughs rolling.
What You Will Need for Your Safety Squad
You don't need a ton of high-tech gear for this. You just need the same high-quality supplies you use for the actual service. Grab your brow tint and developer. You are going to mix it just as you would for a normal service. Have some Applicators & Spatulas handy because hygiene is queen. You will also need some gentle soap and water or alcohol wipes to clean the area, and a pen to mark the spot. Finally, grab your client consultation form. If it's not written down, it didn't happen! Since we love a little retail therapy, ensure you have a great Pre & Post-Waxing Products station for their other services while you wait for the tint to do its thing.
The Ultimate Step-by-Step: Let's Get Testing
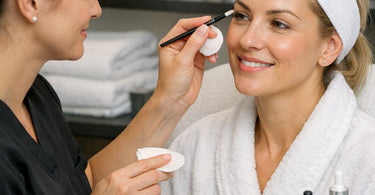
Alright, put on your lab coat (or your cute Professional Spa Apparel) and let us get scientific. We are looking for irritation, not a fashion statement.
Step 1: The Prep Talk
Explain to your client what you're doing and why. Do not just grab their arm like a vampire looking for a vein. Tell them, Sweetie, just to make sure your skin loves this tint as much as we do, I am going to do a little test on your arm. This keeps us both safe! If they are a new client, remind them that even if they have tinted before, you need to do this because you use professional-grade, magical elixirs that require it [citation:5].
Step 2: Clean the Canvas
Choose the spot. The inside of the elbow (the antecubital fossa if you want to sound fancy) or behind the ear are the gold standards [citation:5][citation:7]. Cleanse that tiny area with soap and water or an alcohol wipe. Let it dry completely. If it is wet, the tint will slide right off, and you will be testing nothing but your patience.
Step 3: Mix the Magic (and the Menace)
Mix a tiny, tiny amount of your Premium Lash Extensions & Supplies for Pros tint (since we are focusing on brows, but the principle applies to lashes too) with the developer according to the manufacturer's instructions [citation:4]. You do not need to mix a full bowl. Just a dab will do ya. Using a clean spatula, apply a small amount—about the size of a pea or a tiny dime—to the cleansed area.
Step 4: The Waiting Game
This is the boring part. The patch needs to sit for the recommended time, or at least until it dries (usually around 15–30 minutes) [citation:5]. While you wait, do not let them go swimming or scrub it off. Use this time to upsell! Point out your lovely new Towel Steamers or chat about the benefits of Brow Lamination Supplies for Perfect Brows. Distract them with your dazzling personality and luxury amenities.
Step 5: The Reveal (and the Removal)
Gently remove the dried tint with a damp cotton pad and a little mild soap. Rinse the area and pat it dry. Now, look at it. Is it angry? Red? Bumpy? Itchy? If it looks like a mosquito had a field day on their elbow, that is a positive reaction [citation:5]. DO NOT proceed with the brow tint.
Step 6: The 48-Hour Vigil
This is the most crucial step that newbies sometimes skip. You are not done yet! You have to send them home and tell them to keep an eye on that spot for the next 24 to 48 hours [citation:2][citation:3]. Some reactions are delayed. Tell them to call you immediately if it gets red, itchy, or swollen. If after two days the skin is clear and happy, you have a green light to tint those arches!
What If the Test Goes Haywire?
Okay, so you saw a reaction. The skin is red. Do not panic. Do not cry. Do not blame your Professional Wax Warmers for Salons & Spas. Advise the client to wash the area gently and apply a cold compress if it is itchy [citation:3]. Document everything on their intake form. This client is a no-go for traditional tinting. Instead, pivot to something safe. Offer them a tint-free brow grooming service, a shaping using Hyaluronic Acid Serum for the skin, or suggest a Brow Henna alternative (though be careful, Henna can also cause reactions, so patch test that too!) [citation:3]. The goal is to make them feel cared for, not rejected.
The Golden Rule of Record Keeping
If you do not write it down, it did not happen. I know paperwork is about as fun as watching Hair Bleaches and Lighteners dry, but you have to do it. Sign, date, and record the results of every patch test. Note the brand of the tint, the batch number if you are really on top of things, and the location of the test. This CYA (Cover Your Assets) paperwork is your best friend if a client ever tries to claim you messed them up. Keep it filed with their client profile. It takes two minutes and saves you two years of legal headaches.
When to Re-Test (Yes, It Expires)
That patch test you did six months ago? Yeah, that is about as useful as a chocolate teapot now [citation:1][citation:8]. You need to re-patch test if it has been more than 6 months. You also need to re-test if the client has changed medications, had a major illness, or if you switched your tint brand. Did you just switch from Brand A to Intensive Tint or Refectocil Original? New product means a new patch test. Do not assume because they were fine with the last bottle, they will be fine with this one. Chemistry is weird, and skin is temperamental.
Wrapping It Up (With a Clean Towel)
Look, I know patch testing feels like a buzzkill. It takes time, it takes planning, and it means that impulse walk-in client who wants Insta-brows RIGHT NOW has to wait two days. But you know what kills the vibe more than waiting? A medical emergency in your chair. By slathering on that tiny dot of tint and waiting patiently, you are telling your clients, I see you, I care about your face not melting off, and I am a true professional. So keep those High-Quality Towels folded, keep those Hygienic Table Paper rolls fresh, and always, always patch test. Your brows (and your business insurance) will thank you.
)