Simplify your path to success with happy clients who rebook before they even leave the treatment room. Let’s be honest, nothing tests your expertise—or your client’s loyalty—quite like the dreaded upper lip wax. It is a small area with massive emotional weight, and if you mess it up, that client is walking out with a red, puffy mustache line and a one-star review about how you ruined her date night. But when you nail it? You are a hero. You are a magician. You are the person who gave them the confidence to rock a bold lipstick without checking a mirror for fuzz every five minutes. Today, we are ditching the anxiety and the tears (yours and theirs) and diving deep into the professional techniques required to master this tiny, tricky zone.
We see you out there, trying to use the same Soft Strip Wax on an upper lip that you just used on someone’s leg. Stop it. Just stop. The skin on the upper lip is a diva. It is thin, sensitive, and packed with nerve endings. Treating it like a larger body part is a recipe for lifting skin (we call that a “wax-tion” scar, and it is not cute) and a client in tears. You need technique, precision, and a whole lot of confidence. We are going to give you all three right here, along with the best Professional Wax Warmers and products to make it happen.
Why The Upper Lip Deserves Its Own Playbook
Before we dive into the sticky stuff, we need to respect the anatomy. The upper lip is home to the orbicularis oris muscle, and the skin here has a very thin stratum corneum (the outer protective layer). This means it offers less protection against heat and adhesive. Additionally, this area has a high density of hair follicles and nerve endings, which is why it hurts like the dickens if you do it wrong. Your goal is to remove the hair, not the skin. That requires a shift in your standard protocol. You cannot rush this area. You have to be methodical, gentle, and use products specifically designed for facial sensitivity. This is not the place to save money by using cheap Quality Wax Strips & Rolls from a dubious source; you need high-quality, low-temp wax.
The Great Wax Debate: Hard Wax vs. Soft Wax for The Lip
If you use Soft Strip Wax for Effective Salon Hair Removal on an upper lip, you had better be prepared to do some serious damage control. Soft wax adheres to the skin AND the hair. When you pull that strip off, it creates a temporary inflammatory response that can leave the area looking like a tomato for hours. For the body? Fine. For the face? Absolutely not. We are team Professional Stripless Hard Wax all the way for this job. Hard wax encapsulates the hair and shrinks around it as it cools. It grabs the hair but releases the skin. This is the non-negotiable secret to happy upper lip clients. Brands like ItalWax - Wax or Lycon have specific formulas that stay flexible and pliable, making them perfect for the curves of the face.
Product Spotlight: ItalWax Selfie Hard Wax
Speaking of the right product, let us talk about a face-specific game changer. While we sell a ton of general-purpose hard wax, the true connoisseur of facial waxing reaches for ItalWax Selfie Hard Wax . This particular wax was formulated specifically for the delicate terrain of the face. It has a complex of natural oils and a super low melting point (+38°C!). Why does this matter? Because the lower the melting point, the less heat shock you are delivering to that fragile skin. It also contains no resins, which means it is virtually non-irritating. You apply it, it dries to a flexible film, and it peels off without leaving redness or inflammation . Your clients will be able to go straight from the waxing table to brunch without looking like they cried their mascara off. Stocking this specific product in your Waxing Supplies for Professionals arsenal instantly elevates your facial services.
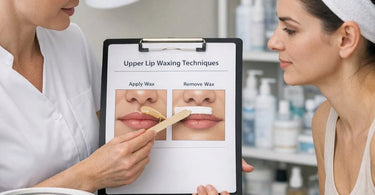
7 Steps to Mastering The Upper Lip Wax
Alright, let us get into the nitty-gritty. You have your Professional Wax Warmers for Salons & Spas set up and your ItalWax Selfie Hard Wax is melted to the perfect honey-like consistency. Here is your step-by-step playbook for a flawless service.
Step 1: Cleanse and Dry (The Golden Rule)
Prepping the skin is everything. Use a gentle, non-oily cleanser. This area collects makeup, sunscreen, and lunch remnants. But here is the trick: you need the skin to be bone-dry. Any moisture or oil will act as a barrier, and the wax will not grip the hair properly. Skip the pre-wax oil on the upper lip; it is too risky. Instead, hold the skin taut and apply a thin layer of ItalWax - Pre/Post lotion meant for sensitive areas, then let it evaporate or dust with a little powder. The skin should look matte.
Step 2: The Temperature Test (No Molten Lava)
Test the wax on the inside of your wrist. If it stings you, it will burn them. Facial skin is thinner, so a wax that feels fine on your hand might be scorching on the lip. You want the wax to be spreadable but thick. If it is runny, it is too hot.
Step 3: The Application Direction (Know Your Growth)
Upper lip hair growth often swirls. Do not just slap it on horizontally. Look closely at the growth pattern. The goal is to apply Professional Stripless Hard Wax in the SAME direction as the hair growth. Use a Professional Wax Spatulas and Applicators for Salons & Spas to create a small, finger-like tab at the end that you will hold later. Make the application thick enough to avoid breaking, but not so thick that it takes five minutes to cool. It should look like a tiny, opaque ice cream bar.
Step 4: The Stretch (The Most Important Part)
Once the wax is on, do not wait for it to turn into hard plastic. You want it to be cool but pliable (the consistency of a gummy candy). Now, you have to stretch the skin. Ask the client to tuck their upper lip over their teeth . This pulls the skin taut and exposes the hairs. You do this so the skin doesn’t come up with the wax. Hold the skin down just below the nose with your other hand. If the skin moves, you will bruise it or tear it.
Step 5: The Pull (Fast, Low, and Parallel)
Hold the tab you created. Hold the skin taut. Take a breath (both of you). Pull the wax off in a swift motion. The pull should be parallel to the skin surface (not up towards the ceiling) and in the opposite direction of the hair growth. Do not hesitate. A slow pull is a painful pull. Commit to the removal. If you did it right, you should see all the hair stuck to the wax and the skin should look calm.
Step 6: Post-Wax Care (Soothing the Diva)
Do not just wipe the area with a dry towel. Gently press the area with cool fingertips or a cool cotton square to calm the nerve endings. Then, apply a calming, anti-inflammatory serum or lotion. Avoid heavy oils that might cause breakouts. Look for ingredients like azulene, aloe, or chamomile. Never use an alcohol-based astringent here. Remind your client to avoid hot showers, spicy food, and heavy exercise for 24 hours.
Step 7: The Debrief (Sell the Solution)
Your service does not end when they pay. Hand them a mirror and show them the results. Then, educate them. Hand them a sample of Ingrown Hair Products or a retail-sized Premium Skincare Products calming balm. Tell them to exfoliate gently (with a soft washcloth, not a gritty scrub) in three days. This builds trust and retail revenue.
When The Upper Lip Goes Wrong (And How to Fix It)
Even the best of us have an off day. Maybe the wax was too hot, or the client was using Retin-A (always check those contraindications!). If the skin comes off with the wax and you see white, raw skin or pinpoint bleeding, do not panic. Do not apply wax again. Treat that area as a wound. Cleanse it gently with saline, apply a thin layer of antibiotic ointment or a specific barrier repair cream like Ayur-Medic, and send the client home with strict aftercare. Do not charge them. Apologize sincerely, learn from the mistake, and reassure them it will heal. If there is residual wax stuck to the skin (often caused by the wax being too thin), do not scrape it. Use a little post-wax oil or a Compressed Sponges dampened with lotion to gently roll it off.
Expanding Your Facial Waxing Horizons
Once you master the upper lip, the world is your oyster. Your clients will trust you with their whole face. Offer combination packages to increase your ticket price. Pair that upper lip wax with a quick Brow Lamination Supplies for Perfect Brows service or a Dermaplaning treatment. If they are already on the table, why not upsell a full-face hard wax? Use the same gentle techniques on the sideburns, chin, and cheeks. Investing in a variety of Complete Waxing Kits for Salons & Spas ensures you have the right tool for every contour of the face. The confidence you gain from nailing a tricky service translates directly to your bottom line. Clients pay a premium for specialists who don’t hurt them.
Ready to upgrade your facial waxing game? Head over to our Waxing Supplies for Professionals section. We have everything from the perfect ItalWax Hard Wax to the softest High-Quality Towels for cleanup. Do not let the upper lip scare you anymore. With the right technique and the right Pre & Post-Waxing Products, you can turn a dreaded appointment into a quick, painless lunchtime service that keeps them coming back for life. Now go make your clients fuzz-free and fearless!