Save time and money... by not having to rebook clients who are scared off by a rough recovery! Let's be real, microneedling is basically giving your client's face hundreds of tiny, strategic "I love yous" in the form of micro-injuries. It's fantastic for collagen, but right after, their skin is basically saying, "Um, excuse me, what just happened?" That's where your magic comes in. The post-needling soothing treatment isn't just an add-on; it's the secret handshake between "OMG" and "WOW." It's what turns a potentially prickly situation into a loyal, glowing client who trusts you with their precious epidermis. Nail this protocol, and you're not just a technician; you're a skin superhero with a very gentle touch.
Think of the skin post-microneedling as a freshly tilled garden. It's ready for amazing growth, but it's also vulnerable, open, and a bit sensitive. Your job is to provide the perfect, calming environment for that garden to flourish without any weeds of irritation or inflammation popping up. This protocol is your step-by-step guide to creating that environment, using professional-grade products and techniques that elevate your service from basic to brilliant. We'll walk through every crucial stage, from the immediate cool-down to the final send-home instructions that ensure your client's skin journey is nothing short of spectacular.
Step 1: The Immediate Cool-Down & Inflammation Taming
The moment the microneedling device is put away, the clock starts. The skin is warm, flushed, and those micro-channels are wide open. Your first mission: cool it down, literally. Do not, I repeat, do NOT just slap on a serum and call it a day. Start with a super-fine, calming mist. Look for ingredients like thermal spring water, aloe vera, or cucumber distillate. Gently mist the face from a distance, allowing a fine layer to settle. Follow this with a cool compress. You can use compressed sponges soaked in chilled distilled water or a chamomile tea infusion, or even specialized cooling gel masks. The goal is to constrict capillaries slightly and take the initial heat out of the skin. This step reduces the client's sensation of heat and sets the stage for maximum product absorption in the next steps. Think of it as applying a soothing balm to a mild sunburn—immediate relief is key for client comfort.
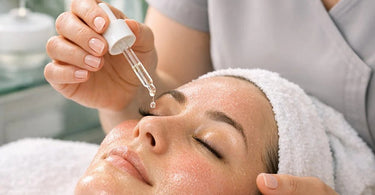
Step 2: The Soothing Serum Soak - Channeling the Good Stuff
Now that the skin is cooled and prepped, it's time to feed it the good stuff. This is not the time for active acids or potent retinols. This is the time for hydration, calming, and barrier support. Hyaluronic acid in various molecular weights is your best friend here, drawing moisture deep into those newly created channels. Pair it with skin-soothers like panthenol (pro-vitamin B5), centella asiatica (cica), and licorice root extract. The application technique matters. Instead of rubbing, use a patting or pressing motion with your fingertips or a cool jade or quartz roller. You can even apply a generous layer of serum and let it "soak" for a few minutes while you perform a gentle lymphatic facial massage on the décolleté or hands. This is where professional lines like Tuel Skincare shine, offering sophisticated post-procedure blends. The skin will drink it up like it's been in the desert, and you'll visibly see the redness start to calm.
Step 3: The Mask of All Masters - Calming and Quenching
This is the pièce de résistance of the post-treatment. A professional calming mask is non-negotiable. We're talking about a mask specifically formulated for post-procedure skin—often a cool, gel-based or sheet mask saturated in healing ingredients. Apply it lovingly. If it's a cream or gel mask, use a clean spatula for hygienic application. For an extra cooling effect, store these masks in a mini fridge in your treatment room. While the mask works its magic (typically 10-15 minutes), this is your golden opportunity to enhance the relaxation. Offer a hand massage with a calming aromatherapy oil, or simply let your client rest in silence with an eye pillow. This downtime is when the skin is fully absorbing the reparative ingredients, and the client's nervous system shifts from "alert" to "ahhh." Brands like Amber Products offer fantastic options for this critical stage.
Step 4: The Barrier-Boosting Finish - Sealing the Deal
After gently removing the mask (with damp, soft cotton pads or a soft cloth), it's time to lock everything in. The skin's barrier is compromised, so you need to apply a nurturing moisturizer that acts like a protective, breathable blanket. Look for ceramides, peptides, and squalane. These ingredients help rebuild the lipid layer without clogging those precious channels. Apply it with the same gentle, pressing motions. If your client is particularly red, a few drops of a green-tinted primer or corrective cream can be gently blended in to neutralize redness for their trip home, making them feel instantly more comfortable. This final layer is what protects all the wonderful work you've just done and ensures the skin stays hydrated and soothed.
Step 5: The Sun Shield Sermon & Send-Home Savvy
Do not let your client leave the room without applying a mineral-based sunscreen. Zinc oxide and titanium dioxide are the heroes here, providing physical protection without stinging. Apply it generously. This is also your moment for the "Take-Home Care Talk." Be clear, funny, and firm. Give them a printed aftercare sheet, but also say it out loud: "For the next 48 hours, your skin is on a strict vacation. No sweating, no picking, no actives. Be a couch potato with great sunscreen. Your skincare routine should consist of the gentle cleanser and repair cream I'm sending with you." Speaking of which, always have post-treatment retail products ready to go. Selling them the correct aftercare is not an upsell; it's a critical part of the treatment's success. It ensures your beautiful work isn't undone by a well-meaning but harsh drugstore scrub. Equip them with everything they need from your curated selection of premium skincare.
Pro-Tips for the Ultimate Experience
Ambiance is everything. Keep the room slightly cooler than usual. Have a towel steamer? Use it for warm neck wraps *before* the treatment, but for post-care, have chilled neck wraps or eye pillows on hand. Consider using a LED light therapy device with a red or amber setting for a few minutes after the mask. Red LED is renowned for its anti-inflammatory and healing properties, making it the perfect high-tech companion to your manual soothing. And always, always use pristine hygiene. Fresh bedding for every client, sterilized tools, and clean hands. This protocol, executed with care and premium products from professional spa essentials, transforms the microneedling experience. It turns potential anxiety into absolute trust, and that glowing skin in the days to follow? That's your best advertisement. Now go forth and soothe!