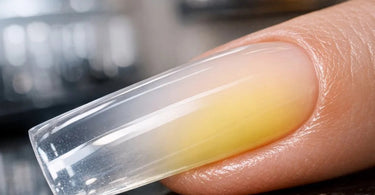
Transform client experiences with top products and expert techniques that ensure flawless results every time. As nail professionals, we pour our hearts into creating stunning, durable acrylic enhancements that make our clients feel like a million bucks. Nothing is more frustrating than watching those perfectly sculpted, crystal-clear nails develop an unwanted yellow tinge just days after they leave your chair. It can feel like a betrayal—you did everything right, used quality products, and yet, there it is. The dreaded yellow hue. But don't let this discoloration dull your confidence or your reputation. At Pure Spa Direct, we're here to help you diagnose the culprit, implement a bulletproof prevention plan, and educate your clients so that their nails stay as bright as their smiles.
Think of yellowing acrylic as a mystery to be solved. Is it a chemical reaction, an environmental villain, or a sneaky application error? The good news is, most causes are completely preventable with the right knowledge and products. We're going to break down every possible reason those nails take a jaundiced turn, from your monomer mix to your client's self-tanning habits. By the end of this, you'll not only be able to prevent the problem but also explain it to your clients with confidence—turning a potential complaint into a testament of your expertise. Let's get those nails back to their brilliant best.
The Chemistry of Clear: Understanding Why Acrylic Isn't Always Inert
First, a little science. Acrylic nails are created through a chemical reaction between a liquid monomer and a polymer powder. While this creates a durable plastic, it's not completely immune to the world around it. The very formula of your monomer can be a key player. As noted in industry resources, the composition of ethyl methacrylate (EMA)—the main ingredient in most professional monomers—varies by manufacturer. Blending other components into the EMA controls everything from curing time to flexibility, adhesion, and crucially, yellowing and clarity . If you're using a budget-friendly liquid that lacks proper inhibitors, you might be setting yourself up for failure from the start.
Beyond the formula, the age and storage of your product matter immensely. Old monomer or powder can degrade over time, leading to discoloration. If your monomer has been sitting on a shelf for months, exposed to sunlight or heat, its chemical structure changes. It becomes less stable, and when applied, it's far more prone to yellowing . Always store your liquids in a cool, dark place, and keep them in their original, properly sealed containers. Never, ever mix old monomer with new monomer—this is a surefire way to contaminate your fresh supply and invite unwanted color changes. If you're looking to stock up on fresh, reliable supplies, we have a full range of Acrylic Nail Supplies to ensure you're always working with the best.
The Hidden Enemy: Contamination in Your Tools and Technique
Sometimes the cause of yellowing is happening right under your nose, or more specifically, in your dappen dish and brush. Cross-contamination is a leading cause of discoloration. Have you ever wiped your brush on a paper towel and noticed a faint yellow residue? This is a major red flag. That yellow residue is a sign of chemical contamination, often from the monomer reacting with acids in the paper towel or, more commonly, from a contaminated brush . If you use the same brush for multiple systems, or if your brush comes into contact with old product, primer, or even oils from your own fingers, it becomes a vector for discoloration.
If you see yellow on your lint-free pad during application, it's time to deep clean or replace your brush. Some brushes also come from the manufacturer with a protective lacquer that can leach yellow if not properly prepped. Your technique during fills is another potential minefield. When doing a backfill, if primer or base coat accidentally gets on the existing acrylic, that chemical residue can become 'sandwiched' between the old and new product, causing a distinct yellow-orange spot to appear later . Be meticulous during prep. Use a gentle dehydrator, apply primer sparingly, and ensure it only touches the natural nail plate. For all the tools you need to maintain a contamination-free workspace, check out our Professional Nail Care Collections for premium implements.
Environmental Assault: UV Rays, Tanning, and Lifestyle Choices
Let's talk about the sun—or rather, the tanning bed. One of the most common external causes of acrylic yellowing is exposure to ultraviolet (UV) light. Just like your car's white paint can yellow over time in the sun, acrylic nails are susceptible to UV degradation. This is especially prevalent in clients who are frequent tanners, whether outdoors or in a tanning bed . The UV rays break down the chemical bonds in the acrylic polymer, leading to a yellow or amber tint.
But it's not just UV. Your clients' daily habits are a goldmine of potential stains. Do they use self-tanning lotions? These often contain DHA (dihydroxyacetone), a color additive that reacts with amino acids in the skin to produce a tan. It also reacts with acrylic and can turn it a murky, orange-yellow color. Hair color is another major culprit. If your client is a DIY colorist, the chemicals in hair dye can easily come into contact with their nails during the process, leaving behind a yellow stain. Even nicotine from cigarettes can cause a yellow film on the nail surface over time. This is where client education becomes your superpower. A simple conversation about lifestyle can save you both from disappointment. We carry a fantastic selection of UV Sterilizers for your tools, but for protecting nails from UV, it's all about prevention.
Moisture and Lifting: The Gateway to Discoloration
This is a big one, and it's often overlooked. If your acrylic application has any lifting—even a tiny pocket at the cuticle or free edge—moisture and oils from the natural nail plate will seep in. Over time, this trapped moisture creates the perfect environment for bacteria or yeast to grow, leading to a green or yellow discoloration underneath the acrylic . This type of yellowing isn't actually the acrylic changing color; it's the nail bed below it. A grayish-yellow tinge is a classic sign that water has gotten in and your seal is compromised .
This is often caused by poor adhesion from improper prep, a mix ratio that's too wet or too dry, or simply the client's nails being subjected to a lot of water exposure (like a nurse constantly washing their hands) . During fills, it's also crucial to thin and shape the nail, removing the older, more brittle acrylic that may have lifted at the free edge. When you just add new product to the growth area without refining the entire nail, you risk leaving microscopic gaps where moisture can enter. To prevent this, ensure you're using a high-quality dehydrator and primer, and consider investing in a reliable e-file for thorough prep. Speaking of prep, don't forget to protect your clients' natural nails with nourishing Cuticle Oil after the service—it helps maintain flexibility without causing lifting when applied correctly.
The Finish Line: Top Coats, Polishes, and Surface Stains
Sometimes, the yellow isn't in the acrylic at all—it's on it. If you're using a top coat that doesn't have UV inhibitors, or a nail polish that isn't high quality, the pigments can stain the porous surface of the acrylic. This is especially true if the acrylic hasn't been properly sealed with a buffer before applying polish. A rough or unsealed surface acts like a sponge, absorbing the color from dark polishes or the yellowing agents in a low-quality top coat . This is often the easiest problem to fix: simply remove the polish and buff the surface. If the yellow disappears, you know the stain was topical.
To prevent this, always recommend a UV-protective top coat to your clients. Many manufacturers offer finishing coats that act as a barrier against UV rays and prevent discoloration . Encourage your clients to use a good quality base coat before applying any colored polish at home. And when it's time for a fresh look, make sure they're not using harsh, non-acetone removers that can leave a residue. Instead, using a remover that contains a little acetone will cut through old polish more effectively without leaving chemicals behind that could cause future issues . For the highest quality finishing products, explore our Premium Nail Polish and Professional Nail Care Collections to ensure the final step is just as perfect as the first.
How to Educate Your Clients: Making Prevention a Partnership
Your role as a professional extends beyond the service. To truly prevent yellowing, you need to enlist your clients as partners in nail care. This is where your expertise shines and where you build lasting trust. Start the conversation during the service. While you're working, casually ask about their lifestyle. "Do you spend a lot of time outdoors or do you use self-tanners?" is a non-judgmental way to open the dialogue. Frame it as a way to help them get the most out of their investment.
Create a simple checklist for your clients. Advise them to:
1. Glove Up: When using harsh chemicals, hair dye, or even cleaning products, wear protective gloves. It's the simplest way to prevent staining.
2. Shield from the Sun: If they love tanning, recommend applying a broad-spectrum sunscreen to their hands or using a UV-protective top coat. Some acrylic brands even offer 'non-yellowing' formulas specifically designed for this purpose.
3. Be Mindful of Self-Tanners: Apply self-tanning lotions with a mitt and wash hands thoroughly after application.
4. Schedule Regular Maintenance: Emphasize the importance of coming in for fills every 2-3 weeks. This not only keeps the nails looking fresh but allows you to check for any lifting or moisture issues before they become major problems.
By positioning yourself as an educator, you transform a potential problem into a value-added service. For products you can retail to help them maintain their nails at home, we have a fantastic selection of Must-Have Spa Retail Products for Enhanced Client Experience, including cuticle oils and nourishing creams that support nail health without causing lifting.
Your Action Plan: A Step-by-Step Prevention Protocol
So, how do we put all this knowledge into action? Here's your go-to checklist for preventing yellowing in every service.
1. Start with Fresh, Quality Product: Always use reputable brands known for their UV inhibitors and stability. Check expiration dates and store everything properly.
2. Meticulous Prep is Non-Negotiable: Thoroughly cleanse the nail plate with a Nail Treatments dehydrator. Remove all cuticle from the nail plate. Ensure the nail is 100% clean, dry, and oil-free before applying any product.
3. Brush Hygiene: Clean your brushes regularly with monomer only. Never use brush cleaners that could introduce contaminants. If a brush starts leaving a yellow residue on a paper towel, replace it immediately.
4. Perfect Your Mix Ratio: A dry, crumbly bead or a runny, wet one can both lead to problems. Master the correct ratio for your specific system to ensure a non-porous, well-sealed finish.
5. Seal the Edges: Make sure your acrylic is thoroughly sealed at the cuticle and free edge. "Capping" the free edge is crucial to prevent moisture ingress.
6. Refine, Don't Just Fill: When doing a backfill, thin out the old acrylic on the entire nail bed, not just the growth area. This removes any compromised product and ensures a smooth, even surface for the new application.
7. Finish with a UV Shield: Always, always use a high-quality, UV-protective top coat. Buff the nail surface to a smooth finish before application to ensure the top coat adheres perfectly without clouding.
To execute this plan, you need the right tools. From professional-grade monomers to precision tools, we have everything you need. Dive into our collection of Professional Nail Care Collections and Nail Files & Buffers to ensure your toolkit is ready for a flawless service every time.
Beyond the Basics: Advanced Care for Specialized Services
Sometimes, the yellowing issue stems from a specific service, like the ever-popular Pink-and-White or French fade (Baby Boomer) nails. These require extra care. If you're noticing that your white acrylic powder is turning yellow quickly, it could be a sign that the powder itself is old or that your monomer is contaminated. The same UV and lifestyle rules apply, but the visual impact is far more noticeable against the stark contrast of the white tip. For these services, using a high-quality, non-yellowing white acrylic is essential.
Another advanced area is the use of colored acrylic powders. Some colors, especially pastels or whites, are more prone to discoloration than others. The same principles of prevention apply, but you must be even more vigilant with your prep and sealing. When a client wants a different design during a fill, ensure you remove the old product properly to avoid chemical reactions between the old and new colors . If you're working with gel-polish overlays on natural nails or acrylics, remember that incomplete curing under the lamp can also cause yellowing and lifting, especially on thumbs which often don't fit perfectly in smaller lamps. For all your advanced treatment needs, including LED Bright Lamps for curing, Pure Spa Direct has the professional equipment you need to ensure a perfect outcome.
Conclusion: Turning Yellow into Green (The Good Kind)
Dealing with yellowing acrylic can feel like a losing battle, but armed with the right knowledge, you can win the war. It's a multi-front attack: quality products, meticulous technique, contamination control, and proactive client education. By understanding the chemistry, respecting the environment, and mastering your application, you can confidently deliver nails that stay clear, bright, and beautiful for weeks on end. Remember, every time a client leaves your chair with a flawless set, they become a walking billboard for your expertise.
At Pure Spa Direct, we are your partners in professional excellence. We provide the high-quality Acrylic Nail Supplies and education you need to elevate your services. So go ahead, tackle those tricky cases, educate your clients with confidence, and watch your reputation—and your business—grow. Here's to crystal-clear nails and even clearer profits.