
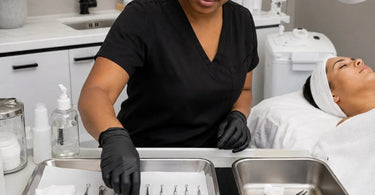
Do great work, effortlessly... or at least, that's the dream, right? But let's be real, if you've ever been mid-facial, wrestling with a stubborn blackhead, and your extraction tool has more gunk on it than a teenager's gaming keyboard, you know the struggle is real. We've all been there, honey. You're trying to be a skin-saving superhero, but your workflow is giving more 'chaotic villain's lair' than 'serene spa sanctuary'. A clear clean-to-dirty workflow for your extraction tools isn't just a fancy term we estheticians throw around to sound important; it's the secret sauce to flawless results, happy clients, and keeping your license shiny and intact. Let's dive into why this system is your new BFF and how to implement it without losing your mind.
Think of a clean-to-dirty workflow like a well-choreographed dance. You wouldn't start a tango with your shoes on the wrong feet, right? (Unless you're into that kind of chaos, in which case, you do you, boo). The same principle applies to your extraction tools. Having a designated path for them to travel—from the sterile, pristine environment of your autoclave or disinfectant, to the warzone of a client's pores, and finally to the contaminated 'needs-a-bath' zone—is non-negotiable. It's about respecting your craft, protecting your clients, and frankly, saving your own sanity.
The Struggle is Real: Why You Need a System
Imagine this: You've just finished a deep cleansing facial on a client with congested skin. You used your trusty Spa Tools & Implements to successfully extract what felt like a decade of built-up gunk. You feel like a true skin whisperer. You're riding that professional high, but then, reality hits. Where do you put that dirty tool? On the counter? In your pocket? If your answer is anywhere other than a designated 'dirty' container, we need to have a serious sister-to-sister talk. In your busy spa, tools are the unsung heroes (and sometimes, the silent villains) of your operation. Without a clean-to-dirty workflow, tools become mobile germ-carriers, turning your pristine treatment room into a petri dish. You wouldn't use the same spatula to apply a client's mask after it fell on the floor, so why would you risk using a dirty extractor?
Let's get one thing straight: this isn't just about aesthetics or your personal brand (though both are important). This is about health and safety. State boards across the country are starting to crack down harder than ever on sanitation protocols. In fact, in states like Indiana and Iowa, it is now legally required to sterilize comedone extractors before use on a customer . That's not a suggestion, honey; that's the law! A clear workflow isn't just about looking professional; it's about keeping you out of legal hot water and your clients out of harm's way. Cross-contamination is the ultimate party pooper, and it can lead to serious infections . Implementing a flawless system ensures that every single tool that touches a client's face is as clean as a whistle.
The Anatomy of a Flawless Workflow: Clean, Dirty, and In-Between
Alright, let's get down to the nitty-gritty. An efficient clean-to-dirty workflow is built on three distinct zones, and you need to treat each one with the respect it deserves. Think of it like a spa-day for your tools.
Stage 1: The Clean Zone (The Sanctuary)
This is where your tools live when they're not on the job. It's their zen garden, their peaceful retreat. In this zone, you need a clean, closed container where your sanitized tools can rest, ready for action. This is also the zone for your pre-service prep. You'll want to open your sealed packs of lancets in front of your client so they know you're a pro . In a perfect world, a fresh, sterile cotton pad and a single-use spatula await every new face.
Stage 2: The Dirty Zone (The Biohazard Bin)
This is the place where tools go to get their groove back. It's a dedicated, clearly labeled container (usually filled with a hospital-grade pre-cleaning solution) for any instrument that has touched a client. This is the quarantine zone. Single-use items like wooden applicators, gauze, and cotton pads immediately go into the trash . But for your reusables like your metal comedone extractor, into the dirty bin they go until they get the full spa treatment.
Stage 3: The Decontamination Station (The Rehab Center)
This is the bridge between the dirty zone and the clean zone. After sitting in their pre-cleaning solution, your tools need a thorough scrub with a dedicated brush and a hospital-grade disinfectant or a run through an autoclave. This is where the real magic happens. Cleaning is physically removing the gunk; disinfecting is killing the bacteria . And don't forget that this applies to more than just your tools—wipe down your facial bed and headrest too! .
Your Step-by-Step Guide to Extraction Domination
Now that you understand the zones, let's walk through a full extraction using a flawless clean-to-dirty workflow. You're not just a professional; you're an artist.
Step 1: The Prep (Setting the Stage)
Before you even think about squeezing a single pore, you must prep the skin. This is non-negotiable. You wouldn't try to pry a stubborn blackhead out of dry, tight skin, would you? (Spoiler alert: if you do, you'll cause trauma, tearing, and a client who will never forgive you). Start by using a Facial Steamer to soften the skin and open those pesky pores . This turns a difficult extraction into a gentle glide. Follow up with a Hydrodermabrasion treatment to loosen dead skin cells and allow that blackhead to pop out smoothly .
Step 2: The Main Event (Extraction with Precision)
Your clean, beautifully-sterilized comedone extractor is your weapon of choice. The large loop is for those open comedones (blackheads) and the smaller loop is for closed comedones (whiteheads) . Hold it at a 45-degree angle, center the loop over the pore, apply even pressure downward, and roll or glide the tool forward. If it doesn't come out easily on the first try, stop! It's not ready, and forcing it will cause redness and broken capillaries . You're an artist, not a bulldozer. Use a gentle rocking motion, and if you're dealing with deeper whiteheads, you may need to use a sterile lancet to create a tiny opening first .
Step 3: The 'Tidy As You Go' Technique
Here's where the clean-to-dirty workflow becomes second nature. After every single extraction, wipe the debris off your tool onto a clean piece of gauze. Do not wipe it on your apron, your chair, or your client's forehead (I'm looking at you, newbies). Once that tool leaves the skin, it is now officially DIRTY. Place it immediately into your designated dirty container. This prevents you from accidentally reusing it on another part of the face. If you need to use it again, have multiple sterilized tools ready to go in your clean zone.
Common Workflow Mistakes (And How to Avoid Them)
Even the best of us can get a little sloppy when we're in the zone. Here are the pitfalls to avoid like the plague:
Mistake #1: The 'Eww, I'll Clean It Later' Approach - Leaving dirty tools sitting on the counter after a service. Not only is it unsightly, but it's a biohazard.
Mistake #2: The 'Good Enough' Sanitization - Just wiping a tool down with a wet wipe and calling it a day. Professional extraction tools require proper disinfection or sterilization. Use professional cleaners and disinfectants to avoid cross-contamination.
Mistake #3: The 'One Tool to Rule Them All' Fallacy - Trying to use the same extractor for every single blackhead without cleaning it in between. Each extraction creates a new dirty tool. Use multiple tools or clean as you go.
The 'After' Party: Post-Extraction Care is Key
So, you've successfully extracted the contents of a thousand pores and your client's skin looks clear as a bell. Don't stop now! Post-extraction care is vital to calming the skin and preventing redness. Use a soothing serum and a calming mask to bring any inflammation down. If your client tends to break out, a quick pass with a High Frequency Machine can work wonders to kill bacteria and speed up healing . And as a final touch, slather on a high-quality moisturizer to keep that skin happy. Make sure to use new, clean tools for every single step.
Level Up Your Tool Game with Pure Spa Direct
Ready to revolutionize your extraction game and show your clients you're a true professional? At Pure Spa Direct, we've got everything you need to create the ultimate clean-to-dirty workflow. We stock the best extraction tools, the most effective disinfectants, and all the spa essentials you could possibly need. Explore our massive selection of equipment & furniture and professional salon equipment to ensure your workspace is as efficient as it is gorgeous. Don't let a messy workflow ruin your flawless reputation. Shop our collections of wax warmers, skincare, and everything in between to find your new favorites. Stop wrestling with chaos and start creating spa magic. Your clients (and your license) will thank you!
