
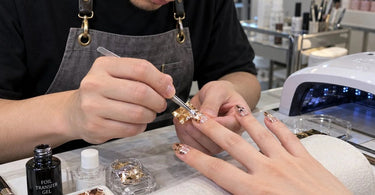
Invest in your success... and in the little techniques that turn a frustrating nail art appointment into a gorgeous finished set. If you have ever pressed a beautiful metallic foil onto a perfectly tacky nail, peeled away the backing, and discovered a design that looks like it survived a tiny tornado, you know exactly how annoying patchy foil transfer can be. The adhesive seemed ready, the foil looked fabulous, and your client was already imagining those glamorous fingertips. So why did only half the design transfer? The answer usually involves more than adhesive readiness, and understanding those hidden variables can save professional nail technicians time, product, and a whole lot of dramatic sighing.
Whether you specialize in intricate designs, luxurious metallic accents, or quick upgrades to traditional manicures, consistent foil application is a valuable salon skill. With the right nail foil transfer supplies, proper preparation, and a repeatable application process, patchy results can become the exception rather than the salon's most unwelcome recurring guest.
Why Does Nail Foil Transfer Look Patchy?
Patchy foil transfer happens when portions of a decorative foil layer fail to release from their carrier film and adhere evenly to the prepared nail. Instead of a continuous metallic finish or complete printed pattern, the technician sees bare spots, missing details, or inconsistent coverage.
The confusing part is that the adhesive may feel tacky and appear perfectly ready for application. Unfortunately, tackiness alone does not guarantee successful transfer. The adhesive must provide suitable contact across the intended design area, the foil must face the correct direction, and the technician must apply appropriate pressure to the nail's curved surface.
Several common factors can contribute to incomplete transfer:
- Uneven or excessively thick adhesive application.
- Incorrect drying or curing for the particular adhesive system.
- Contamination from skin oils, dust, or product residue.
- Insufficient pressure along nail sidewalls and curved areas.
- Incorrect foil orientation.
- Incompatible adhesive and foil materials.
- Premature or inconsistent removal of the carrier film.
- Surface irregularities that prevent full contact.
The good news? Most of these problems can be identified through simple adjustments rather than completely rebuilding the manicure.
The Adhesive Feels Ready, But Is It Actually Ready?
One of the biggest misconceptions about foil transfer is that every adhesive behaves the same way. Professional nail technicians encounter different products, including air-dry foil glues, UV/LED foil transfer gels, and specialty adhesives designed for particular decorative effects.
These materials may look similar in the bottle, but their application requirements can differ considerably.
An air-dry foil adhesive may require a specific drying period before reaching its intended transfer state. Some formulas change appearance as they dry. A UV/LED foil transfer gel, on the other hand, requires curing under a compatible lamp according to the manufacturer's instructions.
Applying foil too early can leave the adhesive inadequately prepared. Applying it after the recommended working conditions have changed can also affect performance, depending on the formula.
For gel systems, insufficient curing may leave the material too soft or improperly set. Excessive curing can also be problematic for certain formulas, although this depends on product chemistry and manufacturer specifications.
Professional tip: Follow the specific adhesive manufacturer's drying or curing instructions rather than relying on a universal time. A product that worked beautifully with one lamp or adhesive brand may behave differently with another combination.
Explore nail foil glue and foil transfer gel options when evaluating products for your salon's nail art services.
Too Much Adhesive Can Be Just as Troublesome as Too Little
It seems reasonable to assume that adding extra adhesive will improve transfer. More glue means more grip, right? Unfortunately, nail art is not always impressed by enthusiastic product application.
An excessively thick layer can interfere with proper drying or curing, create uneven texture, and prevent predictable foil contact. Meanwhile, an overly thin or incomplete layer may leave portions of the nail without enough adhesive to capture the decorative design.
For professional services, consistency matters more than quantity.
Apply the adhesive in a controlled, even layer according to the product directions. Inspect the nail under adequate lighting before proceeding. Look for streaks, skipped areas, bubbles, and product buildup near the sidewalls.
If the product permits self-leveling, allow the recommended settling time before curing. Avoid flooding the cuticle or surrounding skin, especially when working with gel products.
A quality nail brush or precision application tool can help technicians maintain better control when applying adhesive to smaller design areas.
The Nail Surface May Be Sabotaging Your Beautiful Design
Even an excellent foil adhesive cannot overcome every surface preparation problem.
Residual oils, dust, improperly removed product residue, and uneven coatings may prevent consistent adhesion. Small imperfections that seem invisible before foil application can suddenly become very obvious beneath reflective metallic designs.
This is especially noticeable with smooth, full-coverage foils. Reflective finishes have an impressive ability to highlight every tiny inconsistency. Apparently, gold foil believes in total transparency.
Before beginning the transfer process, make sure the underlying manicure is properly prepared and compatible with the intended adhesive.
Complete the required nail preparation, apply the appropriate base and color products, and cure each layer according to its instructions. If surface cleansing is required, use the recommended product and allow the nail to become ready before continuing.
Do not automatically wipe a cured foil adhesive layer. Many transfer gels depend on their remaining tacky surface, and wiping it can reduce or eliminate the ability to transfer foil.
Useful professional supplies include nail files and buffers, lint-free nail wipes, and compatible nail preparation products.
Are You Using the Correct Side of the Nail Foil?
Sometimes the reason for missing foil transfer is surprisingly simple: the decorative material is facing the wrong direction.
Many transfer foils have a carrier side and a transferable design side. The side intended to contact the adhesive is commonly the less glossy side, but the correct orientation depends on the construction of the particular foil.
Because metallic and printed foils can vary in appearance, technicians should not assume that every product follows exactly the same visual rule.
Review the supplier's instructions or perform a small test transfer before beginning a full manicure.
A quick practice test on a nail tip is far less expensive than discovering the mistake after carefully positioning an intricate design across ten nails.
For salons offering multiple foil finishes, organizing materials by brand and transfer method can make the application process more predictable. Browse nail art supplies for decorative materials that complement your service menu.
Why Foil Transfers in the Center But Not Around the Edges
If the center of the nail transfers beautifully while the sidewalls remain patchy, the problem may involve contact rather than adhesive readiness.
Natural nails and artificial enhancements are curved surfaces. A relatively flat sheet of foil does not automatically conform to those contours when pressed straight down.
The center receives pressure first, while the edges may remain slightly elevated. Even a small gap can prevent the design from making complete contact with the adhesive.
To improve coverage, position the foil carefully and press from the center outward. Work gently across each sidewall, paying attention to the curve of the nail and the intended design boundaries.
A silicone applicator or suitable nail art tool can help distribute controlled pressure without requiring excessive rubbing.
For larger designs, use overlapping movements rather than one hurried swipe. The objective is complete contact, not winning an imaginary speed-rubbing championship.
Choose comfortable working angles and reposition the client's hand as needed. Proper hand placement can make difficult sidewall areas easier to reach.
Can Rubbing Too Hard Actually Make Foil Transfer Worse?
Absolutely. Pressure is important, but aggressive rubbing is not always better.
Excessive friction can shift the carrier film, distort delicate printed details, or disturb a transfer that was already properly positioned. Some specialty foils are particularly sensitive to rough handling.
Use firm but controlled movements appropriate for the adhesive and decorative material.
Rather than attacking the foil with the determination of someone scrubbing a kitchen floor, concentrate on applying even pressure across the complete design.
If a section does not transfer, identify the cause before increasing force. The problem may involve insufficient adhesive coverage, poor contact, or incompatible products rather than a lack of pressure.
Why Fingerprints and Oils Can Cause Missing Foil Sections
Handling the transfer surface repeatedly can introduce skin oils or residue that interfere with how the decorative layer contacts the adhesive.
This issue is particularly frustrating because contamination may not be visible until the carrier film is removed.
Professional technicians can reduce the risk by handling foil along the edges, using clean tools, and cutting manageable sections before beginning the application.
If the foil manufacturer's instructions permit cleaning the transfer surface, follow the recommended method. Do not assume that alcohol or other solvents are safe for every printed or specialty foil, since some decorative coatings may be damaged.
Keep foil sheets protected from unnecessary handling, dust, moisture, and contact with other salon products.
A clean, organized manicure station supports better results and reduces interruptions during detailed nail art services.
Could Your Foil and Adhesive Be Incompatible?
Not every foil performs equally with every adhesive.
Different decorative foils may use different backing materials, coatings, pigments, and release characteristics. Similarly, adhesives vary in tack, viscosity, curing requirements, and intended application methods.
A combination that works beautifully with a delicate printed foil may perform differently with a dense metallic design or another decorative finish.
Before introducing a new foil product to your regular service menu, perform a compatibility test using your actual salon materials.
Apply the foil over a prepared practice tip using the same adhesive, lamp, and application technique used during appointments. Evaluate the transfer before applying a protective top coat.
Repeat the test with a second adhesive if necessary, changing only one variable at a time.
Documenting reliable combinations helps establish consistent service procedures and reduces the amount of experimentation required during client appointments.
Does the Color Underneath the Foil Matter?
The base color generally does not determine whether foil releases successfully from its carrier. However, it can dramatically influence how an incomplete transfer looks.
For example, a metallic gold design placed over a contrasting dark background will make tiny missing sections more noticeable than a similar design over a complementary shade.
Technicians who want a continuous metallic appearance may benefit from selecting an underlying color that visually complements the foil.
For intentional distressed effects, stronger contrast can actually become part of the design.
This is where technical preparation and artistic planning work together. A small imperfection does not always require a complete restart if the final design remains attractive and meets the client's expectations.
Explore professional gel polish and professional nail polish options when planning coordinated foil designs.
How to Apply Nail Transfer Foil More Consistently
Developing a repeatable process is one of the best ways to reduce patchiness and maintain predictable appointment timing.
- Prepare the nail. Complete the appropriate manicure preparation and remove interfering residue according to the product system.
- Apply the underlying color. Use a suitable base and color product, completing any required curing or drying.
- Inspect the surface. Check for uneven texture, contamination, or areas that could prevent smooth contact.
- Apply foil adhesive evenly. Follow the recommended layer thickness and avoid touching surrounding skin.
- Dry or cure correctly. Use the specific adhesive manufacturer's instructions, including any lamp compatibility requirements.
- Position the foil properly. Make sure the intended transfer side faces the adhesive.
- Apply controlled pressure. Work across the center, sidewalls, and other curved areas until the intended design has made contact.
- Remove the carrier carefully. Follow the foil manufacturer's recommended removal technique while watching for sections that have not transferred.
- Correct imperfections. Use an appropriate local repair method when possible rather than automatically restarting the entire nail.
- Seal the finished artwork. Apply a compatible protective coating according to the nail system instructions, including free-edge protection where appropriate.
Consistency is especially valuable in busy salons where technicians need to maintain beautiful results without allowing one decorative accent to turn into an unexpected twenty-minute troubleshooting session.
What Should You Do When the Foil Has Already Transferred Patchily?
Discovering missing areas does not necessarily mean starting over.
First, determine whether the design is intended to be continuous or intentionally irregular. Small gaps may be acceptable in distressed metallic artwork, but they can be obvious problems in geometric patterns or full-coverage finishes.
If the carrier has not been fully removed, carefully repositioning and pressing the missed area may help, provided the foil and adhesive system allows it.
For small isolated gaps, some products permit localized adhesive application followed by a second transfer. Follow the manufacturer's instructions for any additional curing or drying.
If the decorative layer has wrinkled, shifted significantly, or developed extensive missing sections, a more complete correction may produce a cleaner result.
Never apply additional uncured gel haphazardly over surrounding skin or assume that layering products will correct an incompatible transfer system.
For professional services, a controlled repair is preferable to repeatedly applying materials without understanding the original cause.
How to Keep Foil From Wrinkling or Lifting Under Top Coat
A beautiful transfer still needs appropriate protection.
Foil designs can become vulnerable to wear when the protective finishing layer fails to cover the decoration properly or does not bond well with the underlying system.
Select a compatible gel top coat or finishing product recommended for the particular nail enhancement system.
Some foil systems benefit from an intermediate clear layer before the final top coat. Others are designed for direct sealing. Follow the manufacturer's instructions rather than assuming that adding more layers always improves durability.
Apply the finishing product evenly and protect the free edge where appropriate. Avoid unnecessarily thick layers, flooding surrounding skin, or using incompatible products.
Complete the specified curing process and check the finished surface for wrinkles, exposed decorative edges, or uneven coverage.
A properly finished foil design should look intentional and polished, not like it is planning an escape from the nail.
Why Practice Tips Are Worth Their Weight in Gold Foil
Introducing new nail art materials directly into client services can create unnecessary uncertainty.
Practice tips allow technicians to evaluate product combinations without the pressure of a scheduled appointment.
They also make troubleshooting easier because individual variables can be isolated. For example, a technician might test two adhesive application thicknesses while keeping the foil, lamp, and pressing technique identical.
Another test might compare different pressure methods using the same prepared surface.
Record the results of successful combinations and establish a simple salon reference guide for frequently used materials.
This approach is especially useful for teams with multiple technicians. Shared procedures make results more consistent and help new staff members understand the products used in the salon.
Useful training materials include nail practice tips, decorative nail foils, and suitable application tools.
Build a Better Foil Transfer Supply Station
A thoughtfully organized workstation can improve the efficiency of decorative nail services.
Keep commonly used foil designs, compatible adhesives, precision tools, and finishing products within comfortable reach. Separate clean application supplies from used materials to reduce unnecessary contamination.
Choose lighting that allows technicians to inspect reflective finishes without excessive glare. A suitable LED work lamp can help reveal missed sections and uneven coverage during application.
Maintain professional cleaning procedures for reusable tools and work surfaces using appropriate products and methods. Explore professional salon cleaners and disinfectants for workstation maintenance.
For frequently requested designs, pre-cut foil sections or prepare organized application kits before the appointment begins.
The less time spent searching for supplies, the more attention technicians can devote to accurate placement and finishing.
Make Foil Nail Art a Profitable Salon Upgrade
Foil designs can be an attractive addition to professional manicure services because they offer visual impact without necessarily requiring extensive freehand artwork.
Metallic accents, abstract patterns, marble-inspired effects, and decorative prints give clients options ranging from understated elegance to full celebration mode.
Rather than offering every possible foil style at one flat price, salons can develop a structured service menu based on complexity, coverage, and appointment time.
For example, a simple accent nail may require less time and material than a detailed full-set application. Pricing should reflect technician labor, product consumption, preparation, and any additional finishing steps.
Keep a portfolio of reliable designs that have been tested with the products used in your salon. Displaying examples can help clients choose an appropriate service and set realistic expectations.
Foil art also pairs well with selected decorative embellishments, including nail art rhinestones, when the overall design and enhancement system support the combination.
Reliable technique allows salons to offer decorative upgrades confidently instead of treating every foil appointment like an unpredictable science experiment.
Frequently Asked Questions About Patchy Nail Foil Transfer
Why is my nail foil adhesive sticky but not transferring?
A sticky surface does not guarantee effective transfer. The adhesive may be uneven, improperly dried or cured, contaminated, or incompatible with the foil. Incorrect orientation and insufficient contact pressure can also prevent the decorative layer from releasing.
Can I use regular gel polish's sticky layer for nail foil?
Some decorative effects may work with particular gel inhibition layers, but the results are not always reliable for full foil transfer. A dedicated foil transfer product is generally the more predictable choice when consistent coverage is required.
Why does foil transfer work on one nail but not another?
Differences in nail curvature, adhesive thickness, lamp positioning, surface preparation, and application pressure can create inconsistent results. Compare the affected nails systematically before changing products.
Should I wait longer before applying foil?
Only if the adhesive manufacturer's instructions require additional drying or curing. Waiting longer is not automatically beneficial, and different adhesive systems have different requirements.
How do I prevent patchy transfer near the cuticles?
Apply the adhesive evenly within the intended design area without touching the skin. Press the foil carefully along the curved cuticle region using controlled movements and an appropriate tool.
Can I fix missing foil without redoing the entire manicure?
Often, yes. Small gaps may be corrected by repositioning the foil or performing a localized transfer using the appropriate adhesive method. Larger defects may require removing and reapplying the affected decorative layer.
What is the best way to protect finished nail foil?
Use a compatible finishing system recommended for the adhesive and nail products involved. Apply an even protective layer, follow curing instructions, and protect vulnerable edges where appropriate.
Turn Patchy Foil Frustration Into Professional Nail Art Confidence
Patchy foil transfer is rarely a mystery once technicians understand the interaction between adhesive preparation, nail surface condition, material compatibility, and application pressure.
The most important lesson is that an adhesive feeling ready is only one part of a successful transfer. Even coverage, correct foil orientation, controlled contact, and suitable finishing products all contribute to the final result.
By testing product combinations, following manufacturer instructions, and building a consistent salon procedure, technicians can reduce frustrating gaps and deliver more predictable decorative services.
Pure Spa Direct offers professional beauty and nail supplies from a variety of manufacturers, making it easier for salon owners and nail technicians to explore materials for their service menus. Browse professional nail care collections, manicure essentials, and nail art supplies when building or refreshing your workstation.
Because your clients deserve beautiful foil designs, your salon deserves efficient appointments, and nobody deserves to spend their afternoon negotiating with a stubborn little sheet of holographic plastic.
