
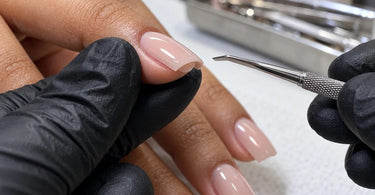
Clients demand the best... and sometimes the tiniest details make the biggest difference between a gorgeous manicure and a disappointing one. Picture this: You have spent an hour perfecting the shape, building beautiful structure, applying flawless color, and creating a shine so impressive that your client cannot stop admiring her nails. Then she flips her hand over and discovers a little mountain of cured product hiding underneath the free edge. Surprise! That beautiful nail set just developed an unwanted bonus feature. Tiny product buildup under the free edge might seem like an insignificant finishing detail, but for professional nail technicians, it can affect comfort, cleanliness, appearance, and the overall quality of an otherwise excellent service.
The underside of a nail enhancement rarely gets the same attention as the glossy surface everyone admires. However, experienced nail professionals understand that an exceptional set needs to look and feel finished from every angle. Whether you work with professional gel polish, acrylic nail supplies, builder gels, or extension systems, controlling excess product around the free edge is an essential part of consistent workmanship.
What Exactly Is Product Buildup Under the Free Edge?
The free edge is the portion of the nail that extends beyond the fingertip. On natural nails, this area separates from the underlying skin and forms the edge that technicians shape and refine. With enhancements, especially longer extensions, the underside becomes an important part of the finished structure.
Product buildup occurs when excess gel, acrylic, base coat, color, or another enhancement material collects beneath that edge. Instead of a smooth, intentional underside, the nail develops a bump, ridge, hanging droplet, or uneven patch.
Sometimes the buildup is immediately visible. Other times, it hides until the client turns her hand over, touches the edge, or notices that something feels uncomfortable.
Not every visible underside structure is a mistake. Sculpted enhancements may have intentional thickness or reinforcement depending on their design. The problem is uncontrolled excess material that disrupts the shape, creates roughness, or interferes with comfortable wear.
Why Such a Small Amount of Product Can Become a Big Problem
It is tempting to dismiss a tiny underside bump as a cosmetic detail. After all, the top of the nail looks beautiful, right? Unfortunately, nails do not spend their entire lives posing for Instagram photographs.
Clients type, wash their hands, handle clothing, reach into handbags, and perform hundreds of little tasks throughout the day. The underside of an enhancement participates in many of those activities.
Unwanted product buildup can create several problems:
- Uncomfortable edges: Hard ridges or protrusions may feel unpleasant when a client touches the underside of the nail.
- Snagging: Rough or irregular material may catch on fabric, hair, or delicate materials.
- Inconsistent thickness: Excess material can make the extension appear bulky or poorly balanced.
- Cleaning difficulties: Irregular surfaces and crevices can make routine cleaning more difficult.
- Visual imperfections: An otherwise elegant extension may look unfinished when viewed from underneath.
- Client dissatisfaction: A client may notice the unevenness repeatedly, even if nobody else can see it.
None of these issues automatically means the enhancement will fail. However, they are avoidable quality concerns that can influence how a client experiences her manicure between appointments.
The Sneaky Ways Product Gets Under the Nail
Understanding how buildup develops is the first step toward preventing it. The cause often depends on the enhancement system, application technique, and nail shape.
Applying too much product: A large bead of gel or acrylic can spread beyond its intended placement area. When the product reaches the free edge, gravity, brush pressure, or manipulation may encourage it to move underneath.
Working with very fluid gel: Some self-leveling gels move quickly, particularly in warm environments. A beautifully controlled application can become less controlled if the technician waits too long before curing.
Overloading the brush: A saturated color or base coat brush can deposit more product than necessary, allowing material to collect around the tip.
Incorrect form placement: During sculpted extension services, poorly fitted forms can create gaps or uneven support that allow product to move into unwanted areas.
Tip application problems: Excess adhesive or extension gel may squeeze out beneath certain full-cover tip systems when too much product or pressure is used.
Incomplete finishing checks: Sometimes the application is technically sound, but nobody inspects the underside before declaring the service complete.
The solution is not simply to use less product everywhere. Technicians still need to maintain the structure and thickness required by their chosen enhancement system. The goal is controlled placement, not underbuilding.
Why Builder Gel Requires Special Attention
Builder gels are popular because they allow nail professionals to create strength, shape, and beautiful overlays. However, their movement characteristics vary significantly between formulas.
A thinner self-leveling builder gel may continue moving after placement, especially when the hand is tilted or the material is applied too generously. If product travels beyond the free edge, it can form an unwanted ridge or drip.
Professional control begins with matching application technique to product viscosity. A thicker gel may remain in place more easily, while a thinner formula may require smaller amounts, careful hand positioning, and appropriate curing intervals.
Technicians should always follow the manufacturer instructions for application thickness, compatible curing lamps, and curing times. A quick flash cure may help hold certain products in position when the manufacturer permits it, but it is not a substitute for the complete required cure.
For salons offering structured gel services, keeping reliable builder gels, appropriate application brushes, and compatible curing equipment available can support more predictable results.
Acrylic Enhancements Can Have Underside Issues Too
Gel does not get exclusive ownership of the underside buildup problem. Acrylic enhancements can also develop unwanted ridges, thickness, or irregular shapes beneath the free edge.
These problems may appear when acrylic is placed too close to the underside, when a bead is excessively wet or large, or when an extension form is positioned incorrectly.
Because acrylic changes consistency as it polymerizes, timing is particularly important. Technicians must understand the working characteristics of their liquid-and-powder system and maintain control while the material is still workable.
Correct bead sizing, intentional brush placement, and proper form fitting can reduce unnecessary finishing work.
Having a dependable selection of professional nail brushes and tools makes precise placement easier. The right brush should give the technician control rather than forcing her to wrestle with a product blob that has developed its own personality.
The Upside-Down Inspection: A Tiny Habit With Huge Value
One of the simplest improvements a nail technician can make is to check the underside of every nail before completing the service.
It sounds obvious, but the view from above does not reveal everything happening underneath an extension.
After the enhancement has been properly cured or set, gently reposition the client hand and inspect the underside of each free edge under adequate lighting.
Look for:
- Unexpected ridges or hanging pieces of product.
- Uneven thickness from one side of the extension to the other.
- Excess material around the lower edges of the tip.
- Sharp corners or rough finishing marks.
- Areas where product may have contacted the skin.
- Visible debris or remaining filing dust.
Compare the nails with one another. Consistency matters, particularly on longer extensions where underside irregularities are easier to notice.
A well-positioned LED bright lamp can make these small imperfections easier to identify before the client leaves the manicure station.
How to Remove Unwanted Buildup Without Damaging the Enhancement
Once a technician discovers unwanted material beneath the free edge, the next step depends on the product, its curing state, and the structure of the enhancement.
For fully cured or properly hardened enhancement material, an appropriate fine file or carefully selected finishing tool may help refine accessible irregularities. However, the technician must avoid aggressive thinning of the extension or filing into the natural nail or surrounding skin.
Products should never be forcibly peeled away from the natural nail or skin. If uncured product has contacted the skin, it should be addressed promptly according to the manufacturer instructions rather than cured in place.
Particular caution is necessary around the hyponychium, the sensitive tissue beneath the nail free edge. This tissue should not be scraped, cut, or aggressively pushed back in an attempt to make the underside appear cleaner.
For technicians using electric files, training and control are essential. E-file bits that are appropriate for removing enhancement material are not automatically appropriate for use near living tissue.
Explore nail files and buffers for professional finishing options, and select tools based on the product system and the service being performed.
If excess material cannot be safely refined without compromising the structure or contacting sensitive tissue, correcting or replacing the affected enhancement may be the better professional decision.
Do Not Confuse Product Buildup With Natural Nail Debris
There is another important distinction that deserves attention. Not everything visible beneath the free edge is leftover enhancement product.
Ordinary debris can collect beneath natural and enhanced nails. The underside may also contain attached living tissue, particularly when the natural nail has grown longer.
A technician should never assume that something beneath the nail needs to be scraped away.
If the area appears irritated, painful, discolored, swollen, or otherwise abnormal, avoid aggressive cleaning or cosmetic coverage. Follow appropriate professional protocols and recommend medical evaluation when indicated.
For routine cleaning, gentle techniques are preferable to sharp instruments or forceful scraping. The goal is a clean, comfortable enhancement without disturbing the natural protective structures of the nail unit.
Why Leaving Uncured Product Under the Nail Is Especially Concerning
There is a meaningful difference between a fully cured cosmetic ridge and uncured nail enhancement product remaining beneath the free edge.
Uncured gel and other reactive nail products may contain ingredients capable of causing skin sensitization. Repeated skin exposure can increase the risk of allergic contact dermatitis in susceptible individuals.
This is one reason professionals should avoid skin contact during application, use compatible curing equipment, respect product thickness limitations, and follow manufacturer instructions precisely.
An enhancement that looks hardened on the surface is not automatically proof of complete curing throughout its full thickness.
More curing time is not a universal correction for incompatible lamps, overly thick application, or improperly formulated product combinations.
For technicians, protecting the client skin is more important than preserving a flawless-looking surface. If proper curing is uncertain, follow the manufacturer guidance for safe correction or removal instead of simply covering the questionable area with another layer.
Seven Habits That Help Prevent Free Edge Buildup
Prevention becomes much easier when underside checks are part of the everyday manicure routine rather than an occasional rescue mission.
- Use controlled product amounts. Choose bead sizes and brush loads appropriate for the nail length, shape, and enhancement system.
- Position extension forms carefully. Check that sculpting forms fit securely and support the desired extension shape without unintended gaps.
- Watch the direction of product movement. Pay attention to hand position and gel viscosity, especially during self-leveling applications.
- Keep product off the skin. Remove accidental uncured product contact according to system instructions before curing.
- Inspect the underside before final finishing. A quick visual check can identify defects that are not visible from the top.
- Refine with appropriate tools. Use controlled filing techniques only where safe and structurally appropriate.
- Finish with a complete quality check. Examine shape, symmetry, surface finish, sidewalls, and free edges before the client leaves.
These habits work best when they become automatic. The experienced technician does not wait for a client to point out an underside bump. She already knows where to look.
Why Professional Lighting and Workstation Setup Matter
Even skilled technicians can miss small imperfections when working in poor lighting or uncomfortable positions.
Good lighting makes it easier to see subtle changes in product thickness, especially beneath transparent or lightly colored extensions.
A properly arranged nail table or manicure station also helps technicians maintain control throughout the service. Brushes, files, wipes, and other essential supplies should be within easy reach so the technician does not have to interrupt application repeatedly.
Consider workstation height, hand support, and visibility when designing the service area. Comfortable positioning benefits the technician and makes it easier to check the nails from different angles.
Organized manicure essentials can reduce unnecessary interruptions and support a more consistent finishing routine.
The Client Experience Does Not End With the Topcoat
For nail professionals, finishing details are closely connected to how clients perceive quality.
A client may not understand the difference between apex placement, extension balance, and product viscosity. She does understand whether her nails feel smooth, comfortable, and beautifully finished.
Imagine two salons producing equally attractive photographs of a manicure. At one salon, the technician finishes the topcoat and immediately moves to the payment process. At the other, the technician takes an additional moment to inspect every angle, smooth appropriate finishing areas, remove residual dust, and check the overall result.
The difference is not necessarily visible in the appointment photos, but it can become noticeable during everyday wear.
Small quality-control routines communicate care and professionalism without requiring an elaborate explanation.
Clients notice when a technician treats the underside of their nails with the same attention as the shiny surface on top.
Should Clients Clean Under Their Nail Extensions at Home?
Basic home-care education can help clients maintain the appearance and cleanliness of their nail enhancements between salon appointments.
Encourage clients to wash their hands regularly, gently clean accessible areas beneath extensions, and dry their hands thoroughly afterward.
Clients should avoid using sharp objects to dig beneath enhancements. Aggressive cleaning can injure sensitive tissue or damage the nail.
If an extension begins lifting, develops a persistent snag, traps debris in an inaccessible area, or becomes uncomfortable, advise the client to schedule a professional assessment rather than attempt a forceful home repair.
Clients should also understand that sudden discoloration, unusual odor, pain, or inflammation should not simply be hidden beneath fresh product.
Thoughtful aftercare instructions reinforce the value of professional maintenance appointments and help clients recognize when something needs attention.
Make Underside Quality Control Part of Every Service
Salon owners and educators can turn this small finishing detail into a practical training opportunity.
Instead of relying on each technician to remember an underside inspection, incorporate it into the standard completion checklist for enhancement services.
A straightforward routine might include checking extension length, overall shape, sidewall symmetry, surface finish, underside condition, and client comfort.
For new technicians, supervised practice with different enhancement systems can help develop the ability to recognize controlled structure versus accidental buildup.
Training should emphasize product-specific methods rather than treating all gels, acrylics, and extension systems as interchangeable.
Professional education, consistent finishing procedures, and dependable supplies can work together to improve service consistency.
Stock Your Nail Station for Beautiful Results From Every Angle
Preventing underside buildup does not require an enormous collection of specialty gadgets. It requires sound technique, compatible products, good visibility, and reliable finishing tools.
At Pure Spa Direct, we help nail professionals shop for the supplies they need to support their services. As a professional beauty distributor, we offer access to products from established manufacturers rather than manufacturing the enhancement systems ourselves.
Explore our Professional Nail Care Collections for salon supplies, including application products, finishing essentials, and accessories. You can also browse professional nail brands such as CND, Gelish, and OPI when planning your nail service inventory.
Choose supplies that suit your techniques, confirm compatibility within each enhancement system, and follow the instructions supplied by the product manufacturer.
Frequently Asked Questions About Product Buildup Under the Free Edge
Can a small amount of cured gel under the nail cause lifting?
Not necessarily. Lifting depends on several factors, including preparation, adhesion, application, structure, and mechanical stress. An irregular underside may contribute to snagging or unwanted leverage in some situations, but a small ridge does not automatically cause lifting.
Should nail technicians always file beneath an acrylic extension?
No. Underside refinement should be performed only when necessary and appropriate. Excessive filing can compromise the extension structure or injure the natural nail and nearby tissue.
Why does builder gel sometimes drip underneath the nail?
Excess product, low viscosity, hand positioning, and application timing may allow gel to move beyond the intended area before curing. Adjusting technique and following manufacturer guidance can help prevent this.
Can uncured gel simply be cured after discovering it underneath the nail?
Do not assume additional curing will solve the problem. Improper thickness, incompatible equipment, skin contact, or inaccessible product may require correction or removal according to manufacturer instructions.
How can technicians spot buildup before the client notices?
Inspect each properly set enhancement from underneath with adequate lighting before completing the appointment. Look for uneven product, rough projections, trapped debris, and areas of possible skin contact.
The Finishing Detail That Separates Pretty Nails From Professional Results
A beautiful nail set deserves attention from every angle. The color may be flawless, the apex perfectly shaped, and the shine absolutely dazzling, but an uncomfortable ridge beneath the free edge can distract from all that excellent work.
Fortunately, preventing tiny product buildup usually comes down to consistent application control and deliberate finishing habits. Use appropriate amounts of product, understand how each enhancement system behaves, inspect the underside carefully, and correct irregularities using safe, product-appropriate methods.
That extra attention helps deliver the polished, comfortable experience clients expect from a professional nail service.
And remember, the underside of an extension should not be where excess product goes to hide. Give those free edges their own little quality-control moment. Your clients, your reputation, and your beautifully finished manicures will appreciate it.
Explore professional nail supplies at Pure Spa Direct and keep your station ready for gorgeous results from top to tip.
