
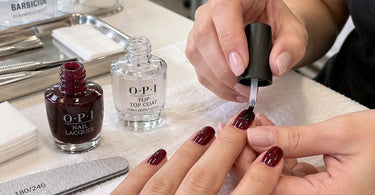
Elevate your business today... by solving one of those tiny manicure mysteries that can turn a gorgeous polish application into a frustrating little disaster: why top coat brushes sometimes drag color. You have carefully applied the perfect shade, checked your coverage, and admired a finish worthy of its own Instagram moment. Then comes the top coat, supposedly the easy part, and suddenly your beautiful burgundy has streaks, your French tip looks suspiciously pink, or your delicate nail art has transformed into modern art nobody requested. The good news? Understanding what makes a top coat brush pick up or move color can help nail professionals prevent smearing, protect their finished work, and deliver consistently beautiful results.
For busy nail technicians, understanding the relationship between professional nail polish, drying time, brush pressure, and top coat chemistry makes a genuine difference. Sometimes the issue is the polish underneath. Sometimes it is the top coat formula. And sometimes that innocent-looking brush is simply working a little too enthusiastically. Let's investigate the usual suspects and learn how to keep beautiful nail color exactly where it belongs.
Why Top Coat Brushes Sometimes Drag Color in the First Place
Top coat dragging occurs when the application brush physically moves pigment, disturbs the underlying polish film, or picks up color that has been softened by the top coat formula. Instead of gliding smoothly over the manicure, the brush creates streaks, transfers pigment, or smears decorative details.
Traditional nail lacquer dries primarily through solvent evaporation. As solvents leave the product, the remaining film-forming ingredients create a progressively firmer coating. Although the surface may appear dry, the layers underneath can still be soft enough to move when another product is applied.
Most conventional top coats also contain solvents. These help the product flow, level, and form a glossy protective film. However, they can also temporarily soften certain underlying polish layers, even when those layers seem dry to the touch.
Add brush pressure or repeated strokes, and suddenly the color has an opportunity to travel. Unfortunately, it rarely chooses a flattering destination.
1. The Color Polish Has Not Dried Enough
One of the most common reasons a top coat brush drags color is that the underlying polish has not reached the appropriate stage of drying for the particular top coat being used.
Imagine applying two generous coats of deep red polish, briefly waiting, and immediately adding top coat. The surface may seem stable, but the lower layers can remain soft. When the brush travels across the nail, the pressure and additional solvents may disturb the pigment.
However, waiting longer is not automatically the correct solution for every product. Some quick-dry top coats are specifically designed to be applied over relatively fresh lacquer. Other systems require additional drying time.
Professional best practices include:
- Follow the manufacturer's instructions for the specific color and top coat combination.
- Apply even, controlled coats rather than excessively thick layers.
- Allow the recommended interval between color applications.
- Adjust timing when using heavily pigmented shades or detailed nail art.
- Avoid assuming that a surface-dry appearance means the entire polish film has hardened.
If dragging happens repeatedly, test the same products with different manufacturer-appropriate application intervals. A simple timing comparison can reveal whether insufficient drying is contributing to the problem.
2. Too Much Brush Pressure Disturbs the Polish
Your top coat brush should glide across the nail, not perform an archaeological excavation through the color layers.
Excessive pressure bends the bristles against the polish surface. If the underlying lacquer is still vulnerable, those bristles can physically displace the pigment and create visible streaks.
This is particularly noticeable with dark colors, bright reds, opaque whites, and delicate decorative designs.
The solution is often a technique called floating the top coat.
Instead of pressing the brush firmly against the nail, load it with an appropriate bead of top coat and allow the liquid to flow between the bristles and the polished surface. Use light, deliberate strokes with minimal contact pressure.
The objective is to move the top coat across the surface without aggressively brushing the layers underneath.
For professionals exploring different application tools, Nail Brushes & Tools can be useful when assembling a manicure workstation that supports controlled, precise application.
3. The Brush Does Not Have Enough Top Coat
Using too little top coat can create an unexpectedly messy result.
When a brush is nearly dry, the bristles make greater direct contact with the underlying color. Instead of allowing the clear formula to flow smoothly, the technician may find herself repeatedly brushing over the same area to achieve coverage.
This increases friction and the likelihood of dragging.
A properly loaded brush carries enough product to create a continuous, even coating without flooding the cuticles or sidewalls.
Try this professional approach:
- Remove the brush from the bottle and control the amount of product against the bottle opening.
- Keep enough top coat on the bristles to support smooth application.
- Place the brush gently near the cuticle without touching the skin.
- Guide the product toward the free edge using light pressure.
- Minimize additional strokes once the surface is evenly covered.
The ideal amount depends on brush design, nail length, nail width, and product viscosity. A narrow natural nail needs a different load than a long enhancement with extensive nail art.
Remember, floating means maintaining a cushion of product, not flooding the client's entire fingertip. We are finishing a manicure, not filling a swimming pool.
4. Overworking the Top Coat Creates Streaks
There is something strangely tempting about making one more brushstroke to perfect a shiny nail.
And then another.
And perhaps just one more because that corner looks slightly uneven.
Unfortunately, excessive brushing can turn an otherwise smooth finish into a streaky one.
As conventional top coat solvents begin evaporating, the product gradually becomes more viscous. Repeated strokes can disturb both the top coat and the color underneath, particularly if the layers are still soft.
For many nail shapes, a controlled center stroke followed by strokes along each side is an effective starting technique. Wider or longer nails may need additional product distribution, but the objective remains the same: achieve coverage with as little unnecessary manipulation as possible.
If you notice the top coat beginning to pull or become tacky, continuing to brush usually makes the situation worse.
Learning when to stop is a surprisingly valuable manicure skill. The nail does not need a farewell brushstroke.
5. The Top Coat Formula May Be Softening the Color
Not all top coats interact with every color polish in exactly the same way.
Traditional lacquer products contain different combinations of solvents, resins, film formers, and other ingredients. Some top coat formulas may temporarily soften particular colors more readily than others.
Quick-dry formulations can behave differently from conventional top coats, while specialty finishes and decorative coatings may have additional compatibility requirements.
That is why a product combination that works beautifully with one shade may occasionally create trouble with another.
When selecting nail top coats, consider the manufacturer's recommended application method, drying requirements, and compatibility with the color system being used.
Professional brands available through collections such as OPI, Essie, and CND offer different nail product systems. Reviewing the instructions for each specific product is more reliable than assuming every top coat behaves identically.
When testing unfamiliar combinations, use practice tips before introducing the products into a fully booked service schedule.
6. Highly Pigmented Colors Can Make Dragging More Noticeable
Richly pigmented polishes can be particularly unforgiving when their color film is disturbed.
Deep reds, navy shades, black lacquer, saturated purples, and highly opaque colors make transferred pigment especially easy to see.
White and pale pastel manicures can also reveal discoloration immediately when an accent color transfers into the clear top coat.
This does not mean dark or heavily pigmented polishes are inherently defective. Rather, the contrast can make small application problems more obvious.
For darker shades, focus on controlled layer thickness, appropriate drying intervals, and gentle top coat application. If a particular color consistently transfers, evaluate the combination of products rather than assuming technique is the only issue.
Testing multiple shades from your Professional Nail Care Collections can help identify whether the issue is shade-specific or affects an entire manicure process.
7. Nail Art Is Especially Vulnerable to Smearing
Fine lines, stamped patterns, hand-painted flowers, and intricate designs are wonderful ways to elevate a manicure. They are also excellent opportunities for a top coat brush to demonstrate exactly how quickly a masterpiece can become a watercolor experiment.
Some nail art products contain pigments or binders that respond differently to conventional lacquer top coats.
Stamping polish, ordinary nail lacquer used for detailing, water-based paints, and specialty decorative products may each require different sealing techniques.
To reduce smearing:
- Allow the design to reach the drying stage recommended for the decorative product.
- Use minimal brush pressure when applying a compatible top coat.
- Avoid repeatedly brushing across fine lines or detailed patterns.
- Consider a suitable non-smudge or specialty sealing product when recommended for the technique.
- Test unfamiliar combinations on practice tips before offering them to clients.
Explore Nail Art Supplies when preparing for detailed salon services, and confirm that decorative products and sealers are appropriate for use together.
For stamping or delicate painted details, a compatible intermediate sealer may sometimes be helpful. However, not every sealer is suitable for every nail product, so product instructions should guide the decision.
8. Thick Polish Layers Can Create Hidden Drying Problems
A beautiful glossy surface does not always tell the whole story.
When conventional nail polish is applied too thickly, solvents may take longer to escape from deeper portions of the coating. The top surface can begin forming a film while the underlying material remains comparatively soft.
Applying another layer too quickly may trap additional solvent and extend the time needed for the manicure to stabilize.
Thick applications can contribute to dragging, denting, bubbling, and uneven finishes.
For salon technicians, the solution is not necessarily to add extra drying time to every service. Instead, concentrate on controlled product distribution and the manufacturer's recommended layer thickness.
Two appropriate color coats generally perform more predictably than trying to achieve complete opacity with one excessively heavy application, although the exact number of coats depends on the formula.
Good application technique is often more valuable than adding unnecessary product.
9. An Aging or Thickened Top Coat Can Be Harder to Apply
Does your top coat feel unusually stringy, sticky, or difficult to spread?
The bottle itself may be contributing to the problem.
Repeated exposure to air can allow solvents to evaporate from traditional lacquer top coats. As the solvent balance changes, the formula may gradually thicken and become more difficult to level.
A thickened top coat can encourage heavier brush pressure and repeated strokes, increasing the likelihood of disturbing the color underneath.
To maintain product performance:
- Close bottles promptly between applications.
- Keep bottle necks clean enough to allow secure closure.
- Store products according to manufacturer recommendations.
- Watch for unusual stringiness, separation, or changes in consistency.
- Use only manufacturer-approved thinner when thinning is permitted.
- Replace products that no longer perform as intended.
Do not add acetone or arbitrary solvents to rescue an aging top coat. Doing so can alter the formulation and potentially compromise application or wear.
A well-maintained collection of professional nail polish products helps technicians maintain more consistent results from appointment to appointment.
10. The Brush Itself May Be Contaminated With Color
Sometimes a top coat appears to drag pigment because its brush has already collected color from another nail.
If the brush touches a soft or solvent-sensitive polish layer, pigment may transfer into the bristles. Returning the brush to the bottle can introduce that pigment into the clear product.
Over time, repeated contamination may make a top coat appear slightly tinted or cloudy.
This is particularly noticeable after services involving dark polish, red lacquer, or intricate decorative work.
Before returning the applicator to its bottle, inspect it for visible pigment transfer. Follow the manufacturer's handling recommendations, and do not use a visibly contaminated clear product when it could discolor the client's manicure.
For high-volume nail salons, maintaining appropriate service-specific supplies and replacing contaminated products when necessary can be more efficient than repeatedly troubleshooting an unreliable bottle.
How to Float Top Coat Without Dragging Color
Floating is one of the most useful techniques for reducing unnecessary friction during top coat application.
Here is a practical sequence for compatible conventional lacquer systems:
- Prepare the color. Apply the polish at the recommended thickness and follow its drying instructions.
- Load the brush. Keep a controlled bead of top coat available so the bristles do not need to scrape across the underlying color.
- Position carefully. Begin near the cuticle, allowing a small margin to prevent flooding the surrounding skin.
- Glide gently. Move the top coat toward the free edge with minimal downward pressure.
- Cover the sides. Use additional controlled strokes only where necessary.
- Finish the free edge. Cap the edge if recommended for that product and manicure system.
- Stop brushing. Allow the top coat to level and dry according to its instructions.
Practice this technique on a strongly pigmented shade applied to a nail tip. If you see color collecting in the clear product, compare your pressure, product load, and drying time.
The goal is not to hover so far above the nail that the top coat never spreads. It is to use the liquid product to create a smooth buffer between the brush and the color film.
Does Gel Top Coat Drag Color the Same Way?
Traditional lacquer and gel polish systems should not be treated as interchangeable.
Conventional nail lacquer primarily hardens through solvent evaporation, while UV- and LED-curable gel products rely on polymerization under an appropriate curing lamp.
If a gel top coat appears to pull color, possible causes include application pressure, unsuitable product combinations, uncured material, or an improperly executed curing process.
Some gel systems also have a residual inhibition layer after curing. Whether that layer should remain or be removed before the next application depends on the manufacturer's instructions.
For technicians working with Professional Gel Polish, the priorities are correct preparation, appropriate application thickness, compatible base and color products, and the specified lamp and curing schedule.
Never attempt to solve gel product transfer simply by guessing at longer or shorter curing times. Improper curing can affect product performance and may increase the risk of exposure to uncured ingredients.
Use the curing equipment and instructions specified by the gel manufacturer, and avoid getting uncured gel on the client's skin.
Quick Troubleshooting: What the Smudge Is Trying to Tell You
Different dragging patterns can provide useful clues about the cause.
Long streaks appearing in the direction of the brush: Check application pressure, top coat load, and whether the underlying color is sufficiently stable.
Color collecting in the top coat brush: Investigate pigment transfer, solvent sensitivity, and potential applicator contamination.
Fine nail art lines becoming blurry: Evaluate the drying requirements of the decorative product, compatibility with the sealer, and excessive brushing.
Top coat feeling sticky or pulling into strings: Check product age, bottle closure, viscosity, and storage conditions.
Only certain shades causing trouble: Compare pigment-heavy formulas, application thickness, and product compatibility.
Problems occurring primarily with gel systems: Review the manufacturer's preparation, curing, and layering requirements rather than relying on lacquer troubleshooting alone.
Keeping brief records of recurring issues can help a salon identify patterns without making technicians repeat the same experiment every week.
Build a More Reliable Top Coat Routine for Your Salon
Consistency matters when multiple technicians work with the same product inventory.
A simple standardized finishing routine can reduce preventable application problems and make training easier for new staff.
Start by identifying which color and top coat combinations are regularly used in your salon. Review the manufacturers' directions and document the application sequence that works reliably for each system.
Consider including these checkpoints in staff training:
- Use the appropriate base, color, and top coat combination.
- Keep color coats at the recommended thickness.
- Observe product-specific drying or curing requirements.
- Use gentle, controlled top coat strokes.
- Avoid repeatedly brushing over delicate nail art.
- Inspect clear top coats for pigment contamination.
- Replace products that have become unsuitable for professional application.
- Test new combinations before offering them during client appointments.
Organizing supplies around commonly performed services can also simplify workflow. Collections such as Manicure Essentials and Nail Treatments can help salons plan a more complete manicure supply selection.
And while a luxurious finishing step is important, a reliable system is even better. Clients may appreciate a little sparkle, but they rarely appreciate discovering that their manicure needed a surprise second attempt.
When Should a Nail Technician Remove and Redo the Color?
Not every minor top coat issue requires starting over, but there are times when attempting to smooth the finish only makes the problem more visible.
If a small area has been disturbed and the product system permits correction, a technician may be able to repair the affected layer after following the appropriate drying or curing procedure.
However, substantial pigment movement, deeply smeared nail art, or obvious color contamination may require removing and reapplying the affected product.
Avoid burying significant imperfections beneath several additional layers of top coat. Excessive product buildup can create more drying problems, an uneven appearance, and unnecessary service time.
When the underlying manicure is compromised, a clean correction is usually more professional than hoping another glossy layer will perform a miracle.
Frequently Asked Questions About Top Coat Dragging
Why does my top coat brush pick up red nail polish?
Red polish can transfer when the underlying color remains soft, the top coat solvents temporarily disturb the pigment-containing film, or the applicator makes excessive contact with the color. Review product compatibility, application timing, and brush technique.
Should I wait until nail polish is completely dry before using top coat?
Not necessarily. Some conventional top coats are intended for use over relatively fresh polish, while others require different application timing. Always follow the directions for the particular products rather than applying one universal waiting period.
Can quick-dry top coat smear nail art?
Yes. Depending on the formulas involved, the solvents or brushing action can disturb certain nail art products. A compatible non-smudge sealer or an adjusted application technique may help when recommended by the product manufacturer.
Why does my top coat brush leave streaks even when the polish seems dry?
Possible causes include excessive brush pressure, insufficient product on the brush, repeated strokes, formula compatibility issues, or an underlying film that is still susceptible to softening.
Can a thick top coat cause dragging?
Yes. A top coat that has thickened through solvent loss may become harder to spread evenly. This can encourage overworking and increased brush contact with the color layer.
Is it better to use more top coat to prevent dragging?
Using enough product to float the brush can reduce friction, but applying excessively thick top coat layers introduces other problems. Aim for the amount and application thickness recommended for the particular formula.
Why does top coat smear stamping polish?
Stamping designs can be vulnerable to both solvent exposure and physical brush movement. Allow the design to dry as directed, use a compatible finishing product, and apply with gentle strokes that avoid disturbing the pattern.
Can I use the same top coat for regular polish and gel polish?
Only when the product manufacturer specifically indicates that the top coat is compatible with both systems and provides appropriate application instructions. Conventional lacquer and curable gel systems have different performance and curing requirements.
Keep the Gloss, Lose the Dragging
Why top coat brushes sometimes drag color ultimately comes down to the interaction between product chemistry, the condition of the underlying polish, and the way the finishing coat is applied.
Giving the color the appropriate drying time, using compatible formulas, floating the brush with controlled pressure, and avoiding unnecessary strokes can all help create a cleaner finish.
For salon professionals, these small improvements have practical value. Fewer smudges mean fewer corrections, more predictable appointment timing, and a more consistent experience for clients who expect polished results.
At Pure Spa Direct, we understand that professionals need access to dependable supplies for real-world services. As a distributor of professional beauty products, we offer a broad selection of nail care essentials from established brands, allowing salons to explore products that suit their preferred techniques and service offerings.
Browse Professional Nail Care Collections, discover top coat options, or explore Nail Art Supplies to support your manicure menu.
Because that final sweep of top coat should be the finishing touch on a beautiful manicure, not the opening scene of a nail polish mystery.
