Get more done in less time with a squeaky-clean electric nail drill that actually works. Let's be real, honey: nothing ruins a flawless pink-and-white acrylic set faster than a drill bit that looks like it just survived a dust storm in the Sahara. We have all been there. You are about to finesse that cuticle area, you hit the pedal, and suddenly your client is staring at a bit that is still wearing the remnants of the last client's enhancement like a bad outfit. It's not just gross; it's a one-way ticket to losing your license. At Pure Spa Direct, we are distributors of sanity, and today we are tackling the dirty (literally) job of cleaning your electric nail drills and bits.
I know, I know. Cleaning bits is about as fun as watching acrylic dry. But since you are a professional who likes having returning clients and zero angry letters from the health department, we need to talk specifics. Whether you are rocking a diamond bit to smooth the nail plate or a carbide monster for chipping off that stubborn hard gel, hygiene is non-negotiable. Think of this as your fun (yes, I said fun) intervention. Grab your favorite Cuticle Oil, settle in, and let us save your bits and your business reputation.
Why Your Drill Bits Are Secretly Judging You (And Spreading Germs)
First, let's address the elephant in the room. Your nail drill bits are tiny little germ hotels. Dust, dead skin, old product, and bacteria love nothing more than to hide in the flutes of a carbide bit or the grit of a sanding band. If you are just wiping them on your apron (you monster!), you are basically giving those germs a free penthouse suite. According to the Texas Administrative Code, those diamond, carbide, and metal bits need a good scrub after every single use . It is the law, but more importantly, it prevents you from giving Mrs. Johnson a fungal infection because you were too lazy to swap out your bit. Let's keep it cute and clean.
The Essential Tools for the Job (Spoiler: It's Not Just a Lick and a Promise)
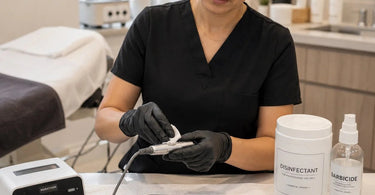
To clean like a boss, you need the right artillery. You wouldn't wax a back with cold wax, so don't clean your expensive professional nail equipment with a dry paper towel. You need a stiff brush (an old toothbrush works wonders if you do not mind your partner finding it), a hospital-grade disinfectant that is bactericidal, fungicidal, and virucidal , and ideally, an ultrasonic cleaner. That little machine is magic. It vibrates the crud right off your bits so you do not have to scrub until your fingers cramp. Also, keep a closed container for your dirty bits and a separate closed container for the clean ones. Do not mix them unless you enjoy chaos .
Step-by-Step: How to Scrub Those Nasty Bits Right
Alright, gloves on, people. Let's get clinical. Do not skip steps here. This is the difference between a five-star review and a lawsuit.
Step 1: The Pre-Clean (Get the Chunky Stuff Off)
Immediately after use, take that bit and brush off the big debris. Use a wire brush or a nylon brush to dig into the grooves. If you are using nail files and buffers or sanding bands, remember those are single-use . Throw them away! For metal bits, you can also soak them in acetone for 5-10 minutes to dissolve product buildup . This is especially good for those bits caked in monomer.
Step 2: The Wash (Hot, Soapy Heaven)
Once the gunk is loose, wash the bits in hot, soapy water. Give them a good scrub. If you have an ultrasonic cleaner, toss them in there with a proper cleaning solution. Let it buzz away for a few minutes. It is like a hot tub vacation for your tools, except the goal is death to microbes, not relaxation.
Step 3: The Disinfectant Dunk (The Big Sleep for Germs)
Here is where the magic happens. You must completely immerse the bits in an EPA-registered, hospital-grade disinfectant . Follow the instructions on the bottle—do not guess. If it says 10 minutes, you let them sit for 10 minutes. Pulling them out early is like taking a cake out of the oven half-baked. You just end up with a mess. This step is non-negotiable for any multi-use bit .
Step 4: The Rinse & Dry (No Water Spots Allowed)
After their chemical bath, rinse the bits thoroughly with water to remove any residue (nobody wants disinfectant chemicals on a client's nail bed). Pat them dry with a clean cloth or let them air dry on a sanitized towel.
Step 5: Storage (The Fortress of Solitude)
Store those shiny, clean bits in a dry, closed container . Do not just leave them lying next to your LED lamp to collect dust. They need a clean home. If you store them dirty, you might as well have not cleaned them at all.
Carbide vs. Diamond vs. Metal: Handling the Drama Queens
Not all bits are created equal, and they have different attitudes about cleaning.
Carbide Bits: These are the heavy lifters. They have sharp grooves that trap product like a trap. You absolutely need a stiff brush here. Never let acrylic harden on these overnight unless you enjoy torture. They must be clear of debris before disinfection .
Diamond Bits: These are great for cuticle work. They are gentler but still germ magnets. Because of the grit texture, soaking and ultrasonic cleaners are your best friends here. Do not drop them; diamonds are hard until they shatter on your tile floor.
Metal Bits (Mandrels): These are the sticks that hold your sanding bands. While the sanding band is trash, the mandrel itself needs a good wipe down with disinfectant spray. Do not soak the motorized handpiece! That is an expensive mistake. Wipe the handpiece with a disinfectant wipe only.
The 'Oh No' Moment: When Bits Look Rusty or Dull
Sometimes, despite your best efforts, your bits look sad. If they are rusting, you likely aren't drying them properly. Moisture is the enemy. If they are dull, they will burn your client's nail plate (and that is a scream you never want to hear). Inspect your bits regularly. If the coating is compromised, toss the bit. Do not be cheap. A new bit costs way less than losing a client. You can find high-quality replacements in our Acrylic Nail Supplies section, so there is no excuse for using dull tools.
Frequency: How Often Do I Really Need To Do This?
Let me spell this out. You clean the bit AFTER EVERY CLIENT. Not at the end of the day. Not when you feel like it. Immediately after you finish service number one, you clean the bit before client number two sits down . At the end of the day, you do a deep clean of everything again. Buffing bits and chamois get a soap-and-water spa treatment at the end of every day . Your pedicure supplies and bits need the same love as your manicure tools. Respect the foot, respect the bit.
Products We Love for This Tedious Chore
Since we are distributors of everything awesome, we have the stuff you need to make this painless. Look for high-quality brushes and ultrasonic solutions. And remember, you can shop by brand for your favorites. We carry a ton of professional lines that make sanitation a breeze. Pair your clean bits with a fresh set of professional cotton products and you are golden.
What About The Actual Electric File?
Do not dunk your motor! Your nail salon furniture might be sturdy, but the electric file handpiece is not waterproof. Use a pre-empt spray or a disinfectant wipe specifically designed for electronics. Scrub the handle, the grip, and the connection point. Let it dry completely before putting a clean bit back in. And for the love of all that is holy, make sure the power is off. We do not need any spinning surprises.
Stay Compliant, Stay Booked
Look, board inspections happen. They love to check your wax strips and your nail drill bits . If your bits are crusty, you get a fine. If your manicure essentials are dirty, you get a fine. Fines are expensive and embarrassing. Save yourself the drama. Set up a cleaning station. Label your containers 'Clean' and 'Dirty'. Train your staff to be clean freaks. Your clients will notice, and they will thank you by rebooking.
So there you have it. The unglamorous, slightly gross, but absolutely vital truth about cleaning your electric nail drills and bits. It takes five extra minutes of your day but saves you a lifetime of reputation damage. Now, go forth and sanitize. And while you are at it, stock up on all your wholesale professional nail care supplies right here at Pure Spa Direct. We have the tools, the bits, and the towels to make your station shine. You've got this, you clean queen, you.
%20Guide%20For%20Nail%20Pros)