Excellence at every step... and every flake! If you're a spa or salon professional offering chemical peels, you've likely had a client call you in a panic on day three, convinced their face is about to slide off. Let's be real, the "ugly phase" of a chemical peel is the industry's best-kept secret that everyone actually needs to know about. It's the key to client retention, stellar reviews, and ensuring those gorgeous results you promise. This isn't about damage; it's about the fascinating, controlled process of demolition and glorious rebirth happening right on their skin. The flaking, the tightness, the "what have I done?!" moment is a completely normal sign that the treatment is working deep within the skin's layers. Your superpower as a pro is not just in the application, but in mastering the art of expectation management and aftercare guidance. It transforms a potentially alarming experience into a trusted journey with you as their expert guide.
Think of it this way: you are the director of a blockbuster skin transformation movie. The "ugly phase" is the crucial, dramatic middle act where the hero seems lost before emerging victorious. By mapping out this process for your clients in a fun, relatable way, you turn anxiety into anticipation. This guide will arm you with the facts, timelines, and yes, even a little humor, to ensure your clients not only survive their peel but become its biggest advocates, coming back for more and referring all their friends to your expert care.
Demystifying the Peel: It's a Renovation, Not a Disaster
First, let's bust the biggest myth that even some professionals believe: heavy, dramatic peeling is NOT the sole indicator of an effective treatment. Many modern peels, especially lighter ones, work at the cellular level to boost collagen and refine texture without causing massive sheets of skin to shed. The visible response depends on the peel depth, the individual's skin, and even factors like the time of year. So, if a client doesn't look like a snake molting, assure them the magic is still happening beneath the surface.
The process is more accurately described as a controlled, strategic "renovation." The chemical solution creates a precise injury to the skin's outermost layers, which is the trigger for the body's powerful healing response. This response involves shedding the old, damaged cells and generating fresh, smooth, radiant skin from below. The tingling, tightness, and eventual flaking are simply the visible and tactile signs of this incredible regenerative process getting down to business. Framing it as a positive, active renewal is key.
The "Ugly Phase" Timeline: A Day-by-Day Roadmap for Clients
Giving clients a clear, visual timeline is the number one tool to prevent panic. Here's a breakdown of what they can typically expect from light to medium-depth peels, which are the bread and butter of most salon and spa services. (Deep peels using phenol are medical procedures with extensive downtime and are less common in standard spa settings).
Days 1-2: The Sunburn Simulator. Immediately after and for the first couple of days, the skin will be red, feel tight, and may have a mild stinging sensation, much like a sunburn. This is the initial inflammatory response. For light "lunchtime peels," this might be very mild, and clients can often apply makeup and return to normal activities quickly. For medium peels, the redness and swelling are more pronounced and peak around 48 hours. This is the time to recommend gentle cleansing, frequent moisturizing with a product like a trusted hydrator from our skincare collections, and liberal use of SPF. A cold compress or soothing gel can be a welcome relief.
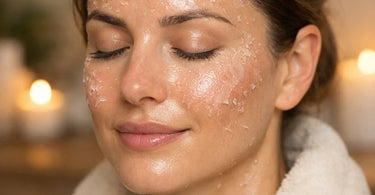
Days 3-5: The Flaky Frontier (Embrace It!). Welcome to the main event! Around day three, flaking usually begins, often starting around the mouth and nose before spreading outward. The skin may darken or look blotchy before it peels. This is when your clients will need your guidance the most. The golden rule: DO NOT PICK, PULL, OR SCRUB. Picking can lead to scarring, infection, and uneven pigmentation. Instruct them to let the skin shed naturally. Gentle cleansing and moisturizing are essential. This is also when imperfections might seem more visible—this is normal "purging" as impurities are brought to the surface. Assure them it's temporary. Having the right tools on hand makes all the difference—recommend soft, professional-grade cotton for patting skin dry and clean applicators for any post-peel products.
Days 5-14: The Grand Reveal. Active peeling typically subsides within a week for light peels and up to two weeks for medium peels. Underneath, the new skin will be pink, supple, and incredibly smooth, but also delicate. This fresh skin is more vulnerable to sun damage, so sun protection isn't just important—it's mandatory for maintaining results and preventing hyperpigmentation. The initial pinkness can last for several weeks, especially with medium peels, but can be covered with makeup once the skin is no longer an open wound (usually after 5-7 days for medium peels). This is the "wow" phase where they see the glow, refined pores, and improved texture you promised.
Your Professional Playbook: Managing the Journey from Start to Finish
Your expertise turns a clinical process into a luxury experience. Here's how to own every stage:
1. The Pre-Peel Consultation: Set the Stage. This is your most critical step. Use visuals, diagrams, or even fun before/after photos that show the "in-between" phase. Discuss their goals and match them to the correct peel depth. Explain the timeline in vivid detail. Warn them about the flaking phase and normalize it. Provide a printed aftercare sheet they can take home. This is also the time to recommend a pre-peel regimen, which might include using a gentle cleanser and avoiding other exfoliating treatments like dermaplaning or sugar scrubs in the week prior.
2. The Application & Immediate Aftercare. During the service, communicate what they're feeling ("You might feel a warm tingling, that's perfectly normal"). After neutralizing, apply a soothing, protective barrier. Send them home with a sample-sized moisturizer and a stern reminder about sunscreen. Ensure their face is comfortably wrapped or shielded if they're going outside.
3. The "Hand-Holding" Phase (Days 1-5). Proactive check-ins are gold. A simple text or email on day two or three ("Hi Jane! This is when many clients start to see some flaking. Remember, no picking! Keep moisturizing. You're doing great!") builds incredible trust and prevents negative reviews. Be available to answer questions. This is where you solidify your role as their skin guru.
4. The Reveal & Maintenance Plan. Once healed, celebrate their results! Take an after photo. Discuss how to maintain that glow with a proper homecare regimen, which may include retail products like nourishing oils (great for face and body!) or a targeted serum. Educate them that for significant concerns, a series of peels (often 3-6 treatments spaced 4-6 weeks apart) is usually needed for optimal, cumulative results. Schedule their next appointment before they leave.
Equipping Your Space for Peel Perfection
Offering chemical peels requires more than just the solution. It's about creating a seamless, hygienic, and comfortable environment. Here are some essentials to ensure your service is flawless:
Comfort & Hygiene: Your client will be lying down for a while. A comfortable spa bed or facial chair with clean bedding is a must. Use hygienic table paper for added protection. Have plenty of soft, absorbent towels and compressed sponges on hand.
Application Tools: Precision matters. Stock up on disposable applicators, brushes, and spatulas to ensure a even, controlled application and uphold the highest sanitary standards.
Pre & Post-Care Products: Your service extends beyond the treatment room. Offer retail-sized, gentle cleansers, rich moisturizers, and high-SPF sunscreens. Having a line like Tuel Skincare or June Jacobs allows you to provide a complete, professional system. A facial steamer can be a wonderful pre-peel tool to prepare the skin, though it should be avoided immediately after the treatment.
Calming Ambiance: A relaxing atmosphere helps with any nerves. Consider an aromatherapy diffuser with calming scents and soft, adjustable lighting like an LED magnifying lamp that can be dimmed.
Turning Peel Panic into Peel Praise
By reframing the "ugly phase" as the "transformation phase," you empower your clients. You're not just selling a peel; you're providing an education and a supported journey to better skin. Their temporary flakiness is a badge of honor, a sign they're on the path to radiant results. When you master this communication and care, you build unshakable loyalty. Clients will return not just for another peel, but for all their skincare needs, knowing they have a true expert in their corner. Now go forth and peel with confidence—and a great sense of humor about the flaky, fabulous process of beauty!