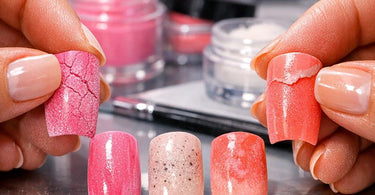
Take your results to the next level... because let's be honest, there's nothing quite like the feeling of unveiling a flawless dip powder manicure to a client who's been counting down the days for a fresh set. You've prepped like a champ, the color is stunning, and you're ready to send them out the door with nails that could stop traffic. But then, a week later, you get the text: a picture of a crack, a little lift at the cuticle, or worse, a mysterious white spot that has them (and you) questioning everything. We've all been there. Dip powder is a powerhouse service—stronger than gel and faster than traditional acrylics—but it comes with its own set of quirks. At Pure Spa Direct, we believe in arming you with more than just products; we believe in giving you the knowledge to conquer any nail challenge that walks through your door.
So, grab your favorite lint-free wipe, pour yourself a strong coffee, and let's dive deep into the most common dip powder dilemmas. We're talking cracking, lifting, contamination, and those frustrating color issues that make you want to throw your powder jar across the room. Consider this your ultimate troubleshooting guide to keep your clients' nails looking fabulous and your sanity intact. Because when your dip game is strong, your business is stronger.
The Great Dip Powder Mystery: Why Is It Cracking?
Cracking is the most dramatic of dip powder problems—it's loud, it's obvious, and it's usually a sign that something went wrong in the structural integrity of the service. Think of your dip nails like a tiny, well-engineered bridge. If the support beams are off, the whole thing collapses. Cracking typically falls into two categories: surface cracks that look like spiderwebs, and complete breaks that split the nail. Both are fixable once you know the culprit.
The Too-Thin Trap: If your dip layers are too thin, your client's natural nail can bend underneath the product . This flexing puts stress on the hard dip coating, leading to cracks. The solution? Don't be afraid to build. For most clients, you'll want at least three to four layers of color or clear to create a structure that resists the natural bend of the nail. If your client has long, active nails, consider using the apex method to add extra strength at the stress point.
The Activator Antagonist: Your activator is the magic that turns that soft powder into a rock-hard shield. If you're stingy with it, or if your activator is old and contaminated, it won't fully cure all the layers . This results in a soft, pliable layer under the hard top coat that is a recipe for disaster. Make sure you're applying a generous, even coat of activator to each nail and letting it dry completely before you move to shaping. And check the age of your liquids! Activator is often the first to go . If it's been sitting around for months, it might be time for a fresh set.
The Dreaded Hard & Brittle: On the flip side, if your layers are too thick, especially around the cuticle, you've created a rigid structure that has no give . When that nail inevitably bumps into a car door or a heavy keyboard, the thick, inflexible product will crack instead of flexing. Keep those layers thin and even, and use your file to refine the shape and remove excess bulk. A well-structured nail should have a smooth, natural curve, not look like a mountain peak.
Finally, always seal the free edge—the tip of the nail—with your base coat and top coat . This "capping" technique prevents water and moisture from seeping in and weakening the bond from the tip down, a major cause of tip cracking.
Lifting: The Unwanted Separation Anxiety
Lifting is arguably the most common complaint in the nail world, and dip powder is no exception. It happens when the product separates from the natural nail plate, usually starting at the cuticle area. It's unsightly, it's a breeding ground for bacteria (nobody wants a "greenie"), and it's a guaranteed way to lose a client's trust . The good news? Lifting is almost always preventable.
Prep Work is Your Best Friend: I know you've heard it a million times, but I'll say it again: 90% of lifting issues stem from inadequate prep . You cannot skip steps here. You must remove all invisible cuticle from the nail plate. That's not just pushing back the skin; it's using a cuticle bit or pusher to gently scrape away the keratinous tissue that clings to the nail. If you apply product over this, it will lift. Period. After that, you need to lightly buff the nail to remove the shine and create a rough surface for the product to grip. Then, and only then, do you dehydrate. Use a pure alcohol or a specialized nail dehydrator to remove every trace of oil, dust, and moisture.
The Skin Sins: Is your base coat touching the skin? Is your dip powder spilling over onto the cuticle? Any product on the skin creates a tiny ledge that will lift as the nail grows out . Be meticulous with your application. If you get base coat or powder on the skin, clean it up immediately with a clean-up brush dipped in alcohol before you activate. A perfect cuticle line is the hallmark of a professional service that lasts.
Natural Oil Issues: Some clients have naturally oily nail beds. Even after a thorough dehydration, their nails will produce oil that pushes the product off. For these clients, you might need a primer or a bonder after dehydration and before the base coat to act as a double-sided tape, adhering to the nail and the dip product. Also, ensure your client hasn't just washed their hands or applied lotion before their appointment. Water and oil are the enemies of adhesion .
The Contamination Station: When Your Liquids Go Rogue
This is the sneakiest issue of all. You think you're doing everything right, but your top coat isn't drying, your base coat is stringy, and your brushes are turning into hard little rocks. Congratulations, you've got a contamination problem. This happens when you cross-pollinate your liquids, usually by getting activator into your top coat or powder into your base coat .
Double-Dipping Disaster: One of the biggest offenders is putting a finger coated in wet base coat back into the jar of powder . Not only is this a sanitation nightmare for state boards, but it also transfers the liquid into the powder, creating hard little clumps that will ruin future applications. Always use the pour-over method: sprinkle the powder over the nail over a tray or a folded piece of paper. If you must dip, use a disposable dipping tray or a cupcake liner .
Brushes Behaving Badly: When you're working, your brush is picking up product. If you go from applying activator to dipping into your base coat without wiping the brush, you've just introduced activator into your base coat bottle . This will cause your base coat to harden in the bottle and become unusable. Always, always wipe your brush on a lint-free wipe between dips. This keeps your liquids pure, extends their life, and ensures consistent results. If your top coat is looking cloudy or not drying to a high shine, contamination is the most likely reason .
And let's talk about the powders themselves. According to industry experts, dip powder does have a shelf life of about three years . If you're using an old, neglected powder, the chemicals can break down, leading to cracking and adhesion issues. Store your powders in a cool, dark place to keep them fresh.
Color Me Crazy: Color Issues Solved
Your client chose that perfect shade of electric blue for a reason. When it comes out looking muddy, streaky, or just plain wrong, it's a letdown for everyone. Color issues in dip powder can be frustrating, but they usually have a simple fix.
Glitter Gremlins: Glitter powders can be tricky. The sparkle can look dull, or you might struggle to get an even application. The trick is to shake your glitter jar well before each use to evenly distribute the glitter particles . Instead of dipping straight in, pour the glitter into a tray and then lay your nail into it, patting the glitter down with your finger or a sandwich baggie to make it smooth . A final layer of clear dip over the glitter will give it that glass-like, dimensional shine.
The Patchy Predicament: If your color looks patchy or uneven, it's usually because your base coat wasn't applied evenly . The base coat is the glue that picks up the powder. If there are gaps or thin spots in your base coat application, those areas will be light or missing color. Make sure you're applying a thin, even layer of base coat to the entire nail plate, from cuticle to free edge, without flooding the skin. For pastel and lighter colors, you might need an extra layer to achieve full opacity.
White Spot Woes: White or cloudy spots can appear after you apply your top coat. This is often caused by applying your final coat of activator too generously or not letting it dry long enough before applying the top coat . The top coat reacts with the excess activator, causing a chemical reaction that creates those unsightly white patches. After your last layer of activator, wait a full 60 seconds or more. You can even wipe the nail with a lint-free wipe to remove any excess moisture before applying the top coat.
Your Pure Spa Direct Toolbox for Perfect Dip Services
Now that you're armed with the knowledge to troubleshoot any dip disaster, you need the tools to execute a perfect service every time. At Pure Spa Direct, we've curated the best professional brands to ensure your results are flawless. Start with the foundation of any great service: impeccable Manicure Essentials. From there, explore our selection of Dipping Powder Systems for Salons from top brands like SNS and OPI. Don't forget the importance of high-quality Nail Files & Buffers for shaping and refining, and reliable Professional Cleaners & Disinfectants for maintaining a sanitary workspace.
For the nail tech who wants to offer the best of the best, consider incorporating premium Professional Gel Polish for hybrid services or expanding your offerings with Acrylic Nail Supplies. And for your clients' at-home care, retail high-quality Cuticle Oil and Nail Treatments for Healthy Nails to keep their manicures lasting longer between visits. A happy, well-educated client is a loyal client.
At Pure Spa Direct, we're not just your distributor; we're your partner in success. Whether you're looking for the latest in Professional Nail Care Collections or the perfect Stylish and Functional Nail Salon Furniture, we've got you covered. We know that a beautiful, long-lasting manicure is a work of art, and we're here to provide the canvas and the paint.
So next time a client comes in with a crack, a lift, or a color concern, you'll be ready. You'll have the answers, the skills, and the top-tier products from Pure Spa Direct to turn a potential problem into a testimony of your expertise. Now go forth and create those flawless, show-stopping nails. Your clients are waiting!
)