Quality you can’t ignore... especially when you snap a "before" photo that makes your client look like they haven't slept since the Bush administration. We've all been there. You nail the brow wax, the lamination is flawless, or the facial has given that skin a glow that could guide ships at sea. Then you take the "after" photo. And somehow, magically, it looks like a mugshot taken under a flickering fluorescent bulb in an abandoned subway station. It isn't you. It isn't your skills. It is almost always the light. For spa and salon pros, lighting for high contrast photography is the secret sauce that transforms your portfolio from "meh" to "magazine cover." We aren't just wiping brows here; we are building a brand. High contrast photography is essential for showing the texture of skin, the sharpness of a Lash & Brow lift, or the smoothness of a wax service. But if your lighting is flat, orange, or casts demonic shadows under the chin, you are hiding your hard work. Today, we are fixing that. Put down the ring light (gasp) and listen up.
Let's talk about why your current setup probably hates you. Most treatment rooms are designed for relaxation, not photography. They have warm, dimmable sconces, salt lamps, and that one overhead can light that makes everyone look like they have a unibrow. That is great for a Swedish massage; it is terrible for capturing a Hydrodermabrasion result. The struggle is real: overhead sources create Raccoon Eyes (dark sockets), while wall colors often bounce weird tones onto the skin (hello, greenish tint from your sage green accent wall). To get high contrast photography, you need to separate the subject from the background, define the texture, and avoid the dreaded "flat look." We need to see the lift, the smoothness, and the glow. So, how do we turn your 10x10 treatment cell into a studio worthy of Vogue? It starts with the angle of your light source.
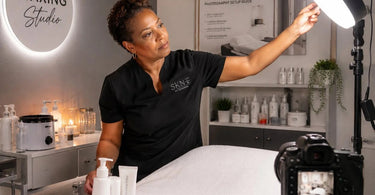
The "45-Degree Rule" (Or, How to Stop Hiding Your Work)
Here is the first thing you need to do: turn off the ceiling lights. I mean it. Walk over to the switch and flip it off. Trust the process. The secret to stunning high contrast photography is directional light, not ambient soup. You want one key light source to create dimension. In photography, we often use the 45/45 rule: light placed 45 degrees to the side of the client and 45 degrees above their eye line . This angle mimics natural sunlight and creates soft shadows under the cheekbones and jawline. Those shadows are your friend; they define the contour of the face and show off the results of your Dermaplaning service. If you use a ring light, you get flat, shadowless light that makes the nose disappear and the skin look artificially smooth. You don't want that. You want texture and contrast. Use an LED Bright Lamp on a stand. Swing it to the side. Watch how the face literally sculpts itself with shadow.
The Inverse Square Law: Why You Need to Stop Hugging Your Client with the Light
We aren't trying to give you a headache with physics, but there is one rule you cannot break. It is called the Inverse Square Law . Basically, the closer the light is to the client, the softer the light falls off. But for high contrast photography, you actually want a little bit of intensity drop-off. If your light is two feet away, the side of the face facing the light is bright white, and the other side is pitch black. That is too much contrast (unless you are going for a film noir villain vibe). If the light is eight feet away, the light wraps around the face more evenly, but you lose the shadow drama. The sweet spot? About 3 to 4 feet away from the client's face. This distance allows the light to wrap just enough to keep detail in the shadows, but stay strong enough to create that high contrast pop that makes pores disappear and muscle definition appear. And please, for the love of all that is holy, use a softbox or diffuser . Bare bulbs create shiny hot spots on the nose and forehead. We aren't trying to signal airplanes.
High Contrast vs. High Drama: Managing the Background
One of the biggest mistakes in treatment rooms is having a busy or reflective background. To achieve killer high contrast photography, your background needs to be dark or light, but never grey. If you have a white wall, move the client at least 4 feet away from it. This ensures the light doesn't bounce back onto the back of their head, which kills the contrast. If you have a dark wall, even better. The dark background absorbs the spill light, making the illuminated face the star of the show. This is crucial for services like Brow Lamination or Lash Extensions. You want the eye to go straight to the work. If the background is distracting or too close, the eye wanders. Also, ditch the cheap Hygienic Table Paper as a backdrop. Please. Invest in a simple black or white muslin. It instantly elevates your social media game by 1000%. It tells the algorithm, "This is a professional."
The Color Temperature Conspiracy (Warm vs. Cool)
Why do your before and after photos sometimes look like the client changed races? Color temperature. Your Facial Steamer might be set to 98 degrees, but your light temperature is measured in Kelvin (K). Most Towel Steamers sit in a room with yellow light bulbs. Yellow light makes red skin look orange and inflamed. It makes wax residue look muddy. For high contrast photography, we need a neutral white light, usually around 5000K to 5500K. This is "daylight" balanced. It renders skin tones accurately, shows the true color of hair color, and makes gel polish look vibrant. If you mix a 5500K LED with a 3000K incandescent bulb, your camera's white balance will have a seizure, and your photos will look like a retail product nightmare. Switch all your treatment room bulbs to the same high-CRI (Color Rendering Index) daylight bulbs. CRI should be 90+ . This ensures that the red in the Ingrown Hair Products you applied actually looks red, not brown.
Specular Highlights: The Enemy of Texture
Here is a funny one. Have you ever taken a photo and the client's nose or forehead looks like a glazed donut? That is specular highlight . It happens when light hits a surface and bounces directly back into the lens. It is the absolute enemy of high contrast photography because it washes out the skin texture. You can't just move the light; you have to change the surface. If you just applied a ton of Massage Oil or a dewy serum, the skin is shiny. You need to either: A) Gently blot the skin with a tissue before the photo (tell the client it's for "matte finish"), or B) Move the light source slightly higher or lower so the "angle of incidence" doesn't equal the "angle of reflectance" . Basically, if the light is at 45 degrees, and the camera is straight on, the reflection bounces away. If the light is next to the camera, it bounces right back. So keep that light off to the side!
Let's Talk About Your Nail Station (The Fingernail Dilemma)
While faces are hard, nail art photography is a special circle of hell. You need high contrast photography to show the shimmer of Nail Art Rhinestones or the crisp line of a French tip. If you are shooting nails at your Nail Table, your lighting must be above and slightly behind the nail tech. Why? Because nails are curved. If you light from the front, you get a shadow in the cuticle area. If you light from above/behind, the light skims the surface of the nail, revealing every sparkle and every ridge. Use a Magnifying Light or a small LED desk lamp positioned at the 10 o'clock position relative to the hand. This creates micro-shadows that give the nail depth. For Pedicure Chairs and feet, you need to get low. The contrast between the bright polish and the darker skin of the toe defines the shape. Never use the flash on your phone for nails. It creates a white dot that obliterates the glitter. Use continuous, side lighting.
Equipment You Actually Need (Stop Buying Gimmicks)
You don't need a $2,000 camera. The best camera is the one you have (usually the latest iPhone or Samsung). What you need is control over the environment. Invest in a sturdy set of light stands. Get two LED video lights with adjustable brightness and color temperature (Bi-color). Place one as your Key Light (the main event, 45 degrees). Place the second as a Fill Light (low power, behind the camera, to soften the deep shadows just a tiny bit). Ratio is everything: a 2:1 ratio (Key light twice as bright as Fill) gives you perfect high contrast photography without losing detail in the shadows . If you are on a budget, bounce the fill light off a white Compressed Sponge or a piece of foam core. And for the love of Mike, buy a color checker card to set your white balance. It will save you hours of editing skin tones that look like cheese puffs.
Pro Tip: Prep the Canvas Before the Click
Before you even raise the camera, prep the skin. For waxing after-photos, apply a Pre & Post-Waxing Product that mattifies, not just soothes. For massage, ask the client to lift their chin slightly to stretch the neck skin, removing wrinkles that create unwanted shadows. For makeup, use a setting spray to melt the powders, but blot the T-zone. These small adjustments make the light's job 100x easier. Remember, the light is a tool, not a miracle worker. If the skin isn't prepped, high contrast will just highlight the flakes and dryness. Harsh? Yes. True? Absolutely. That is why we are pros.
Conclusion: Let Your Work Shine (Literally)
Adjusting your high contrast photography setup isn't just about getting "likes." It is about respecting your own craft. You spent 45 minutes on that Advanced Facial Treatment. You aced the Hydrodermabrasion protocol. Don't let a stupid yellow light bulb steal your thunder. By moving your light to the side, managing your color temperature, and controlling your background, you turn a simple treatment room into a conversion machine. Clients book based on what they see. If they see stunning, high contrast photography that shows every lifted lash and smooth pore, they will walk through your door ready to spend. Now, go turn off those overhead lights. Your portfolio will thank you, and your accountant will definitely thank you.
)