
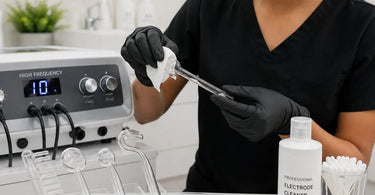
Stay ahead, stay successful... but let's be real, nothing kills the vibe of a luxurious facial faster than a high-frequency wand that looks like it's been through a tiny, electric apocalypse. You know the one—the glass electrode that's lost its crystal-clear sparkle and now sports a murky, greyish film that no amount of wishful thinking will wipe away. That, my friend, is the dreaded carbon build-up, and it's the arch-nemesis of both your machine's performance and your professional reputation. But fear not! We're not about to let a little bit of stubborn gunk get between you and that satisfying, violet-hued glow. This comprehensive guide is your one-stop-shop for banishing that carbon crud for good, ensuring your High Frequency Machines stay as powerful and pristine as the day you brought them home. Get ready to roll up your sleeves and learn the art of the deep clean—it's going to be shockingly simple and surprisingly satisfying!
So, what exactly is this mysterious carbon, and why does it seem to have a personal vendetta against your favorite beauty tool? It's not a plot against your success (though it can feel like it). The carbon deposits are actually the byproduct of the ozone-producing process that makes your high-frequency treatments so effective. When the electrical current passes through the argon or neon gas in the glass electrode, it generates ozone. This ozone is what kills acne-causing bacteria and works its magic on the skin . However, this process also creates a reaction that, over time, causes carbon to accumulate on the glass surface, especially if you're using it on skin that isn't perfectly prepped .
Why Your Electrodes Are Crying for a Clean
We've all been there—it's a busy day, you're running from one client to the next, and cleaning that electrode properly falls to the bottom of the priority list. But ignoring that build-up comes with a host of problems that can seriously derail your flow. A clean electrode isn't just about appearances; it's about delivering the best possible service and protecting your investment in your professional equipment.
- Buh-Bye, Effectiveness: The science is simple: carbon is an insulator. So when it cakes onto the glass, it literally blocks the electrical current from transferring efficiently to your client's skin. That means less oxygen, less bacterial-killing action, and a treatment that's about as effective as a lullaby. You're basically paying for the electricity to heat up the crud instead of performing a miracle on your client's complexion.
- Howdy, Cross-Contamination: Let's be blunt: using a dirty electrode is a hygiene nightmare. It's the perfect vehicle for transferring bacteria and residual skincare products from one client to the next. In a post-pandemic world, this is a cardinal sin in the spa and salon industry. Your clients trust you with their skin, and a sparkling clean wand is a non-negotiable part of that trust.
- Bye-Bye, Budget: High-quality electrodes aren't cheap. When you don't maintain them, you're drastically shortening their lifespan. Investing a few extra minutes in proper cleaning now will save you from the dreaded, frequent replacement costs. Think of it as a little TLC that pads your bottom line.
The Sparkle Method: Your Step-by-Step Cleaning Ritual
Alright, it's time to get down to business. This isn't just a quick wipe-down; this is a full-on spa day for your favorite electrical companion. And like any good spa treatment, you want to do it right. Here's the breakdown of the daily, weekly, and as-needed routine that will keep your high-frequency wand glowing for years.
The Daily After-Client Ritual: Your Non-Negotiable Routine
This is the bare minimum, the standard you should hold yourself to after every. single. treatment. Don't skip it. Your future self and your clients will thank you.
1. Safety First, Always: Before you do anything, turn the high-frequency machine off and unplug it from the wall. It's a safety thing, not a suggestion. You want to be a glowing esthetician, not a human sparkler.
2. Detach with Care: Gently remove the glass electrode from the wand handle. Be careful not to twist or yank it, as the connection can be delicate.
3. The Alcohol Wipe-Down: Grab a fresh, lint-free cloth or a gauze pad and pour a little 70% isopropyl alcohol on it. This is your weapon of choice. It's a disinfectant and a solvent that's tough on grime but gentle on glass . Pro-Tip: Never, ever submerge the electrode in liquid or spray it directly. Water or liquid can easily seep into the seal where the glass meets the metal base, causing corrosion or a short circuit that will ruin the electrode. Just say no to bubbly baths for your wand.
4. Wipe Thoroughly: Meticulously wipe down the entire glass surface, paying extra attention to the tip and the sides where product and carbon build-up are most common.
5. Air Dry Completely: Place the electrode on a clean, dry paper towel and allow it to air-dry completely. This crucial step ensures no moisture is trapped, which is a breeding ground for bacteria and can cause electrical issues. Once it's dry and shiny, it's ready to be stored or used again.
The Weekly Deep Clean: A Little Extra Love
Once a week, take a few extra minutes to give your electrodes a thorough inspection and a more intensive cleaning. Think of it as their weekly check-up.
1. The Inspection: Hold the electrode up to the light and carefully inspect it for any tiny hairline cracks, chips, or scratches. Even a tiny flaw in the glass can be a big problem. A compromised electrode can shatter during use, or it might not distribute the current properly, leading to uncomfortable 'hot spots' on your client's skin . If you see any damage, it's time to thank it for its service and replace it with a new one from our Bulbs & Replacement Parts section.
2. The Deep Scrub: If you notice some stubborn carbon deposits that the daily alcohol wipe isn't budging, you can step up your game. Some professionals use a mild abrasive, like a paste of baking soda and water, to gently polish the glass. Apply a small amount to a soft cloth and rub the electrode in a circular motion. Rinse it with water (quickly!) and then thoroughly wipe it down with alcohol to remove any residue. Always check with your electrode's manufacturer for specific cleaning recommendations.
3. Handle and Cable Check: Don't forget to wipe down the wand handle with a surface disinfectant and check the power cable for any fraying, kinks, or damage to the insulation. A clean, well-maintained unit looks more professional and is safer to use .
What NOT to Do: The Hall of Shame
We've covered the right way, but sometimes it's just as helpful to know what could potentially go wrong. Avoid these common pitfalls to ensure your wand's safety (and your own sanity).
- Don't Use Harsh Chemicals: Bleach, ammonia-based cleaners, abrasive sprays, or nail polish remover are a hard NO. These can permanently etch or cloud the glass and release harmful fumes. Stick to the tried-and-true isopropyl alcohol.
- Don't Soak or Dishwash: We said it before, but it bears repeating: your electrode is not a water bottle or a salad bowl. Submerging it is a one-way ticket to needing a replacement .
- Don't Clean While Plugged In: This should be common sense, but the temptation to save a second might be real. Resist it. Unplugging is your best friend.
Pro-Tips for a Long and Sparkly Life
Beyond the cleaning, a little bit of prevention goes a long way. Here are some final pro-tips to keep your high-frequency electrodes in tip-top shape.
- Pre-Treatment Prep is Key: The cleaner the skin you're working on, the less gunk your electrode will accumulate. Ensure your client's skin is thoroughly cleansed and completely dry before you start your high-frequency treatment. Oils and creams are just carbon fuel .
- Use a Barrier for Sensitive Work: For clients with active acne or very sensitive skin, consider placing a single layer of dry, sterile gauze over the tip of the electrode. This creates an extra hygienic barrier and still allows the current to pass through .
- Store with Care: The number one cause of electrode death isn't age, it's gravity meeting a hard floor. Always store your electrodes in a protective case to prevent them from getting knocked around or dropped.
- Know When to Retire: If an electrode is excessively scratched, consistently difficult to clean, or just doesn't have that 'oomph' anymore, it's time to move on. Find a full selection of professional-grade replacement electrodes and accessories in our Professional Cleaners & Disinfectants section.
And there you have it! Keeping your high-frequency electrodes squeaky clean is a simple but mighty practice that ensures your treatments are effective, your clients are safe, and your equipment lasts for years. It's a small habit with huge payoffs. So go forth, banish that carbon build-up, and let your wand's sparkle be as legendary as your results. Now, who's ready to clean? ...Anyone? Let's make it a party! A very clean, very safe, very professional party.
