Smart solutions for busy days... because honestly, who has time for clunky, hair-folding shears that make your wrist feel like it ran a marathon? If you’ve ever been mid-bob and felt your Professional Hair Shears starting to chew the hair instead of slicing it, you know the frustration. The culprit is almost always hiding in one tiny, overlooked spot: the pivot point. That little screw is the brains of the operation, and if you ignore it, your expensive shears will throw a tantrum. But don't worry! We are about to turn you into a pivot-point whisperer, saving your hands from fatigue and your schedule from dull, irritating cuts.
Welcome back to the Pure Spa Direct blog, your home base for surviving and thriving in the Spa Masters universe. Whether you run a high-volume Hair Salon, a hip Barber Shop, or a busy spa offering everything from Advanced Facial Treatments to Lash & Brow Enhancement, your scissors are your lifeline. Let’s dive into how to keep that pivot point happy, healthy, and high-performing.
Why That Tiny Pivot Point Is Such a Drama Queen
The pivot point isn't just a screw; it's the engine of your shears. It controls the tension and the ride between the two blades. When the pivot is neglected, everything goes wrong. Hair starts pushing or folding instead of cutting cleanly, you have to squeeze harder to get through a section, and eventually, your wrist starts screaming at you. If you’ve ever felt that "crunchy" feeling when you open and close your shears, that’s the sound of product buildup and hair dust having a party inside your pivot mechanism—and it’s time to shut that party down .
Ignoring your pivot point is like ignoring the oil change light in your car. You might get away with it for a bit, but eventually, you're going to break down at the worst possible moment (like right before a walk-in color correction). Plus, taking care of your tools means you aren't constantly running to buy new ones, leaving more budget for fun stuff like Nail Art Rhinestones or a new Pedicure Chair for the back room.
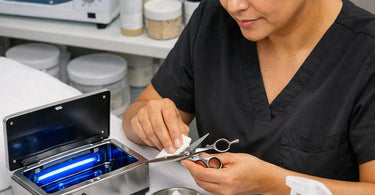
Step 1: The Daily Wipe Down (Yes, Every Day)
We know you're tired. Your feet hurt, you smell like ItalWax, and you just want to go home. But take 30 seconds to wipe your blades. Using a soft, dry cloth, wipe the entire blade surface and the exposed area around the pivot. This removes hair, product residue, and moisture that can corrode the metal . If there’s sticky gunk from styling products, a little spritz of isopropyl alcohol on the cloth works wonders, but never dunk your shears in liquid!
Think of this as tucking your shears into bed. You wouldn't sleep in your day clothes, and your shears don't want to sleep covered in hairspray and dust. If you do Waxing in your salon as well, keep your shears far away from the wax warmer. Wax residue on shears is a nightmare to remove and will gunk up that pivot instantly.
Step 2: Oiling The Pivot Point (The "Drink of Water")
This is the golden rule. The pivot point needs oil. Every. Single. Day. Use a high-quality Shear Oil or clipper oil. Open your shears wide and place ONE tiny drop right where the screw meets the blades. Just one! We aren't deep-frying them .
After you drop the oil, open and close the shears 10 to 15 times. This action works the oil down into the bearings and between the metal surfaces, reducing friction and flushing out microscopic hair particles . Then, take your cloth and wipe away any excess oil that seeps out. Too much oil just attracts dust and lint, which turns into that black, gunky paste that ruins your tension. Do this daily, and your shears will feel smoother than a fresh Sugar Scrub on a spa day.
Step 3: The "Drop Test" For Tension
How tight is too tight? If your shears feel stiff and you have to force them to close, you're strangling them. If they wobble like a loose tooth, they're too drunk to cut straight. Enter the classic "Drop Test" .
Hold one handle of the shears so the blades point straight up. Open the top blade to a 90-degree angle and let go. Watch it fall.
- The Sweet Spot: The blade should fall slowly and stop halfway or two-thirds of the way down. It doesn't snap shut, and it doesn't freeze.
- Too Loose: The blade closes all the way instantly. This causes hair folding and pulling.
- Too Tight: The blade barely moves or sticks where you left it. This will cause hand fatigue, repetitive strain injuries, and dull your blades faster.
Adjusting the tension is usually done with a small screwdriver or a specialized adjuster on the pivot itself. Turn clockwise to tighten, counter-clockwise to loosen . Turn in micro-steps—we're talking 1/16th of a turn—and retest. Your hands will thank you after a long day of Professional Hair Color services.
The Weekly Deep Clean (Get In There!)
Once a week, take five minutes for a deeper clean. If your shears allow it (and you are comfortable doing so without losing parts), you can remove the pivot screw to separate the blades. This isn't mandatory, but it is great for a deep reset .
If you take them apart, wipe each blade face with alcohol to remove the hard-water stains and product buildup. Clean the screw and the bearings. Let everything dry completely, then apply oil to the bearing area and the screw before putting them back together. Retest your tension. Doing this while watching your Towel Steamer heat up in the morning is a great way to multitask. If you use Professional Shears, Clippers, & Trimmers for Barbers from brands like Fromm International or Wahl, check the manual first, as some clipper blades have different maintenance needs.
The Golden Rules: What NOT to Do
We love a good "Don't" list. It saves lives (and shears). First, never cut paper or foil with your professional shears. I don't care if you need to open a pack of Compressed Sponges or trim a Hygienic Table Paper roll; go find the office scissors. Cutting anything other than hair will instantly ruin the razor edge alignment .
Secondly, never drop them. Dropping shears is the fastest way to misalign the cutting edge or damage the pivot point. If you drop them, immediately check the tension and the bite of the blades. Finally, don't store them loose in a drawer where they can bang against Nail Files & Buffers and Mixing Bowls. Always use a protective case or a shear pouch. High-Quality Towels are soft, but they won't protect your edge from a falling Professional Wax Warmer lid.
When to Call the Pros (Sharpening)
Even with perfect pivot maintenance, your blades will eventually get dull. If you've cleaned, oiled, and adjusted the tension, but the shears still push hair or feel "grabby," it's time for professional sharpening . Do not let your cousin's roommate "have a go" at it with a kitchen sharpener. Find a reputable sharpener who uses the correct hollow-grind or flat-hone techniques for beauty shears.
Regular professional sharpening every 6 to 12 months (depending on your volume) will restore the edge and ensure the pivot geometry is balanced. A sharp shear is a safe shear. It requires less pressure, reduces the risk of Massage therapists-grade wrist pain, and keeps your cuts looking sharp.
Maintaining your pivot point isn't just about the tool; it's about your career longevity. When your shears glide through hair like butter, you look more professional, you work faster, and you go home with less hand cramping. So grab that oil, give that pivot some love, and get back to creating beautiful hair. And while you're at it, stock up on all your Must-Have Supplies for Salon & Spa Business Success right here at Pure Spa Direct—your one-stop shop for everything from ItalWax to CND and Boca Terry linens.