The right choice for better results often starts with looking around your treatment room and wondering where on earth you're supposed to put one more thing. I have definitely been there—standing in a perfectly good aesthetic room, holding a box of fresh Cotton Products, and realizing I have absolutely zero surface space left. It's like a game of Tetris, but if you lose, you knock over a bottle of expensive serum. Organizing a small multi-purpose aesthetic room isn't just about making things look pretty for the 'gram (though we love a good flat lay). It is about creating a workflow that saves your back, your time, and your sanity. When you have to switch from a Brow Lamination to a Hard Wax leg service in fifteen minutes, you cannot be tripping over rolling carts or searching for your lost spatulas.
Whether you are a solo esthetician renting a cozy suite or running a bustling Spa where every square foot costs money, efficiency is queen. Today, we are going to tackle the chaos together. I am going to walk you through exactly how to set up a room that can handle facials, waxing, lashes, and maybe even a little retail magic, all without feeling like you are practicing for a clown car record. Grab a tape measure and a trash bag, because we are about to Marie Kondo the heck out of your workspace.
Step 1: Accept That You Are Not A Magician (But You Can Be A Zone Master)
The biggest mistake I see in small aesthetic rooms is trying to do everything everywhere all at once. You cannot have your Facial Steamer dripping on your wax pot, and you definitely do not want lash glue fumes mixing with your lunch. The solution? Zoning. You need to divide your tiny kingdom into specific districts, just like a very small, nice-smelling city. First, identify your "wet zone" (for extractions, steams, and peels), your "wax zone" (where the Wax Warmers live), and your "dry zone" (for lashes, brows, and retail displays).
Use visual boundaries to separate these zones—even in a 100-square-foot room. A simple rolling cart placed perpendicular to the wall can act as a divider between your facial bed and your waxing station. Place a small rug under the facial bed to define the relaxation area, and keep the flooring clear near your Pedicure Chair or massage table. When you mentally map out your space this way, you stop moving like a pinball and start moving like a ballet dancer. Your Lash and Brow supplies stay on their side, and the Ingrown Hair Products stay on theirs. Peace in the valley.
Step 2: Murder Your Clutter (The Great Supply Purge of 2026)
I am going to say something that might hurt your feelings, and I am sorry. You do not need seven half-empty bottles of the same cleanser. You do not need those 400 wooden spatulas from 2019. If you cannot see it, you will not use it. Before you buy a single fancy organizer, take everything out of your cabinets and drawers. I mean everything. Sort it into three piles: Love it (use it daily), Like it (use it once a month), and Dump it (expired, crusty, or just gathering dust). For supplies you love, check your inventory against our Bulk Wax Deals or Compressed Sponges to save space later. For the "Dump it" pile, be ruthless. That weird peel-off mask from three trade shows ago? It has to go.
Once you have purged, look at what is left. Are you doing more Dermaplaning or more Hydrodermabrasion? Stock accordingly. You do not need a full ItalWax rainbow if you only do brows. Keep your????? items at eye level. If you have to stand on a stool to reach your Towel Steamer refills, your layout is wrong. Remember, every second you spend searching for a Cuticle Oil is a second you are not getting paid.
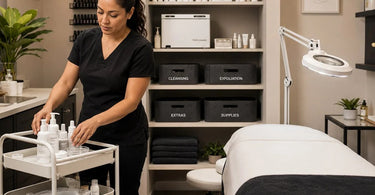
Step 3: Vertical Storage Is Your Skin-Saving Superhero
Floor space is precious real estate. Wall space is where the magic happens. Look up, my friend. Are your walls empty? They should not be. Install floating shelves, magnetic strips, or pegboards. A pegboard is an absolute game-changer for a multi-purpose room. You can hang your Wax Strips, roll your cords around hooks, and hang your Body Brushes neatly. It is functional art. Use clear jars on high shelves to store bulky items like Sugar Scrubs or Salt Scrubs, which look pretty and save drawer space.
Do not forget the back of the door. An over-the-door organizer with clear plastic pockets is perfect for Applicators and Spatulas, tiny scissors, and lash supplies. I also recommend wall-mounted Magnifying Lights instead of taking up desk space with a lamp. If you are using a Portable Massage Table, hang it on a wall bracket when not in use. Get everything off the floor. The more you can mount, the easier it is to sweep up that inevitable dust of crushed Nail Art Rhinestones.
Step 4: The Rolling Cart: Your Drifting Best Friend
If I had to marry an inanimate object, it would be a three-tier rolling cart. In a multi-purpose room, a stationary desk is a liability. A rolling cart is an asset. You can have one cart dedicated to Waxing Kits and another for Facial Treatments. When you switch services, you just roll the cart to the bedside and roll the other one out of the way. It is like having a portable assistant that never complains about the hours.
Set up your cart with tiers: top tier for tools you use constantly (spatulas, applicators, Pre and Post Waxing Products), middle tier for bulkier items (bottles of lotion, clean towels), and bottom tier for trash or dirty linens. If you offer Nail Services as well as waxing, color code your carts. Red cart for waxing, blue cart for nails. This system works beautifully for Waxing Supplies for Professionals because you can wheel your setup right next to the client instead of reaching awkwardly across their body. Plus, it tucks neatly into a corner or closet when you need the floor space for yoga or retail displays.
Step 5: Hide The Ugly, Show The Pretty (Retail & Storage)
You want to sell that Premium Skincare, right? But you do not want the room to look like a pharmacy exploded. Use the 60/40 rule: 60% of your storage should be closed (drawers, cabinets with doors), and 40% open (shelves). Keep your backup inventory of Towels and Gloves and Masks hidden behind closed doors where clients cannot see the industrial packaging. Use beautiful baskets or bins on open shelves to corral retail products.
For the retail you want to sell, keep it near the exit or the waiting area, not right next to the Paraffin Warmer. If you offer services like Lash and Brow Tint, display those retail kits prominently. Decant bulk products into uniform Bottles and Jars. Nothing screams "professional" like matching pump bottles. Nothing screams "I gave up" like five different half-empty generic shampoo bottles. Invest in a label maker. Your future self will thank you when you can actually tell the difference between the body wash and the hand soap at 8 PM on a Saturday.
Step 6: Furniture That Works As Hard As You Do
Standard furniture is for people with standard spaces. You, my friend, need Transformers-level furniture. Look for an Electric Lift Massage Table that allows you to raise it for waxing (saving your back) or lower it for lymphatic drainage. If you do Nail Care, a fold-down manicure table that attaches to the wall is a lifesaver. When you are doing a facial, that table folds up and disappears. For Pedicure Chairs, if you cannot fit a full-sized spa chair, look for a portable pedicure basin that can be stored under a cabinet.
Consider a Locker system for your own personal belongings or client valuables, but mount it high on the wall. Use nesting stools for seating—they stack into each other like Russian dolls. If you offer Massage Oils and lotions, get a side table that has a built-in towel warmer or a lower shelf specifically for sheets. Every piece of furniture must serve at least two purposes. If it only has one job, fire it and hire a stool that has storage inside.
Step 7: Lighting That Lies (In A Good Way)
We all know that harsh overhead lighting is the enemy of good skin and good moods. But in a multi-purpose room, you need different lights for different tasks. You need bright, white, high-CRI lighting (90+ CRI recommended) for Waxing and Lash Lifts so you can see every stray hair. But you need warm, dimmable lights for facials and massage. The solution? Layering. Install dimmable overhead LED lights for general ambient brightness. Add a Magnifying Light on an articulated arm for close-up work. Place a small salt lamp or floor lamp in the corner for relaxation vibes.
Use lighting to define your zones. A pendant light over the facial bed tells the brain "relax." A bright ring light near the wax station tells the brain "precision." Do not forget to use mirrors to bounce light around the room and make the space feel twice as large. A floor-to-ceiling mirror on one wall will do wonders for making a 150-square-foot room feel like a suite. Just be careful where you point that Facial Steamer nozzle, or you will be cleaning condensation off that mirror constantly. (Speaking from experience on that one.)
Step 8: The 5-Minute Reset (Your Sanity Saver)
You can have the most beautiful, organized room in the world, but if you leave it looking like a tornado hit a cotton ball factory after every client, you are going to cry. You need a reset routine. This is non-negotiable. At the end of every service, take five minutes. Wipe down your Manicure Station or bed. Spray your Disinfectants. Restock your cart. Put the lid back on the wax pot.
Keep a small caddy under your sink with your cleaning supplies and a checklist. If you do Hair Color services, make sure the mixing bowls are washed immediately. If you do waxing, throw away the used spatulas. A clean room is a profitable room. When you start your day fresh with everything in its place, you look more professional, you feel less stressed, and you are ready to take on that back-to-back booking schedule. Treat your space like a sacred instrument, not a storage unit. It will pay you back in spades (and tips).
Shop Your Organization Upgrade at Pure Spa Direct
Ready to stop tripping over clutter and start making that money? You do not have to break the bank to get organized. Pure Spa Direct has the Must-Have Supplies you need to streamline your workflow. From Professional Wax Spatulas to keep your waxing sanitary, to Hygienic Table Paper for quick turnovers, we have the inventory to stock your newly organized shelves. Explore our Spa Essentials for the little things that make a big difference, like Mixing Bowls and Towels. Check out brands like ItalWax for efficient storage of waxes, or Boca Terry for linens that fold small but feel big.
Remember, organization is not a one-time event. It is a daily practice. But with these systems in place, you will save time, reduce stress, and create a sanctuary for your clients (and yourself). Now go forth and conquer that tiny room. You have got this.
)