Top wholesalers recommend this for pros: the difference between a five-star review and a potential liability issue often rolls on a tiny, spiked wheel. We’re talking about your microcoring derma roller. This powerhouse tool delivers incredible results for clients, tackling everything from fine lines and acne scars to improving overall skin texture by stimulating collagen production. But here’s the not-so-funny truth—if you treat it like just another spa tool in your drawer, you’re playing a risky game. Every single use creates microscopic channels in the skin, which is great for product absorption but also creates a direct pathway for bacteria, viruses, and other pathogens if the tool isn’t impeccably clean. Let’s get serious about safety, efficacy, and protecting your professional reputation with a maintenance protocol that’s as non-negotiable as using sterilizing alcohol.
Why "Clean Enough" Is Never Clean Enough for Derma Rollers
Before we dive into the “how,” let’s be crystal clear on the “why.” This isn’t just about wiping off visible serum. A derma roller is a semi-invasive tool. Cross-contamination is a severe risk, with the potential to transfer not just surface bacteria but serious bloodborne pathogens. Sharing a roller between clients is an absolute “never,” but even dedicated client tools must be sterilized to a medical grade between sessions. Think about it: would you reuse a waxing spatula without cleaning it? The principle is the same, but the stakes are higher because the skin’s barrier is compromised. Proper maintenance protects your client’s health, ensures the tool remains effective, and ultimately safeguards your business from preventable disasters. It’s the cornerstone of professional advanced facial treatments.
The Gold-Standard, Step-by-Step Cleaning & Sterilization Protocol
Follow these steps meticulously after every single client. No shortcuts. Your client’s skin and your license depend on it.
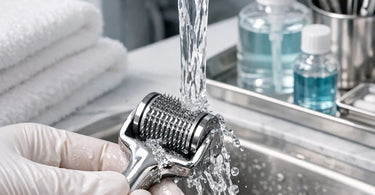
Step 1: The Immediate Post-Treatment Rinse
Right after the treatment, before the biological matter dries, hold the roller head under warm, running water with the needles pointing downward. Gently rotate it to help rinse away any residual blood, skin cells, lymph fluid, or serum. This is a crucial pre-cleaning step that makes the sterilization that follows far more effective. Do not use soap at this stage.
Step 2: The Critical Sterilization Soak
This is the step that kills the germs. You must use a 70% isopropyl alcohol solution. Why 70%? It’s the perfect concentration—potent enough to destroy pathogens but with enough water content to evaporate slowly, allowing it proper contact time to work. Fill a clean, shallow container (like a small glass bowl dedicated to this purpose) with enough alcohol to fully submerge the roller head. Let it soak for a minimum of 10 to 15 minutes. This is not a quick dip; the soak time is non-negotiable for true sterilization.
Step 3: The Perfect Air-Dry
After soaking, remove the roller and gently shake off the excess alcohol. This is key: place the roller on a clean paper towel or in a clean, dry stand with the needles facing up. Do not lay it on its side or needles down, as this can bend the needles and trap moisture. Allow it to air dry completely in a clean area before storage. Never use a cloth towel, as fibers can cling to the needles and reintroduce contaminants.
Step 4: Pre-Use Client Preparation
Before using the roller on your next client, you must repeat a shortened sterilization process. Even though it was cleaned after its last use, it has been in storage. Soak the roller head in fresh 70% isopropyl alcohol for 5-10 minutes, then allow it to air dry completely again before touching the client’s skin. This pre-use sterilization is your final safety gate.
What NOT to Do: Debunking Dangerous Cleaning Myths
In a pinch, it’s tempting to improvise. Don’t. Here’s what to avoid at all costs:
- Boiling Water: It can damage the plastic housing and potentially dull or misalign the delicate needles.
- Soapy Water or Dish Detergent: These do not sterilize. They can leave a film that harbors bacteria and may cause skin reactions.
- Household Disinfectants (e.g., Dettol, Bleach): These often contain toxic chemicals like chloroxylenol that are not meant for subdermal exposure and can cause severe skin reactions.
- Hydrogen Peroxide: It can be corrosive to the metal needles over time, compromising their integrity.
- Wiping with a Sanitizing Wipe: This is sanitation, not sterilization. It reduces microbes but does not eliminate all pathogens.
- Using a Toothbrush or Sponge to Scrub: This will absolutely bend and destroy the micro-needles.
Extending Your Tool’s Life: Inspection, Storage & Replacement
Proper maintenance isn’t just about bacteria; it’s about preserving your investment.
Regular Needle Inspection
Before every sterilization cycle, hold the roller under a good light or use a magnifying light. Look closely at the needles. They should all be straight, sharp, and uniformly aligned. If you see any needles that are bent, hooked, or dull, the roller is immediately unsafe for use. A damaged needle can tear the skin instead of creating a clean micro-channel, leading to irritation, damage, and increased risk of infection.
Professional-Grade Storage
Once completely dry, always store the derma roller in its original protective case. If the case is lost, use a clean, hard-sided container. Store it in a cool, dry place—not in a humid bathroom cabinet. This protects the needles from physical damage, dust, and environmental contaminants. Consider using a UV sterilizer cabinet for an added layer of protection during storage.
Knowing When to Retire Your Roller
Derma rollers are not forever tools. Even with perfect care, needles will eventually dull. A general guideline for professional, frequent use is to replace a derma roller every 10-15 uses, or more often if you use longer needle lengths. If the roller no longer glides smoothly, causes more discomfort than usual, or you simply cannot recall how many clients it’s seen, err on the side of caution and replace it. Your source for reliable, professional-grade replacements is your trusted partner, Pure Spa Direct.
Building Client Trust Through Transparent Hygiene
Your meticulous hygiene protocol is a powerful marketing tool. Don’t hide it—showcase it. Perform the pre-use sterilization in front of the client, or have the sealed, sterile case on your workstation. Educate them briefly on why this process is so critical for their safety. This transparency transforms a routine procedure into a demonstrable act of professional care, justifying your service price and building unparalleled loyalty. It shows you value their well-being above all else.
The Bottom Line for Your Bottom Line
Maintaining your microcoring derma roller isn’t just a task; it’s a fundamental aspect of your professional duty. By implementing this rigorous, two-stage sterilization protocol, conducting regular inspections, and committing to timely replacement, you ensure every treatment is safe, effective, and builds your reputation as a meticulous and trustworthy skincare expert. For all the supplies you need—from high-quality 70% isopropyl alcohol and storage cases to the latest professional derma rollers—your one-stop shop is Pure Spa Direct. Now, go forth and roll with confidence (and cleanliness)!