Solutions you can trust... especially when they involve a very sharp blade near your client's lovely face! Let's be honest, dermaplaning is that magical treatment that looks equal parts terrifying and terrifically effective. But when performed correctly, it's a total game-changer, offering instant exfoliation, flawless makeup application, and a radiant glow that keeps clients coming back. The secret to moving from scary to spectacular isn't magic—it's an unwavering commitment to safety, hygiene, and technique. This guide is your professional playbook for mastering dermaplaning with disposable blades, ensuring every treatment ends with a "wow" and not an "ouch."
Think of this as your backstage pass to confidence. We'll walk through the non-negotiable pre-treatment checks, the perfect blade grip, the step-by-step strokes, and the crucial aftercare that protects your results and your reputation. Because in our world, a safe treatment is a successful treatment.
The Non-Negotiables: Client Assessment & Setup
You wouldn't build a house on a shaky foundation, and you should never start a dermaplaning treatment without a solid pre-game routine. This phase is all about prevention and preparation.
First, the client consult is your safety net. This is a mandatory conversation, not a casual chat. You must review their medical history, medications, and current skincare habits. Key contraindications include active acne, eczema, rosacea, herpes simplex, open wounds, or recent use of Accutane (Roaccutane). Clients using prescription retinoids, blood thinners, or recent chemical peels need special consideration and possibly a waiting period. This isn't just ticking boxes; it's building trust and avoiding complications. Always secure informed consent, clearly explaining the procedure, potential risks, and realistic outcomes.
Next, prep the skin and your space. The client's skin must be meticulously cleansed—consider a double cleanse to remove all makeup, sunscreen, and impurities. The skin needs to be clean and dry for the blade to glide effectively. Now, prep your throne (aka your treatment room). Disinfect all surfaces, organize your tools, and ensure your magnifying lamp is positioned for perfect visibility. Your hygiene protocol starts now: wash your hands thoroughly and don fresh disposable gloves.
Your Tools of the Trade: Choosing & Handling Disposable Blades
Your blade is your paintbrush, and choosing the right one matters. For professional dermaplaning, surgical-grade stainless steel blades are the gold standard. The most common types are the #10R and the #14.
The #10R blade (the "R" stands for round) is a superstar. Its rounded tip is specifically designed for dermaplaning, providing a smoother glide and significantly reducing the risk of nicking compared to a standard pointed #10 blade. It's ideal for the contours of the cheeks, forehead, and jawline. The #14 blade is larger and excellent for covering broad, flat areas quickly. Many pros start with a #14 for the main areas and switch to a #10R for precision work around the nose, lips, and under the eyes.
You have two main options for disposability: 1) A traditional handle (like a #3 handle) with individually loaded sterile blades, or 2) A completely disposable scalpel with a pre-attached blade. Whichever you choose, the rule is ironclad: ONE BLADE PER CLIENT. Never, ever reuse a blade. After the treatment, the used blade must be immediately disposed of in a dedicated sharps container. For safe removal from a reusable handle, use a tool like a blade remover or Kelly forceps—never your fingers.
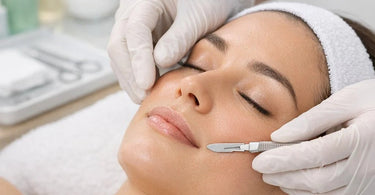
The Step-by-Step: Safe Technique and Motion
Here's where the zen meets the technique. Master this motion, and dermaplaning becomes a rhythmic, effective treatment.
1. The Grip: Hold the handle like a pencil for control. Your grip should be firm but relaxed to allow for gentle, fluid movements.
2. The Angle: This is critical! Maintain a 45-degree angle between the blade and the client's skin. Holding it too flat won't exfoliate effectively; holding it too steep increases the risk of cuts.
3. The Tension: With your free hand, gently but firmly stretch the skin taut. This creates a smooth, stable surface for the blade to glide over. No stretching means loose, wobbly skin that's much easier to nip.
4. The Stroke: Use short, feather-light, overlapping strokes in the direction of hair growth (which is usually downward on the face). Let the sharpness of the blade do the work—you should not be applying pressure. Imagine you're barely skimming the surface. After each stroke, wipe the accumulated debris (dead skin and peach fuzz) off the blade with a sterile gauze pad.
5. The Sequence: Work in systematic sections: forehead, cheeks, chin, then the more delicate areas like the upper lip and around the brows. For the nose, use extra caution and very short, controlled strokes, always keeping the skin taut. Avoid the bony ridge of the jaw and any active blemishes entirely.
Pro Tip: If you feel the blade "dragging," it's likely collecting product or moisture, or it's becoming dull. Wipe it clean or change to a fresh blade immediately. A sharp blade is a safe blade.
The Grand Finale: Post-Treatment Care & Advice
Your responsibility doesn't end when you cap the blade. Proper aftercare is what locks in the glow and prevents irritation. Give your clients clear, printed instructions to take home.
Immediately After (First 24-48 hours): Their skin is in a heightened state of absorption and sensitivity. Advise them to use only gentle, hydrating products. A gentle cleanser and a soothing moisturizer with ingredients like hyaluronic acid or ceramides are perfect. They must avoid retinoids, AHAs/BHAs, physical scrubs, and absolutely must apply a broad-spectrum SPF 30 or higher. Sun exposure is public enemy #1 for freshly planed skin.
Also recommend they avoid heat (hot showers, saunas, intense workouts), swimming pools, and wearing makeup for at least 24 hours to let the skin breathe and recover.
Long-Term Maintenance: Dermaplaning results are gorgeous but not permanent. For sustained smoothness and exfoliation, treatments can be repeated every 3-4 weeks. This aligns with the skin's natural regeneration cycle. In between appointments, they should maintain a good hydrating routine with products like a quality facial oil or serum.
Building Your Dermaplaning Arsenal with Pure Spa Direct
Ready to offer this in-demand service? We've got you covered. Start with our curated Dermaplaning Collection, which features everything from single-use blades to safety tools.
For the ultimate in safety and precision, stock up on professional-grade dermaplaning blades and handles. Don't forget the essentials for a pristine service: sterile gauze, nitrile gloves, and sharps containers. Elevate the entire experience with pre-treatment products from our Advanced Facial Treatment line and luxurious post-treatment care from brands like Tuel Skincare.
By marrying impeccable technique with single-use, professional tools, you transform dermaplaning from a simple hair removal service into a results-driven, luxurious skincare treatment. It's a skill that builds client loyalty and elevates your menu. So grab a blade (safely!), practice your tension and angle, and get ready to reveal the most beautiful glow in the room—safely, confidently, and professionally.