Solutions that make your life easier... like a perfectly cured gel manicure that stays put for weeks and has your clients singing your praises on every social platform known to humankind. But let's be real—that dream can turn into a sticky, goopy nightmare if your UV/LED lamp and your gorgeous gel polish aren’t on speaking terms. The secret handshake? Wattage compatibility. Think of it as matchmaking for your manicure station: when the power of your lamp and the needs of your gel are in perfect harmony, you get a cure that’s harder than your resolve to avoid salon gossip. Getting it wrong, however, leads to the sad trilogy of “wrinkled, tacky, and peel-y,” followed by the dreaded one-star review. So, grab your favorite cuticle oil (may we suggest something from our luxurious collection?), and let’s decode wattage compatibility so you can banish under-curing for good.
This isn’t just tech talk—it’s about protecting your reputation, your time, and your client’s nails. A proper cure is what separates a professional service from a DIY disaster. It ensures the gel polish achieves its maximum durability, shine, and color integrity. More importantly, it prevents skin sensitization and allergic reactions that can occur from uncured gel residues. Implementing a simple compatibility check should be as routine as sanitizing your manicure table. Let’s dive into the ‘what,’ ‘why,’ and most crucially, the ‘how.’
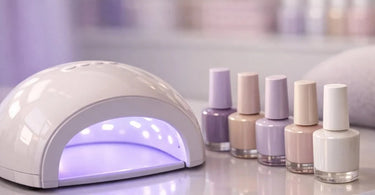
Wait, Watt? Understanding UV/LED Lamp Power Basics
First, let’s demystify the numbers. When you look at a lamp, you’ll see wattage (like 48W, 72W, 120W). This isn’t a measure of brightness like a lightbulb; it’s a measure of the electrical power the lamp consumes. In the world of gel curing, what you really care about is the output—the intensity of the UV/LED light that actually hits the gel. This is often measured in mW/cm² (milliwatts per square centimeter). A higher wattage lamp *typically* houses more or stronger LEDs/UV bulbs, which *can* mean higher intensity and faster cure times.
But here’s the kicker: not all 48W lamps are created equal. The design, the quality of the LEDs, the reflector technology, and even the wavelength spectrum (e.g., 405nm for LED, a broader range for UV) play massive roles. A high-quality 48W lamp from a top brand like CND or Gelish might outperform a cheap, no-name 72W lamp. The wattage is a starting point, not the final answer.
The Gel’s Demand: Why Polish Formulations Are Picky
Your gel polish isn’t just being difficult (well, maybe a little). Its chemical formulation is designed to polymerize—harden—under a very specific light intensity and wavelength. The photoinitiators in the gel are like tiny little guards that only wake up when the right light password is shone on them.
Gel manufacturers test their products extensively with specific lamps to determine the optimal cure time. That’s why you see them pushing “system” sales—their polish with their lamp. They’ve done the compatibility legwork for you. When you venture outside the system, you become the scientist. A gel formulated for a high-intensity 120W lamp might under-cure in a 36W lamp, even if you double the time. Conversely, a gel for a milder lamp might cure too quickly and heat-spike in a super-powerful one, causing discomfort for your client. It’s all about balance, baby.
The 5-Step Compatibility Check: Your Pre-Service Ritual
Implementing a check doesn’t require a physics degree, just a methodical approach. Make this part of your setup for any new gel product or lamp.
Step 1: The Manufacturer’s Word is (Usually) Gospel. Always, always, always check the gel polish manufacturer’s instructions first. They will list compatible lamps and often the required minimum intensity (e.g., “Requires a lamp with at least 36W LED/48W UV” or “Cures in 30 seconds with an intensity of 50 mW/cm²”). Start there. If your lamp is on their list, you’re golden. Bookmark the tech sheets for your favorite brands like OPI or Essie gel lines.
Step 2: Play Matchmaker with Specs. No direct recommendation? Time to compare specs. Find your lamp’s manual or look it up online. You need its light intensity (mW/cm²) and peak wavelength (nm). Compare this to the gel’s requirements. If the gel needs 45 mW/cm² and your lamp outputs 60 mW/cm², you’re good—you might even cure a tad faster. If your lamp only outputs 30 mW/cm², you’ll likely need to significantly increase cure time, which is risky and inefficient.
Step 3: The “Fingertip Test” (The Sniff Check). After curing, the gel should be completely hard and non-tacky (unless it’s a no-wipe top coat, which leaves a tacky inhibition layer). Gently press a fingernail into a cured swatch on a color palette or practice hand. If it leaves any indentation, it’s under-cured. Also, give it a subtle sniff right after curing. A strong, lingering chemical smell can indicate improper curing. Properly cured gel should have little to no odor after the lamp cycle.
Step 4: The “Thumb Drag" Stress Test. Apply and cure the gel on a practice tip or a willing coworker (volunteers who get a free manicure are easy to find!). After 24 hours, take their thumb and firmly drag it across the surface of the cured gel. Does it scratch or dull easily? Does it feel soft or flexible when you apply side pressure? A fully cured gel should be very scratch-resistant and hard. This test reveals curing issues that aren’t apparent immediately after the lamp.
Step 5: Document Your Findings! Keep a little salon journal or a digital note. Write down the gel brand/color, the lamp used, the cure time you tested, and the result. “Brand X Ruby Slipper - 60 sec in MySun 48W Lamp - PASS - rock hard.” This builds your own personal compatibility database and saves you from retesting every time.
Troubleshooting Common Curing Conundrums
Even with checks, things go sideways. Here’s your quick-fire diagnostic guide:
Problem: Wrinkling or shrinking. Likely Cause: Too much heat too fast (over-curing/heat spike) or too-thick layers. Fix: Use thinner layers, try a “flash cure” (5-10 seconds) before the full cure, or if your lamp has adjustable power, dial it down.
Problem: Sticky, tacky layer that won’t wipe off (on a regular top coat). Likely Cause: Under-curing. The surface didn’t get enough light because the intensity was too low or the time was too short. Fix: Increase cure time in 10-second increments, or invest in a higher-wattage/higher-intensity lamp from our extensive selection.
Problem: Color fading or yellowing after a few days. Likely Cause: Under-curing allows pollutants to penetrate the soft gel layer. Fix: Ensure complete cure. Also, recommend a quality nail treatment and UV protectant spray to clients.
Problem: Lifting or peeling within days. Likely Cause: While often prep-related, under-curing at the base or top can be a major contributor. The gel hasn’t reached its full adhesion potential. Fix: Revisit your compatibility check, especially for your base and top coats.
Investing in Your Cure: Choosing the Right Lamp
If you’re constantly playing compatibility whack-a-mole, it might be time for a lamp upgrade. The goal is a versatile workhorse. Look for:
High, Consistent Intensity: A lamp with a high mW/cm² rating (many professional lamps are now 80-100+ mW/cm²) will handle most gels on the market. Consistency across all nails is key—good lamps have strategic LED placement and reflective interiors.
Full-Spectrum or Dual-Wavelength: Some newer “full-spectrum" or “hybrid" lamps emit both the standard 405nm LED wavelength AND lower UV wavelengths (like 365nm). This makes them compatible with an even wider range of products, including some older UV-only gels and specialty products like brow laminations glue or lash extension adhesives.
Brand Reputation & Support: Stick with professional brands sold by trusted distributors like us. You get reliability, accurate specifications, and access to replacement parts. A lamp isn’t just a light; it’s a core piece of your nail salon equipment.
Beyond the Nails: A Universal Principle of Professionalism
This mindset of checking compatibility and performance isn’t limited to nails. It’s what defines a true professional. It’s the same reason you test a new soft wax temperature on your wrist before applying, or why you patch-test a new brow tint. It’s about mastering your tools—from your facial steamer to your microdermabrasion machine—to deliver predictable, exceptional results every single time.
So, embrace the wattage check! It’s a small habit that pays off in huge ways: fewer redos, more confident clients, and a stack of flawless manicures that speak louder than any advertisement. Your future self, calmly sipping coffee while your lamp perfectly cures another set, will thank you. For all your compatibility-checking needs, from top-tier lamps to every gel under the sun, your partners at Pure Spa Direct are here to help you shine.