Do your best work, every time... even when that work involves strategically gluing tiny little shields to someone’s eyelid and hoping for the perfect curl. Let’s be real, the life of a lash tech is a glamorous mix of artistry, precision, and the occasional moment of panic when you realize you’ve just glued your client’s eye completely shut. We’ve all been there, right? (If you haven’t, just wait – your time will come!). But when lash lifts go right, they are pure magic, giving your clients that wide-eyed, “I woke up like this” look without a curler in sight. Today, we’re diving deep into the wonderful world of Lash Lift Supplies: Shields, Adhesives, Processing Times, and Troubleshooting. Think of this as your funny, slightly sarcastic, but incredibly helpful bestie guide to nailing the perfect lift every single time.
Whether you’re a seasoned pro or a newbie just getting your hands on your first Lash & Brow Enhancement kit, mastering the details is key. We’re going to break down everything from picking the right shield size (because one size definitely does not fit all) to figuring out why your adhesive decided to take a personal day. Plus, we’ll troubleshoot the most common lash lift catastrophes and show you how to keep your clients coming back for more of that beautiful, fluttery magic.
The Foundation of the Flip: Choosing Your Lash Lift Shields
Alright, let’s talk shields. These little silicone or plastic rods are the backbone of the entire lift. Think of them as the curlers you used in the 80s, but for tiny, delicate lashes. Choosing the wrong size is like trying to curl your hair with a pencil when you wanted beach waves – the results are going to be... interesting, and not in a good way.
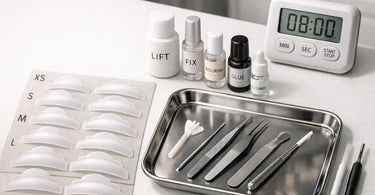
Most shield sets come in sizes ranging from extra-small (XS) to large (L). The image for this very blog post even labels ‘LIFT’, ‘FIX’, and sizes like ‘XS’ and ‘MIN’ on its packaging, hinting at the precision involved. The general rule of thumb is: the shorter the lash, the smaller the shield. For those lucky clients with long, lush lashes, you’ll want a larger shield to create a soft, elegant curl without giving them a 90-degree angle straight up to their eyebrow. If you put a tiny shield on long lashes, you’ll get a super-tight, “I stuck my finger in a light socket” look. On the flip side, using a shield that’s too large for short lashes will give you a barely-there lift, leaving both you and your client underwhelmed. It’s all about matching the shield to the lash to get that perfect, eye-opening curve. You can find a huge variety of shield sizes and brands in our Premium Lash Extensions & Supplies for Pros collection.
The Sticky Situation: Lash Lift Adhesives Unmasked
Next up: the glue. Without a good adhesive, your perfectly placed shields are just tiny, useless pieces of silicone. We have two main types of glue in the lash lift game: the one that sticks the shield to the eyelid, and the one that sticks the lashes to the shield. Getting them mixed up is a classic rookie mistake that leads to a very sticky situation indeed.
The shield adhesive (often a water-based, latex-free glue) is your first step. You apply it to the underside of the shield and gently press it onto the clean, dry eyelid. This stuff needs to be strong enough to hold the shield in place for the entire processing time but gentle enough to come off without removing your client’s skin along with it. Then comes the lash adhesive. This is the glue that makes the magic happen. You’ll brush it onto the topside of the lashes, carefully combing them up and over the shield to stick them in place. This is the moment of truth! A good, reliable adhesive is non-negotiable. Brands like Intensive Tint or Refectocil, known for their tints, also offer excellent companion products for the full service. And remember, if your adhesive is too thick or dries too fast, it can be a nightmare. You can find a wide selection of adhesives and removers in our Lash & Brow Service Supplies section.
Time is of the Essence: Cracking the Processing Code
This is where you earn your money. The image teases us with “FIX”, “MIN”, “SEC”, “START”, and “STOP” – a little countdown to lash perfection. Processing times are not just suggestions; they are the sacred recipe for the perfect curl. And the tricky part? Every single client is a unique little snowflake with lashes that have a mind of their own.
The chemical process involves a lifting lotion (the perm solution) that breaks down the disulfide bonds in the hair, allowing you to reshape it around the shield. This is followed by a fixing lotion (the neutralizer) that reforms those bonds in their new, curly shape. The time each lotion stays on is critical. Leave the lifting lotion on too long, and you risk over-processing, leading to brittle, damaged, or even “fishtailed” lashes (where the ends flip out weirdly). Not long enough, and your client will be back in a week asking why their lashes look like they just had a bad hair day.
Factors like lash thickness, porosity (has your client been using a growth serum? That changes everything!), and even the room temperature can affect processing. This is why it’s crucial to start with the minimum recommended time, peek (after checking with a quick visual, not by touching!), and assess. Using a reliable timer app on your phone or even a dedicated salon timer is a lifesaver. And always, always follow the manufacturer’s instructions for the specific brand you’re using. Your favorite Lash Lift & Perm kit will have its own perfect timeline.
When Things Go Bump: Lash Lift Troubleshooting 101
Alright, grab a coffee (or maybe something stronger), because we’re about to get real. Even the best of us face lash lift fails. But fear not! Here’s your troubleshooting guide to the most common mishaps:
The “Why Is One Eye Giving Me a Side-Eye?” (Uneven Lift): This is usually a case of the shields not being placed symmetrically, or one eye processing faster than the other (body heat can vary!). Fix: Be meticulous with your placement. Use a silicone shield applicator tool for precision and double-check your angles in a mirror before applying the first lotion. If one eye processes faster, note it for next time and adjust your timing.
The “I Think I Just Gave Her a Unibrow” (Adhesive on Skin): A little bit of lash glue where it doesn’t belong is a rite of passage. Fix: Prevention is key! Use the tiniest amount of lash adhesive on the topside of the lashes. If you do get a blob on the skin, wait for it to dry completely and then gently lift it off with a pair of precision tweezers. Never, ever try to wipe wet adhesive – you’ll just smear it everywhere. A good pair of gloves and clean tools are your best friends here.
The “Why Are Her Lashes Sticking to the Shield Like Glue?” (Lashes Not Lifting): This can happen if the lashes weren’t properly cleansed before application. Oils, makeup residue, or even natural skin oils can create a barrier, preventing the lifting lotion from working. Fix: Always start with a deep cleanse using an oil-free cleanser, like some of the gentle options from Premium Skincare Products for Spas and Salons. Give those lashes a good scrub!
The “My Client Looked Like She Saw a Ghost” (L-Shaped/Fishtailed Lashes): This is the sign of a classic over-process. The tips of the lashes have been curled too much, often because the lifting lotion was left on too long or applied too close to the tips. Fix: When applying the lifting lotion, focus it on the mid-to-lower part of the lash, avoiding the very tips. And for the love of all that is holy, watch your clock! When in doubt, check early. You can always add more time, but you can’t take it back. If it happens, a lash-conditioning treatment can help, but usually, you just have to wait for new lashes to grow in.
Nourish and Finish: The Grand Finale
After all that drama and precision, we finally get to the “NOURISH” step hinted at in the image. The chemical process can be a little drying, so finishing with a nourishing lash serum or oil is non-negotiable. This isn’t just a nice-to-have; it helps rebalance the pH, condition the lashes, and shows your client you care about the long-term health of their natural lashes. A little Cuticle Oil can actually work wonders here too, as it’s gentle and hydrating. Brush through with a clean spoolie to separate any sticky lashes, and voila! You’ve given them the perfect, eye-opening lift.
Before you send them off into the world with their gorgeous new lashes, give them some simple aftercare instructions: no water, steam, or makeup on the eyes for 24-48 hours. This gives those reformed bonds time to fully set. It’s also a great opportunity to point them toward some fabulous retail products, like a gentle mascara or a nourishing lash serum from one of our trusted brands like Le Marque, which is also amazing for brows.
So there you have it, the not-so-secret secrets to Lash Lift Supplies: Shields, Adhesives, Processing Times, and Troubleshooting. From the initial cleanse to the final nourishing spritz, every step is a chance to showcase your skill and make your clients feel like a million bucks. And when you’ve got the right supplies and a little know-how, you can handle any sticky, uneven, or over-processed situation that comes your way. Now go forth and lift those lashes! And remember, for all your must-have salon supplies, from hygienic table paper to the perfect lash tools, we’ve got you covered at Pure Spa Direct. Happy lifting!