Nail designs with rhinestones are the ultimate way to add a touch of glamour and sparkle to any manicure. Whether you're creating a subtle accent or going all out with a full-on bling look, rhinestones can elevate your nail art game to a whole new level. But how do you make sure your rhinestone designs stand out without crossing the line into 'too much'? Let's explore the world of rhinestone nail designs and how to make them work for every client.
Why Rhinestones?
Rhinestones offer versatility and glamor that's hard to beat. They come in a variety of shapes, sizes, and colors, allowing you to create endless combinations that match any style or occasion. From simple, elegant accents to bold, eye-catching designs, rhinestones can transform any basic manicure into a masterpiece.
For professionals, using rhinestones in nail designs can be a great way to attract clients looking for something special. They're ideal for events like weddings, parties, or just for clients who love a little extra sparkle in their everyday look. Plus, with the right tools and techniques, applying rhinestones can be quick and easy, making them a profitable addition to your nail art services.
Design Ideas to Wow Your Clients
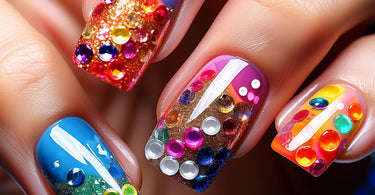
Ready to get creative? Here are some stunning rhinestone nail designs to inspire your next manicure:
- Minimalist Chic: A single rhinestone on a nude or pastel nail can add a touch of elegance without overwhelming the design.
- All-Over Bling: Cover the entire nail with rhinestones for a look that's bold, glamorous, and perfect for special occasions.
- Accent Nails: Add rhinestones to just one or two nails on each hand for a subtle yet stunning effect.
- Patterns and Shapes: Use rhinestones to create intricate patterns, like flowers or geometric shapes, for a unique and personalized design.
- Mix and Match: Combine rhinestones with other nail art elements, such as glitter, foil, or hand-painted designs, to create a truly one-of-a-kind look.
How to Apply Rhinestones Like a Pro
Applying rhinestones might seem tricky, but with the right techniques and products, it can be a breeze. Here's a step-by-step guide to help you achieve flawless rhinestone designs:
- Prep the Nails: Start by applying a base coat and your desired nail polish color. Let it dry completely.
- Apply Nail Glue: Use a dotting tool or toothpick to apply a small amount of nail glue where you want the rhinestone to go. Be precise!
- Place the Rhinestone: Using a rhinestone picker or tweezers, carefully place the rhinestone onto the glue. Press down gently to ensure it sticks.
- Seal the Design: Once all the rhinestones are in place, apply a layer of top coat over the entire nail. This will help secure the rhinestones and add extra shine.
- Let It Dry: Allow the nails to dry completely before touching anything to prevent smudging or moving the rhinestones.
Products to Use
For the best results, make sure you're using high-quality products. Check out our collection of nail art supplies to find everything you need, from rhinestones to nail glue and top coats:
For those looking to take their nail art to the next level, rhinestones are a must-have in your toolkit. With the right application techniques and a little creativity, you can create dazzling designs that will have your clients coming back for more. So go ahead, add some sparkle to your services and let your creativity shine!