Smarter tools, better outcomes... Let's be real, the struggle is real. You've just applied the perfect tint to a client's lashes or brows. They look amazing, the color is on point, and then... you notice it. A little smudge, a stray dot of pigment stubbornly clinging to the skin right at the waterline. It's enough to make any beauty pro want to scream into a fluffy towel. But fear not, because conquering this tiny tint tyrant is all about having the right tools for the job. And here at Pure Spa Direct, we've got the arsenal you need to achieve that flawless, pristine finish every single time.
Think of it like a high-stakes game of Operation, except instead of a funny bone, you're dealing with a client's eye, and the buzz isn't a game over, it's an unhappy customer. We're here to make sure that never happens. We're going to break down the best tools for safely and effectively removing that excess tint, so you can keep your cool, keep your clients happy, and keep those perfect arches and fringe on fleek. So grab your favorite beverage, get comfy, and let's dive into the wonderful world of waterline rescue. Honestly, if we can remove stubborn wax without a flinch, we can definitely handle a tiny tint spot!
Why the Waterline is a Tint Magnet (and a Tech's Nightmare)
Before we get to the good stuff—the tools—it helps to understand why this happens in the first place. The waterline, that delicate rim of skin where your eyelashes or brows meet, is a high-moisture, high-oil zone. It's basically the wild west of the face when it comes to product adhesion. Tint loves to cling to this area, often seeping into the tiny crevices and leaving behind an unwanted mark. This is especially true if you're using a high-quality, potent tint that's designed to last. The good news? It's completely normal. The even better news? It's totally fixable.
The key is to act fast and use the right products. Leaving the tint to fully set on the skin can make it a much bigger challenge to remove. This is where your prep station becomes crucial. Having your Lash & Brow Service Supplies organized and within arm's reach is the first step to mastering the art of the clean waterline. Just like you wouldn't start a waxing service without your ItalWax - Pre/Post products, you shouldn't start a tinting service without your cleanup crew ready.
The Ultimate Tint-Erasing Tool Kit
Let's get down to business. You need a reliable toolkit that's gentle on the skin but tough on pigment. Using harsh chemicals or abrasive materials near the eye is a big no-no. We're professionals, and we use professional tools. Here are the MVPs you need to have on your station:
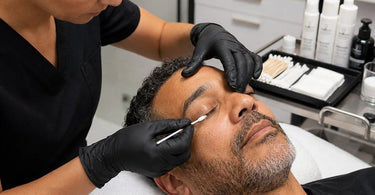
1. The Precision Point Applicator: Your Tint Detailer
Think of this as your magic wand. A Precision Tint Applicator Swab, often with a fine, pointed tip, is your best friend for this task. It allows you to get right into the waterline with surgical precision. Dip the tip in a gentle, ophthalmologist-approved tint remover or a bit of creamy cleanser, and you can carefully swipe away the offending pigment without disturbing the tint on the lashes or brows themselves. It's all about control, baby.
2. The Gentle Cleanser: A Soapy Savior
Sometimes, the simplest solutions are the best. A mild, fragrance-free liquid soap or a specially formulated eye cleanser is perfect for gently wiping away fresh tint stains. The key here is 'gentle.' You don't want to irritate the eye area. Apply a tiny drop to a clean, soft Professional Cotton Products round or a fine-tipped applicator and gently dab at the stain. For the waterline, a cotton-tipped applicator, like a Q-tip, can work wonders. Just be sure to use it with a light touch and a gentle cleanser that won't sting.
3. The Soft Lint-Free Wipe: The Final Flourish
After you've removed the tint, it's important to gently pat the area dry and remove any leftover residue. This is where a high-quality, lint-free wipe comes in. You don't want tiny fibers getting into your client's eyes. Look for wipes that are soft, absorbent, and specifically designed for use on the face. These are often found in your Spa Essentials kit. They provide a clean, safe finish to your tidy-up operation.
4. The Barrier: An Ounce of Prevention
This isn't a removal tool per se, but it's the ultimate 'life hack' for this problem. Before you even apply the tint, apply a thin layer of a protective barrier, like a bit of petroleum jelly or a specialized eye cream, along the waterline. This creates a shield that the tint simply can't penetrate, making any excess wipe away effortlessly with a Tint Applicator Swab or a damp cotton round. It's the secret weapon of lash and brow wizards everywhere.
Step-by-Step: Tint Removal Like a Boss
Okay, you've got your tools, you've prepped your area. Now let's walk through the process like the pros we are.
- Assess the Situation: After you've applied your Professional Lash and Brow Tint and allowed it to develop for the recommended time, take a look. Is there a tiny dot? A slight smudge? A larger spot? The size and location will determine your best approach.
- Choose Your Weapon (Tool): For precise spots, grab your pointed applicator. For larger areas or smudges, a quality cotton round with a dab of gentle cleanser is your go-to.
- Apply with Care: Gently, and I mean gently, touch the applicator or cotton to the stained area. Do not rub. You want to lift the tint, not grind it into the skin. A soft dabbing or swiping motion is key. If the tint has set a bit, you might need a drop of Eye Makeup Remover designed for the eye area.
- Blot and Dry: Once the pigment is gone, use a clean corner of your lint-free wipe to blot the area dry. This removes any leftover moisture or product.
- Double-Check: Look again. Good lighting is crucial here. Make sure you've removed every trace. A magnifying lamp can be a lifesaver!
Advanced Tools for the True Tint Master
For those of you who want to elevate your game even further, consider these pro-level additions to your toolkit:
- Microbrushes: These tiny, disposable brushes are phenomenal for detail work. They are stiffer than a cotton swab but softer than a brush, giving you fantastic control for working in tight spaces.
- Angled Tweezers: Sometimes, a tiny piece of dried tint or a stray hair with pigment on it needs to be carefully removed. A good pair of Precision Tweezers, like the ones you'd use for Brow Lamination Supplies, can be incredibly helpful for this precise plucking.
- Cleansing Foam or Mousse: A low-lather, gentle cleansing foam is a game-changer for cleaning up the entire eye area after tinting. It's easy to apply with a cotton round and helps neutralize any residual tint or chemicals, leaving the skin feeling fresh and clean.
Remember, consistency is key. Having a dedicated set of Professional Cotton, Sponges, and Wipes and applicators for your tinting services will ensure you're always ready for anything.
Wrapping It Up (Pun Intended!)
Removing excess tint from the waterline doesn't have to be a stressful experience. With the right tools and a steady hand, it becomes just another smooth step in your service routine. It's these little details that separate a good service from a great one, and a happy client from a client who comes back (and brings their friends). By investing in quality Lash & Brow Service Supplies and mastering these techniques, you're not just applying tint; you're creating an experience of precision and care.
So, the next time you spot a stray dot of tint, don't panic. Just channel your inner surgeon, reach for your toolkit, and show that pigment who's boss. Your clients will thank you with their gorgeous, perfect results. And of course, for all your professional needs, from Hygienic Table Paper to High-Quality Towels, remember to check out the massive selection at Pure Spa Direct. We've got everything you need to make your business shine!