Quality drives growth with this tool... and by tool, we mean the magical little scalpel that transforms your client's face from fuzzy peach to smooth goddess. Dermaplaning isn't just about banishing unwanted vellus hair (though, let's be honest, that's a huge perk). It's about revealing radiant, baby-soft skin that makes every dermaplaning treatment feel like a mini miracle. Ready to master this game-changing service? Grab your dermaplaning blade and let's dive in!
Before we get to the step-by-step magic, let's address the elephant in the room: No, your clients won't grow a beard afterward. That's a myth as ridiculous as thinking pineapple belongs on pizza (fight us). Dermaplaning removes only the fine vellus hairs, leaving skin smoother than a jazz saxophonist's pickup line.
Pre-Treatment Prep: Setting the Stage for Success
First things first – cleanse that canvas! Use a gentle yet effective facial cleanser to remove makeup, oil, and any lingering doubts about this being the best decision of your client's life. Pro tip: Warm towels from your towel steamer make this step feel like a luxury spa experience rather than just pre-game scrubbing.
Next, analyze the skin like it's the latest season of your favorite reality show – with intense focus. Look for active breakouts, irritation, or sun damage that might need special attention. Remember: Dermaplaning is like that friend who tells you hard truths – great for most, but maybe not when you're super sensitive or have active acne.
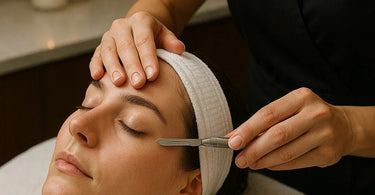
The Main Event: Your Step-by-Step Dermaplaning Dance
Now for the good stuff! Hold your dermaplaning tool at a 45-degree angle – any steeper and you're shaving, any shallower and you're just tickling their face. Use short, feather-light strokes in the direction of hair growth. Imagine you're painting the Mona Lisa, not mowing a lawn.
Start with the forehead (less sensitive) to build trust before moving to more delicate areas. When you reach the cheekbones, stretch the skin taut – we're going for smooth operator, not accordion player. For the upper lip area, have your client stretch their mouth into a weird fish-face pose. It looks ridiculous but works like a charm.
Pro move: Combine with a hydrodermabrasion treatment afterward for next-level glow. It's like peanut butter and jelly – good alone, magical together.
Post-Treatment Pampering: Locking in That Glow
Now that you've revealed fresh baby skin, treat it right! Apply a soothing aloe vera gel or calming facial serum. This isn't the time for your strongest acids – be gentle like you're handling a basket of kittens.
Finish with an SPF – non-negotiable! Their new skin is more sensitive to sun than a vampire at noon. We love a professional-grade sunscreen that doesn't leave that ghostly cast.
Pro Tips to Elevate Your Dermaplaning Game
1. Always use a fresh blade for each client – sharing is caring, but not with facial tools! Stock up on disposable dermaplaning blades.
2. Time it right – avoid scheduling before big events in case of rare redness.
3. Educate clients on home care – recommend a gentle exfoliant for maintenance.
4. Upsell with a serenity-boosting add-on like a scalp massage – because smooth skin should come with relaxed vibes.
There you have it – the complete dermaplaning protocol that'll leave your clients looking (and feeling) like they just walked out of a filter. Now go forth and de-fuzz the world, one glowing face at a time!