Boost your bottom line with ease by mastering the art of Japanese gel nail extensions—your clients will be lining up for these ultra-glam, chip-resistant masterpieces! If you've ever wondered how to create those impossibly glossy, natural-looking extensions that last for weeks (and make your clients text you heart-eye emojis), this step-by-step guide is your golden ticket. Plus, we've got all the pro tools you need at Pure Spa Direct to make your nail station the most popular spot in the salon. No magic wand required—just follow these steps and watch your booking calendar explode!
Japanese gel nail extensions are the holy grail of nail enhancements—lightweight, flexible, and oh-so-natural that even the pickiest client will swear they were born with them. Unlike bulky acrylics or temperamental dip powder, this technique uses a soft gel builder to sculpt the perfect extension, layer by layer. Ready to become the Michelangelo of manicures? Let's dive in!
Step 1: Prep Like a Pro (Because Chaos Leads to Chips)
Before you even think about gel, prep is everything. Start by sanitizing your client's hands with an antibacterial cleanser—because germs and glam don't mix. Gently push back cuticles using a cuticle pusher, then buff the nail plate lightly to remove shine. Pro tip: Skip the heavy filing! Japanese gel adheres best to a slightly textured surface, not a nail plate that's been sanded into oblivion.
Step 2: Apply the Base Coat (AKA the 'Don't You Dare Peel' Layer)
A thin, even layer of base gel is your foundation. Cure it under a LED lamp for the recommended time (usually 30–60 seconds). Under-curing is the enemy here—it leads to lifting, and nobody wants to explain why Brenda's nail flew off during her spin class.
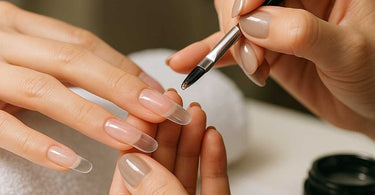
Step 3: Sculpt the Extension (Channel Your Inner Nail Architect)
Here's where the magic happens! Apply a small bead of soft builder gel to the free edge, then use a flat brush dipped in gel cleanser to shape it into a subtle curve. Japanese extensions are known for their tapered, natural look—think 'my nails, but better.' Cure for 60 seconds. Repeat if needed for extra length, but remember: less is more. You're going for elegance, not talons that could double as weapons.
Step 4: File to Perfection (Because Nobody Likes a Lumpy Nail)
Once cured, use a fine-grit file to smooth any bumps and refine the shape. Japanese nails are sleek, not square—aim for a soft almond or oval. Dust off debris with a clean brush, then wipe with gel cleanser to remove any residue.
Step 5: Color and Seal (Cue the Glossy Finish)
Apply your client's favorite gel polish color in thin layers, curing between each. Finish with a high-shine top coat (cure again), and voilà! You've just created nails so stunning, they'll break the internet—or at least your client's Instagram feed.
Pro Tips for Longevity (AKA How to Avoid 'Help, My Nail Lifted!' Texts)
- Hydrate cuticles daily with cuticle oil to prevent dryness.
- Avoid using nails as tools (yes, even to pry open that soda can).
- Schedule a fill every 2–3 weeks to maintain the look.
Now, go forth and create nail magic! And remember, Pure Spa Direct has all the supplies you need to keep your salon stocked and your clients obsessed. Happy sculpting!