Because details matter... and glowing skin is always in demand, mastering the LED Light Therapy Facial is a game-changer for your spa or salon. This futuristic treatment combines the power of red and blue light to tackle everything from wrinkles to acne, leaving clients looking like they just stepped out of a sci-fi movie (in the best way possible). Whether you're a seasoned esthetician or just adding LED light therapy devices to your menu, this step-by-step guide will ensure you deliver flawless results every time.
Clients are obsessed with non-invasive treatments that deliver real results, and LED light therapy checks all the boxes. No downtime, no pain, just radiant skin. Plus, it's the perfect add-on to other services like microdermabrasion or hydrodermabrasion. Ready to shine? Let's break it down.
Pre-Treatment Prep: Setting the Stage for Success
Before you even think about turning on those fancy lights, prep work is key. Start with a clean slate by thoroughly cleansing the skin. A gentle facial cleanser will remove makeup, oil, and debris, ensuring the light can penetrate effectively. For an extra-deep clean, consider using a dermaplaning tool to remove peach fuzz and dead skin cells.
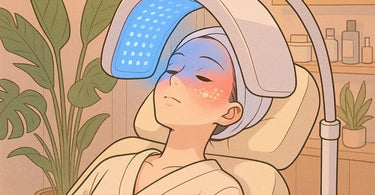
Next, protect those peepers! LED lights are bright enough to make a disco ball jealous, so shield your client's eyes with protective goggles. If you're using a combination of red and blue light, make sure to explain the process to your client. Blue light targets acne-causing bacteria (perfect for teens and anyone battling breakouts), while red light stimulates collagen production (hello, ageless beauty!).
Step 1: Cleanse and Exfoliate
Begin with a double cleanse using an oil-based cleanser followed by a water-based one. This ensures all impurities are banished. Follow up with a mild exfoliant—chemical exfoliants like glycolic acid work wonders here. Avoid harsh scrubs that could irritate the skin before light exposure.
Step 2: Apply a Conducting Gel (Optional)
Some LED devices work better with a conducting gel to enhance light penetration. If your device recommends it, apply a thin layer evenly across the face. This step is especially helpful for clients with drier skin types.
Step 3: Blue Light Therapy – Zap Those Zits!
Start with blue light if your client is dealing with acne. Set the device to the appropriate wavelength (typically around 415nm) and position it about 6 inches from the face. Treatment time usually ranges from 10-20 minutes, depending on the device and skin condition. Pro tip: Play some relaxing spa music—clients love a multi-sensory experience!
Step 4: Red Light Therapy – Turn Back the Clock
Switch to red light (around 633nm) for anti-aging benefits. The red light stimulates collagen and elastin production, reducing fine lines and improving skin texture. Another 10-20 minutes under the red light, and your client will be on their way to baby-soft skin. Feel free to combine with a paraffin wax treatment for hands or lips while they relax.
Step 5: Post-Treatment Pampering
After the lights are off, soothe the skin with a hydrating serum packed with hyaluronic acid. Follow up with a moisturizer and always, always finish with SPF. LED therapy makes skin more photosensitive, so sunscreen is non-negotiable. Recommend a post-treatment skincare routine to extend the results at home.
Pro Tips for Maximizing Results
- Pair LED therapy with advanced facial treatments like peels for enhanced results.
- Offer package deals—clients usually need 6-8 sessions for optimal results.
- Keep your LED device clean between clients to maintain hygiene.
There you have it—the ultimate protocol for an LED Light Therapy Facial that will keep clients coming back for more glow. Now go forth and light up their lives (and faces)!
%20-%20Your%20Ultimate%20Guide%20to%20Glowing%20Skin)