Your journey to better results starts here... and by better results, we mean nails so stunning they’ll stop traffic (or at least get you a ton of double-taps on Instagram). Nail art stamping is the secret weapon in every pro’s toolkit, and today, we’re spilling all the tea on how to master it like a boss. Whether you’re a seasoned nail tech or just dipping your toes (and fingers) into the world of nail art, this step-by-step guide will have you stamping like a pro in no time. And hey, if you need top-tier supplies, we’ve got you covered with our Nail Art Supplies collection—because greatness starts with the right tools!
Ready to turn those blank canvases (aka nails) into miniature masterpieces? Let’s dive in!
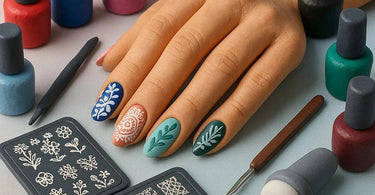
Step 1: Gather Your Stamping Squad
First things first: you can’t create magic without the right squad. Here’s what you’ll need:
- Stamping Plate: The blueprint for your design. Choose from intricate florals, geometric patterns, or even cute little llamas (because why not?). Check out our Nail Art Rhinestones for extra bling.
- Stamping Polish: Regular polish won’t cut it—you need a highly pigmented, fast-drying formula. Pro tip: metallics and blacks work like a dream.
- Stamper & Scraper: The dynamic duo. The stamper picks up the design, and the scraper removes excess polish. Think of them as the Batman and Robin of nail art.
- Base & Top Coat: Non-negotiable. A smooth base ensures your design pops, and a top coat seals the deal (and keeps it from chipping before your next coffee run).
Step 2: Prep Like a Pro
Great nail art starts with a great canvas. Prep your client’s nails by:
- Cleaning: Wipe nails with nail cleanser to remove oils.
- Buffing: Gently buff the surface for smoothness (but don’t go Hulk-mode—nails aren’t weights).
- Base Coat: Apply a thin layer and let it dry. This is the unsung hero of nail art.
Step 3: Stamp It Like You Mean It
Now for the fun part! Here’s how to stamp like a pro:
- Paint the Plate: Swipe your stamping polish over the design. Act fast—this stuff dries quicker than your patience when a client says, "I want something natural... but dramatic."
- Scrape: Use the scraper at a 45-degree angle to remove excess polish. One firm swipe is all it takes.
- Pick Up: Roll the stamper over the design in one smooth motion. If it doesn’t pick up, you might need to prime the stamper (rub it with a magic eraser or tape to remove residue).
- Stamp: Gently roll the design onto the nail. No pressure—think "petting a unicorn," not "squashing a bug."
Step 4: Clean Up & Seal the Deal
Oops, stamped outside the lines? Dip a tiny brush in nail polish remover to clean up edges. Then, lock in your masterpiece with a glossy top coat. For extra longevity, try a Gel Top Coat.
Step 5: Admire Your Handiwork (and Take Pics!)
Congratulations, you’ve just leveled up your nail game! Snap a pic, tag your salon, and watch the compliments roll in. And if you’re itching to try more designs (or need to restock your stamping supplies), explore our Nail Art Collection—because the only limit is your imagination (and maybe your client’s ability to sit still).
Now go forth and stamp like the nail artiste you were born to be!