
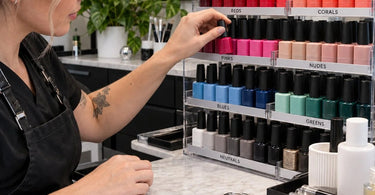
Be the professional clients rely on, not just for flawless application but for an experience that feels effortless from the moment they sit down. We all know the scenario: a client flips through a tiny swatch fan for ten minutes, sighs, and says “I don’t know, what do you think?” Meanwhile, your next appointment is already texting to see if you’re running on time. The way you organize your Professional Gel Polish isn’t just about tidiness—it’s the difference between a color consultation that takes ninety seconds and one that derails your entire afternoon. When your polish wall is chaos, your service is chaos. When it’s organized by color family with intention, you become the salon that runs like clockwork.
Here’s the good news: you don’t need to choose between an Instagram-worthy backbar and one that actually functions during a packed Saturday schedule. The secret is a color family system that’s built for speed, not just aesthetics. Let’s dig into how to make it happen.
Why Color Family Organization Beats Everything Else
Let’s be honest about how clients actually shop for color. They don’t walk in asking for “DND 546.” They say things like “something in a dusty rose,” “a nice nude but not too pink,” or the dreaded “surprise me.” If your polishes are arranged alphabetically or by brand, you’re forcing yourself to translate their vague language into a filing system they can’t see. That’s mental gymnastics you don’t have time for.
Organizing by color family flips the script. Clients immediately scan a sea of reds, a cluster of nudes, a sparkle of glitters. Their brain does the narrowing down for you. You become the guide, not the detective. Research backs this up—when swatches are arranged by color family rather than scattered or brand-organized, clients make faster decisions and report higher satisfaction with their final choice.
The speed factor alone is worth the effort. One study of salon workflows found that organized color displays reduce time spent searching for specific shades during service, which compounds into real minutes saved across a full book of clients. Those minutes add up to either breathing room or back-to-back burnout. Your call.
The Four-Zone Backbar Setup That Actually Works
Not all color families are created equal in terms of frequency of use. Think of your backbar like a grocery store—the staples go front and center, the specialty items live further back, and the seasonal stuff rotates in and out. Here’s the zone system that works for most salons:
Zone 1: The Daily Drivers (Nudes, Pinks, Soft Neutrals)
This is your bread and butter. Most clients—whether they know it or not—are looking for a version of a nude or soft pink that flatters their skin tone. These shades should occupy the most prominent, easiest-to-reach real estate on your backbar or display system. If you’re using a DND Daisy Swatch Board, the fan-out design puts hundreds of shades at your fingertips in seconds. The numbered system on DND charts means you can note a client’s favorite shade once and find the bottle instantly next time—no more “was it the pink one or the other pink one?”
For salons that carry a deep nude range, consider breaking Zone 1 into sub-categories: cool nudes, warm nudes, pink nudes, and beige nudes. This granularity helps clients who know their undertone preferences skip past shades that will look “off” on them.
Zone 2: The Statement Makers (Reds, Berries, Vamps)
Red is the color clients take the longest to decide on. It’s also the shade most likely to make someone feel like a million bucks. Give your reds, burgundies, and berry tones a dedicated zone that’s easy to scan. Deep vamps and classic reds deserve their own visual clusters because the undertones matter enormously—a blue-red and an orange-red are practically different species.
If your current display has reds scattered between nudes and glitters, you’re making the decision process harder than it needs to be. Group them. Let clients see the full spectrum of “I want to feel powerful” options in one glance.
Zone 3: The Seasonal Rotators (Trend Colors, Pastels, Neons)
Spring pastels in April? Absolutely. Neon coral in July? Of course. But that lime green that sold out in June doesn’t need prime real estate in December. Create a flexible zone for seasonal and trend shades that can be rotated without disrupting your core system. This is where Dipping Powder Systems for Salons and other color formats can be merchandised alongside gel to give clients a full picture of what’s new.
Pro tip: when you retire a seasonal shade, don’t just shove it in a drawer. Note its performance. If it was a top seller, order it again next year and give it a better slot. If it collected dust, let it go. Your backbar should reflect what clients actually buy, not what a trend report told you they would.
Zone 4: The Effects and Art Shades (Glitters, Shimmers, Cat Eyes)
Effects can be a secret weapon for upselling, but only if clients can see them. A chunky glitter that lives in a closed drawer might as well not exist. Pull your Nail Art Supplies and specialty finishes into a visible zone where the sparkle does the selling for you. Cat eye shades, glassball effects, and chrome-adjacent finishes deserve a “jealousy-inducing” spot on your display.
If you’re using a framed color chart like the DND DIVA Framed Color Chart - 9D Cat Eye Glassball, the display itself becomes a conversation starter. Clients see the reflective potential and ask about it. That’s an upsell that happens without you saying a word.
Swatch Systems That Don’t Slow You Down
The polish bottle is the product. The swatch is the sales tool. If your swatch system is clunky, you’re losing time and money. Here’s how to set up swatches that work as fast as you do.
The Fan-Out Display Advantage
Compact fan-style displays like the DND Daisy Swatch Board solve a specific problem: they show hundreds of colors without eating up wall space. The accordion design means you can flip to the section you need, show three or four options in a tight cluster, and close it back up. For salons with limited counter space, this is the move. The numbered system also means if a client loves “546” today, you can write that number on their client card and pull the exact bottle next time without a scavenger hunt.
Portable Magnetic Books for Chairside Consultation
Sometimes the best color conversation happens at the manicure table, not at the backbar. A magnetic swatch book lets you bring a curated selection of colors directly to the client’s chair. The TIP DISPLAY Leather Magnetic Book holds up to sixty colors in a compact, professional-looking case. Each tip is removable, so you can hand the client the exact swatches they’re considering without juggling the whole book. It feels premium, it keeps swatches protected, and it turns a hesitant client into a confident one.
When you’re updating your book, arrange by color family within the book itself. One page for nudes, one for reds, one for glitters. Clients learn the system quickly and start pointing to the section they want.
The Wall Display That Doubles as Decor
If you have the wall space, a proper color wall isn’t just storage—it’s branding. A well-lit, organized display of gel polish creates a visual rhythm that says “we know what we’re doing here.” Acrylic display boards like the Ikonna Nail Color Display Board hold up to fifty bottles in a clean, wipeable panel that mounts on the wall or stands on the counter. The clear material doesn’t compete with the polish colors, so the shades themselves are the star.
The key with a wall display is grouping. If you just line up fifty bottles in a row, clients can’t see the families. Cluster your nudes, cluster your pinks, cluster your reds. Leave a little breathing room between clusters so the eye can reset. Even a thirty-second reorganization of an existing wall can make a noticeable difference in how quickly clients decide.
Labeling Systems That Save Your Sanity (and Your Inventory)
Color family organization is only half the battle. The other half is knowing exactly which bottle is which when you need to reorder. Nothing kills a smooth service like realizing your favorite nude is almost empty and you have no idea what the shade number is.
Number Everything
DND, OPI, and most professional gel lines already use numbering systems. Lean into them. Write the number on the swatch. Write it on the client’s record. If your display has numbered slots, make sure the bottle in slot 42 is actually shade 42. This sounds obvious, but you’d be surprised how many backbars drift into chaos after a busy month.
Use Color-Coded Labels for Quick Reorder
If you carry multiple brands or lines, color-coded dots or labels on the bottom of bottles can help you identify which line a polish belongs to at a glance. This is especially useful for salons that stock CND, OPI, and Gelish side by side. A little visual shorthand goes a long way when you’re mid-service and need a specific bottle fast.
Keep a Reorder List Where You Can See It
Low bottle? Add it to the list immediately. Don’t wait until you’re doing inventory at the end of the month and realize you’ve been improvising with a slightly-off shade for two weeks. A simple clipboard or a shared note on your phone works. The goal is zero interruption to service, zero missed reorders.
Making the System Work for Your Team (Not Just You)
If you’re a solo nail tech, you can keep the entire color system in your head. But the moment you have a team, you need a system that anyone can navigate. Your new hire shouldn’t have to memorize that “the coral is next to the green, but only on Tuesdays.”
Train the Map
During onboarding, walk new techs through the color zones. Show them where the nudes live, how the swatch book is organized, and where the reorder list is kept. Make it part of their first-week training, not something they have to figure out through trial and error.
Create a “Client Favorites” Zone
Over time, you’ll notice certain shades that clients request again and again. Give those a prime spot—maybe a small cluster at the front of Zone 1. This isn’t about playing favorites; it’s about reducing decision fatigue for clients who trust your recommendations. When someone says “just pick for me,” you can point to the proven winners and move forward confidently.
Rotate Responsibility for Backbar Maintenance
Organizational systems decay without maintenance. Assign a weekly or biweekly “backbar reset” to a team member. It’s a fifteen-minute task: check that bottles are in their correct slots, wipe down displays, note any empty swatches that need repainting. Small, consistent effort prevents the slow slide back into chaos.
The Bottom Line: Organization Is a Service Upgrade
When you organize your gel polish by color family with speed in mind, you’re not just tidying up. You’re upgrading the client experience. You’re saying, “I value your time, I know my craft, and I’m prepared to help you find exactly what you want.” That’s the kind of professional clients come back to. That’s the kind of professional you already are.
The best part? This system doesn’t require a full salon renovation. It requires a few intentional decisions, a display that works for your space, and the discipline to keep it running. Start with one zone. See how it changes the flow of your next color consultation. Then build from there.
Your backbar is the first impression of your technical skill. Make it count.
)